
Building Your First Trading Strategy
Turn scattered trading knowledge into one clear, rule-based strategy that tells you what to trade, when to trade, where to enter, where to exit, and how much to risk.
A Strategy Is a Complete Decision-Making System
Most new traders do not begin with a strategy. They begin with pieces of information. They learn a candlestick pattern, a support level, a moving average, a trendline, or a breakout method. They then combine these ideas differently from trade to trade and wonder why their results are inconsistent.
A trading strategy is not a collection of indicators. It is a complete set of rules explaining exactly when you are allowed to trade and when you must remain out of the market.
Your strategy should define the market conditions you require, the instruments and timeframes you trade, the setup you look for, the confirmation needed before entry, the invalidation point, the target method, the amount of risk, the trading session, and the management rules.
This lesson combines the concepts from Building a Trade Setup, Entry Confirmation, Stop Loss Placement, Take Profit & Trade Management, and Trading Sessions & Timing.
Learning Objectives
- Understand the difference between a setup and a complete strategy.
- Choose a specific market, session, and timeframe.
- Define objective market-context rules.
- Create precise entry and confirmation conditions.
- Define stop loss and invalidation rules.
- Select realistic take profit and management rules.
- Build risk controls for individual trades and the entire day.
- Create clear no-trade conditions.
- Write a complete beginner strategy in plain language.
- Prepare the strategy for backtesting and forward testing.
1. Trading Setup vs Trading Strategy
One Potential Opportunity
A setup is a specific market condition suggesting that a trade may be developing.
- Price reaches support.
- A bullish rejection candle appears.
- A chart pattern approaches completion.
- A breakout and retest forms.
- Market structure begins to shift.
A setup answers: “What opportunity may be forming?”
The Complete Rulebook
A strategy determines whether that setup is permitted and explains how the trade must be executed.
- Which instruments may be traded.
- Which session and time window are allowed.
- Which market context is required.
- What confirmation must occur.
- Where the stop and target belong.
- How much capital may be risked.
A strategy answers: “Exactly when and how am I allowed to trade?”
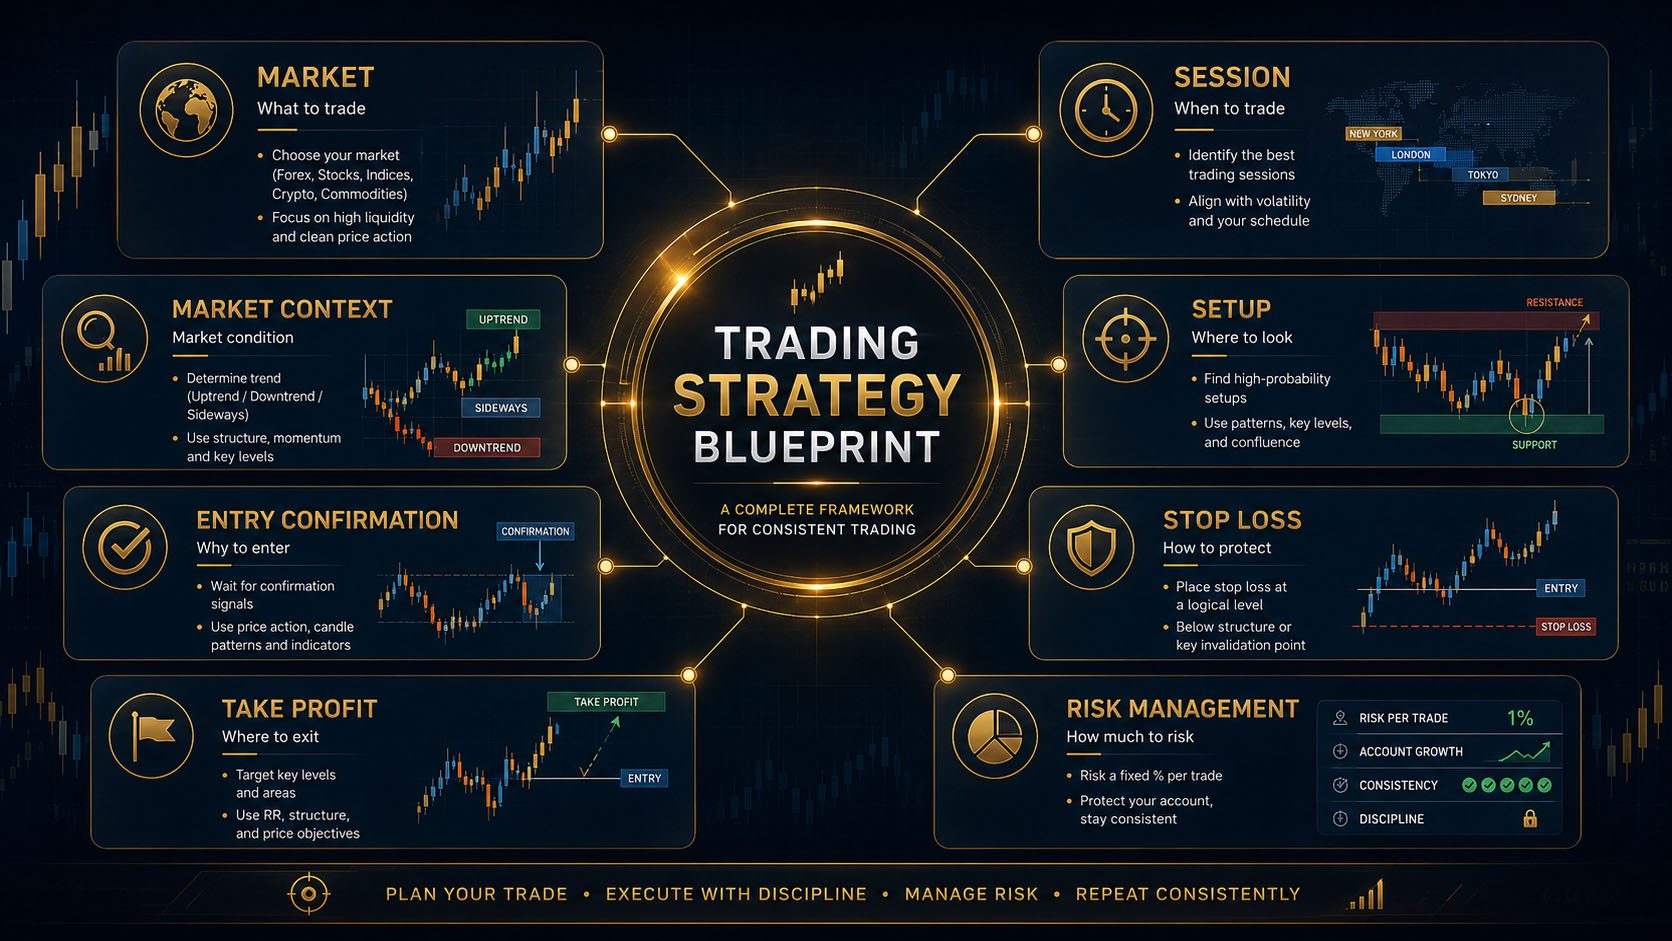
2. The Nine Parts of a Complete Trading Strategy
Market
Define the exact instruments you will trade.
Timeframe
Choose the charts used for context, setup, and entry.
Session
Define when you are allowed to look for trades.
Market Context
Specify the trend, range, or structural environment required.
Setup
Define the location and pattern that create the opportunity.
Entry Confirmation
Specify the evidence required before opening the position.
Stop Loss
Define invalidation and maximum planned risk.
Profit Target
Choose the target and management method.
Risk Rules
Control position size, daily losses, and total exposure.
3. Step One: Choose What You Will Trade
A beginner strategy should focus on a small number of instruments. Trading too many markets creates information overload and makes it difficult to understand how each instrument behaves.
A Strong Beginner Approach
- Select one or two currency pairs.
- Choose liquid markets with competitive spreads.
- Use instruments that are active during your available session.
- Avoid constantly switching between forex, gold, indices, crypto, and stocks.
- Study the same markets long enough to recognize their normal volatility.
Questions to Ask
- Is this instrument active during my trading window?
- Is the average spread reasonable?
- Does the instrument move too quickly for my experience level?
- Can I calculate position size accurately?
- Does major economic news frequently affect it?
4. Step Two: Choose Your Timeframes
Different timeframes have different jobs. A complete strategy may use one timeframe for market context and another for entries.
| Purpose | Possible Timeframe | What You Analyze |
|---|---|---|
| Higher-timeframe context | 4-hour or 1-hour | Trend, major structure, support, resistance, and directional bias. |
| Setup timeframe | 1-hour or 15-minute | Pullback, range, pattern, liquidity area, and setup location. |
| Entry timeframe | 15-minute or 5-minute | Rejection, engulfing candle, retest, momentum, and structure shift. |
| Management timeframe | Usually the setup or entry timeframe | Trailing structure, partial targets, and exit conditions. |
Review Multi-Timeframe Analysis before combining several chart periods.
5. Step Three: Define Your Trading Session
A strategy should define when trades are permitted. Without a fixed trading window, traders often remain on the chart all day and eventually force an entry.
Example Session Rule
Your Session Rules Should Define
- Which session you trade.
- The exact start and end of your trading window.
- Whether you wait after the session opens.
- Whether you trade during the London–New York overlap.
- When no new positions may be opened.
- How economic releases affect the schedule.
Review Trading Sessions & Timing.
6. Step Four: Define the Required Market Context
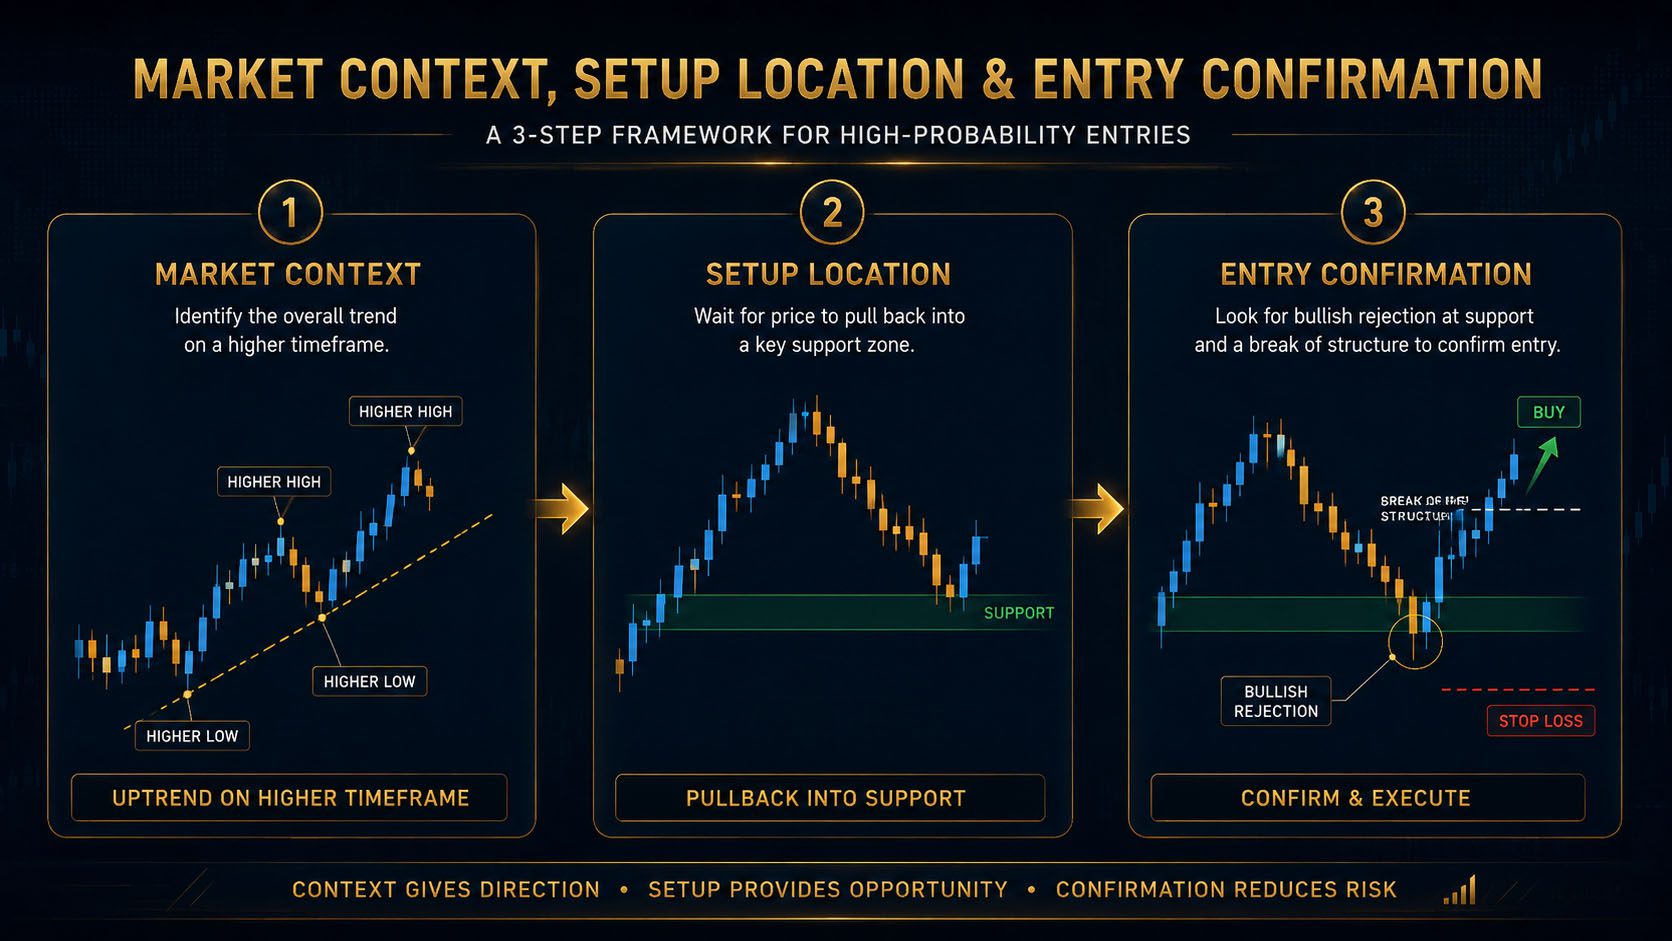
A strategy should not trade the same setup in every market environment. A trend-continuation strategy may perform well in a directional market and poorly inside a narrow range.
Possible Context Rules
- Trade only in the direction of the one-hour trend.
- Require clear higher highs and higher lows for bullish trades.
- Require lower highs and lower lows for bearish trades.
- Avoid trading when structure is mixed or sideways.
- Require price to be near a major support or resistance area.
- Avoid entering after price has already completed a large session move.
- Trade breakouts only when volatility and session timing support them.
Review Market Context, Understanding Market Structure, and Technical Analysis Summary.
7. Step Five: Define the Setup Location
Trend-Continuation Location
- Pullback into support during an uptrend.
- Pullback into resistance during a downtrend.
- Retest of a broken structural level.
- Return to a trendline or channel boundary.
- Retracement into a previous breakout area.
Reversal Location
- Major higher-timeframe support or resistance.
- Liquidity sweep above a high or below a low.
- Failed breakout from a range.
- Double top or double bottom area.
- Extreme channel boundary with structural confirmation.
Study Support and Resistance Trading Strategy, Trendlines and Channels, and Chart Patterns.
8. Step Six: Define Entry Confirmation
Entry confirmation tells you when the potential setup has become actionable. Your confirmation rules must be specific enough that two traders reading the strategy would identify approximately the same entry.
Possible Confirmation Rules
- A rejection candle forms at the setup area.
- A bullish or bearish engulfing candle closes.
- Price breaks lower-timeframe structure.
- A breakout retest holds.
- Momentum increases in the intended direction.
- Two or more forms of confirmation align.
Weak Rule
Stronger Rule
Review Entry Confirmation and Candlestick Patterns.
9. Step Seven: Define the Entry Method
Market Entry
The position is opened immediately after confirmation. This improves the chance of entering but may increase spread and slippage.
Limit Entry
The trader waits for price to retrace to a planned level. This may improve reward but can result in a missed trade.
Stop Entry
The order activates only when price breaks a confirmation level. This can confirm momentum but may enter after expansion begins.
10. Step Eight: Define Stop Loss Placement
The stop loss belongs at the price level where the strategy’s trade idea becomes invalid. It should not be selected from the amount of money you want to risk.
Example Stop Rules
- For a bullish pullback, place the stop below the protected higher low.
- For a bearish pullback, place the stop above the protected lower high.
- For a breakout retest, place the stop beyond the failed retest area.
- Add a small buffer for spread and normal volatility.
- Never widen the stop after entering.
- Skip the trade if the logical stop creates unacceptable risk-to-reward.
Review Stop Loss Placement.
11. Step Nine: Define Profit Targets and Management
Your strategy must explain where profit is taken and whether the position will be actively managed.
Possible Target Rules
- Target the previous swing high or low.
- Target the next support or resistance area.
- Use a minimum risk-to-reward ratio.
- Close the full position at one target.
- Take partial profit at the first target.
- Trail the remaining position behind structure.
Possible Management Rules
- Move to break-even only after reaching 1:1 or 1:2.
- Move the stop only after a new protective swing forms.
- Close 50% at the first target and leave 50% for the final target.
- Do not extend the target without new technical evidence.
- Do not close early because of one opposite candle.
Review Take Profit & Trade Management and Risk-to-Reward Trading.
12. Step Ten: Define Risk Per Trade
A strategy is incomplete without exact risk rules. Even a strong setup can produce a losing trade, so every position must have a predefined maximum loss.
Example Risk Rules
- Risk no more than 0.5% per trade.
- Reduce risk after two consecutive losses.
- Do not increase risk after a winner.
- Calculate lot size from the actual stop distance.
- Count correlated positions as combined exposure.
- Never add to a losing trade unless the strategy has a tested scaling rule.
Review Position Sizing Made Simple.
13. Step Eleven: Create Daily Risk Limits
Your strategy must protect the entire trading day, not only one position. Many accounts are damaged after the first loss because the trader immediately looks for another trade to recover.
Possible Daily Limits
- Maximum of two trades per day.
- Stop after two consecutive losses.
- Stop after reaching a fixed daily loss limit.
- Stop after one high-quality winning trade if the daily objective is met.
- Do not re-enter the same setup repeatedly after invalidation.
- Do not open new trades outside the planned session.
Review Understanding Daily Drawdown and Maximum Drawdown Explained.
14. Step Twelve: Define No-Trade Conditions
A professional strategy explains when not to trade. No-trade rules often protect the account more effectively than entry rules.
Market-Based Restrictions
- Structure is unclear or sideways.
- Price is trapped between nearby support and resistance.
- The target does not provide acceptable reward.
- The setup forms after the main session move.
- Spread is unusually wide.
- Volatility is abnormal.
Timing and Personal Restrictions
- Major economic news is approaching.
- The trading window has ended.
- The daily loss limit has been reached.
- You are tired, angry, distracted, or rushing.
- You missed the entry and would need to chase.
- You cannot explain the setup clearly.
Review When Not to Trade, Overtrading, and Patience Pays.
15. Keep the Strategy Simple
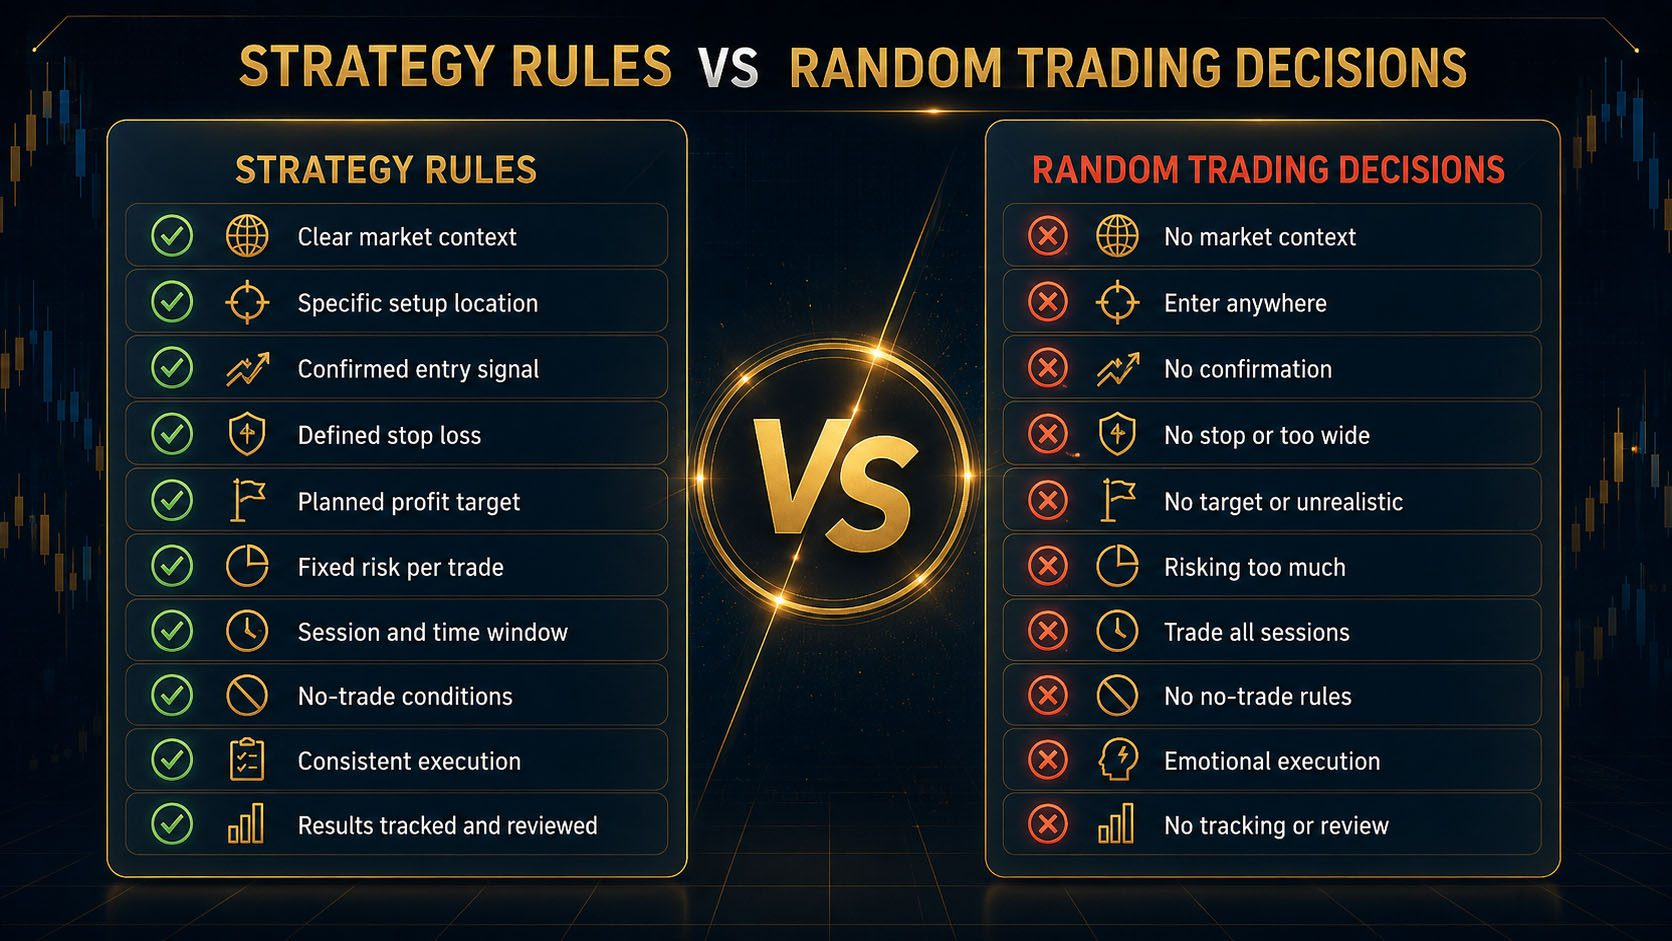
Simple Strategy
- One or two instruments.
- One market condition.
- One primary setup.
- One confirmation sequence.
- One risk model.
- One management method.
- Clear no-trade rules.
Overcomplicated Strategy
- Ten indicators.
- Several unrelated setups.
- Different rules every day.
- Too many timeframes.
- Subjective confirmation.
- Constant parameter changes.
- No reliable performance data.
16. Example Beginner Strategy: Trend Pullback
Strategy Name: London Trend Pullback Strategy
Market
Trade EURUSD only.
Session
Trade during the London session only. No new entries immediately before high-impact news.
Higher-Timeframe Context
Use the one-hour chart. Buy only when price forms higher highs and higher lows. Sell only when price forms lower highs and lower lows.
Setup
Wait for price to pull back into one-hour support during an uptrend or resistance during a downtrend.
Entry Confirmation
Use the five-minute chart. Require a rejection candle followed by a structure break in the direction of the one-hour trend.
Entry
Enter after the structure-break candle closes or after a controlled retest.
Stop Loss
Place the stop beyond the protected five-minute swing with an appropriate buffer.
Target
Target the previous one-hour swing high or low. Require at least 1:2 risk-to-reward.
Risk
Risk 0.5% per trade. Maximum two trades per day. Stop after two losses.
No-Trade Rules
Do not trade unclear structure, late entries, major news, wide spreads, or setups with poor reward.
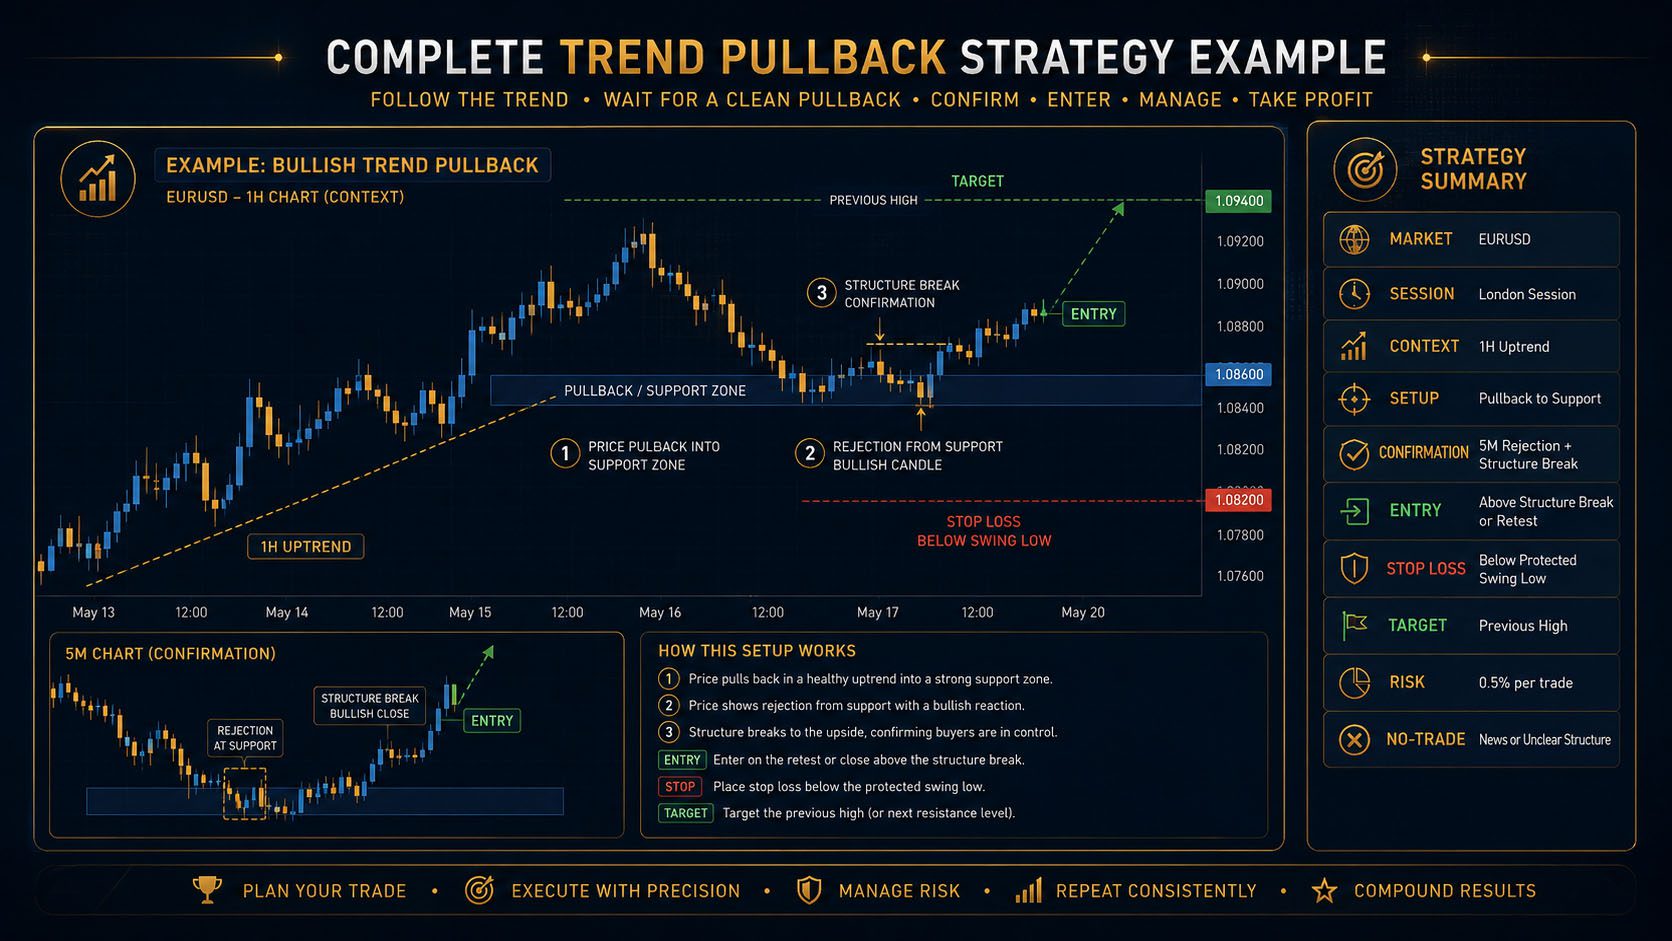
17. Bullish Strategy Example
Bullish Trend Pullback
- Context: The one-hour chart forms higher highs and higher lows.
- Location: Price pulls back into previous resistance that now acts as support.
- Timing: The setup forms during the London session after the opening volatility settles.
- Confirmation: A five-minute rejection candle forms, followed by a bullish structure break.
- Entry: After the structure-break candle closes.
- Stop: Below the protected five-minute higher low.
- Target: Previous one-hour high.
- Risk: 0.5% of account equity.
- Management: Move the stop only after price creates a new confirmed higher low.
18. Bearish Strategy Example
Bearish Trend Pullback
- Context: The one-hour chart forms lower highs and lower lows.
- Location: Price retraces into former support that now acts as resistance.
- Timing: The setup forms during the New York session after high-impact news passes.
- Confirmation: A bearish engulfing candle forms, followed by a lower-timeframe structure break.
- Entry: On the confirmed retest of broken structure.
- Stop: Above the protected lower high.
- Target: Previous one-hour low or next major support.
- Risk: 0.5% of account equity.
- Management: Trail above confirmed lower highs only.
19. What Makes a Rule Objective?
| Subjective Rule | Objective Rule | Why the Objective Rule Is Better |
|---|---|---|
| Trade when momentum looks strong. | Enter only after a candle closes beyond the previous swing. | The condition can be clearly identified and tested. |
| Buy near support. | Buy only after price rejects one-hour support and breaks five-minute structure. | Location and confirmation are both defined. |
| Use a tight stop. | Place the stop below the protected swing low plus a volatility buffer. | The stop is connected to invalidation. |
| Take profit when the trade looks tired. | Target the previous one-hour swing or trail beneath confirmed higher lows. | The exit follows a repeatable method. |
| Do not risk too much. | Risk 0.5% per trade and stop after two losses. | The account limit is measurable. |
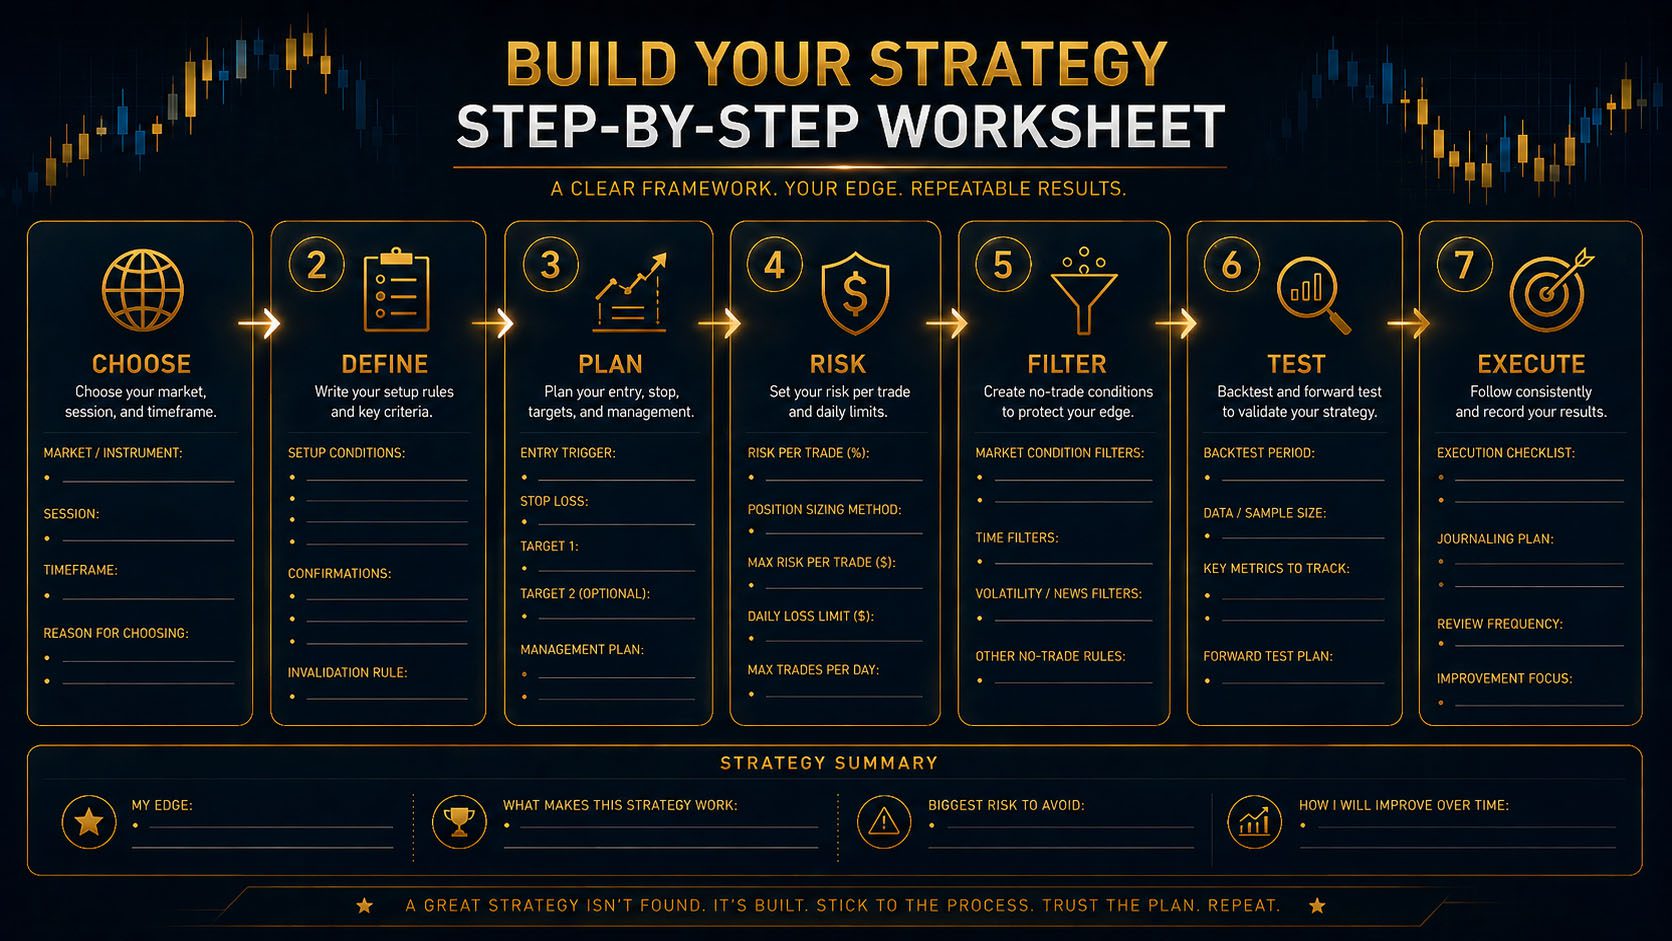
20. Your First Strategy Template
Complete the Following Strategy Framework
21. Do Not Change the Strategy After Every Loss
Every strategy will produce losses. A losing trade does not automatically mean the rules are broken. Constantly changing the strategy prevents you from collecting meaningful performance data.
Unproductive Reactions
- Adding another indicator after one loss.
- Changing the stop distance after one stop-out.
- Switching instruments after a slow session.
- Increasing risk to recover quickly.
- Removing confirmation because a trade was missed.
- Changing the target because price almost reached it.
Professional Response
- Record the trade.
- Confirm whether every rule was followed.
- Collect a meaningful sample size.
- Separate execution mistakes from strategy losses.
- Change one variable at a time only when data supports it.
22. Strategy Loss vs Execution Mistake
Valid Strategy Loss
- Every rule was followed.
- The setup was valid.
- Risk was correct.
- The stop was logical.
- The market simply invalidated the trade.
This is a normal cost of trading.
Execution Mistake
- The trade was chased.
- Confirmation was missing.
- Risk was oversized.
- The entry occurred before news.
- The stop or target was changed emotionally.
This is a discipline problem, not necessarily a strategy problem.
23. Strategy Rules for Prop Firm Challenges
A strategy used inside a prop firm account must respect the firm’s rules in addition to normal trading logic.
Prop Firm Strategy Requirements
- Risk must remain comfortably below daily drawdown limits.
- Total open exposure must be calculated across all trades.
- News-trading restrictions must be understood.
- Weekend-holding restrictions must be reviewed.
- Consistency rules must be considered.
- Maximum lot size and restricted instruments must be checked.
- The strategy must not depend on recovering losses quickly.
Review Common Rules That Get Traders Disqualified and How to Build a Professional Trading Plan.
24. Professional Strategy-Building Process
Choose
Select one market, one setup, and one session.
Define
Write objective rules for every part of the trade.
Simplify
Remove rules that do not have a clear purpose.
Test
Apply the exact rules to historical and live data.
Record
Track entries, exits, risk, context, and mistakes.
Review
Evaluate performance from a meaningful sample.
Refine
Change one variable only when the data justifies it.
Execute
Follow the final strategy without improvising.
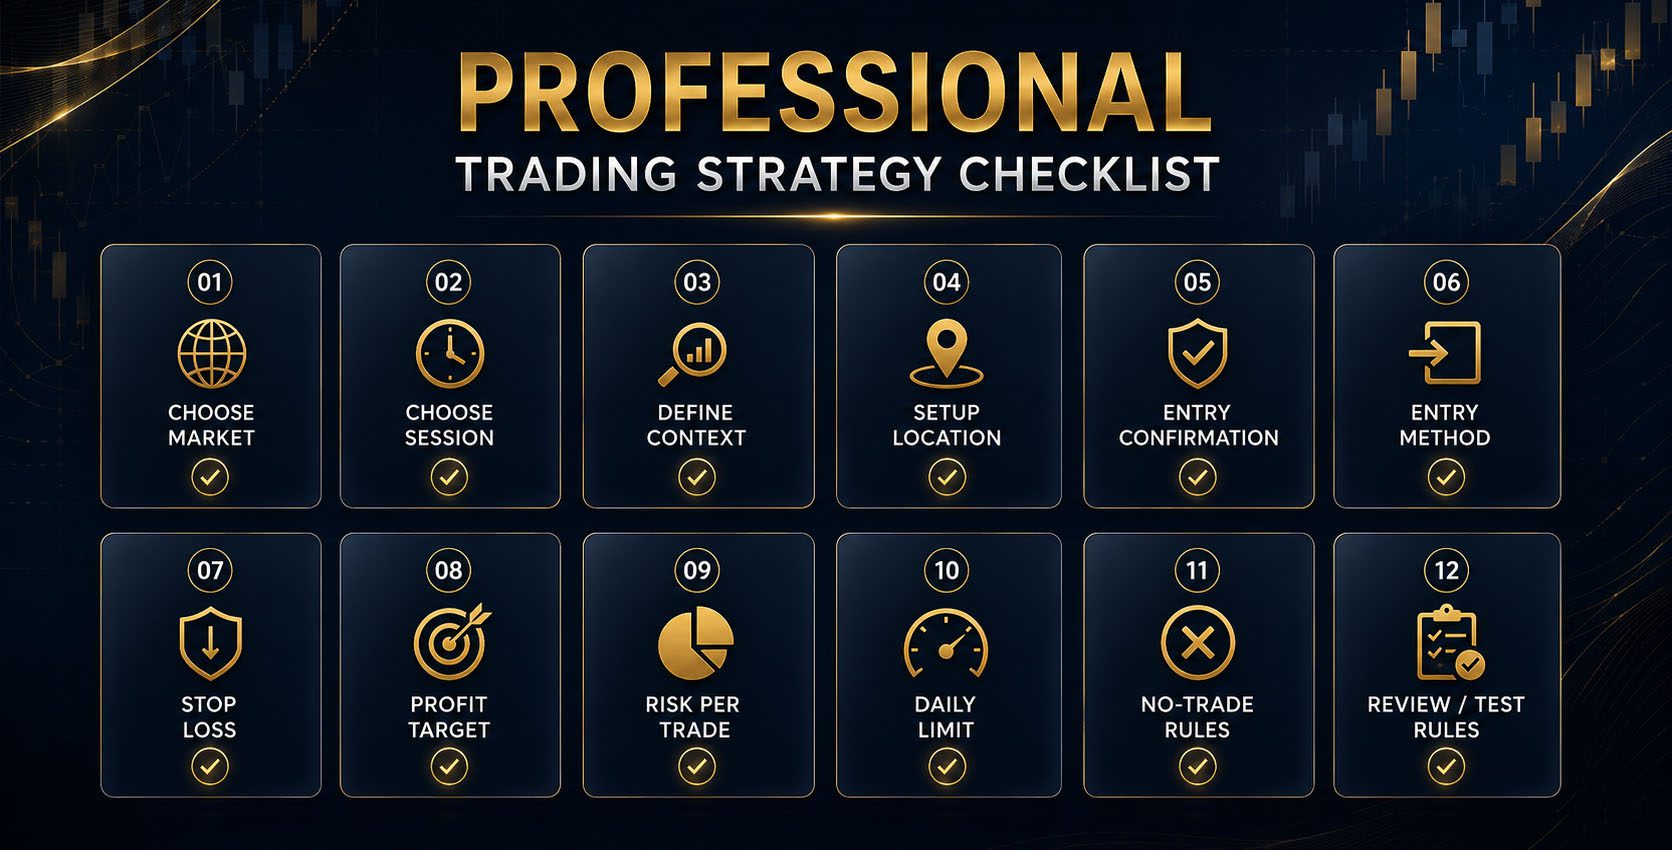
25. Trading Strategy Checklist
- I selected a specific instrument or small market list.
- I defined my higher-timeframe and entry-timeframe roles.
- I selected a specific trading session and time window.
- I defined the required trend or market context.
- I identified the exact setup location.
- I defined objective entry confirmation.
- I selected an entry order method.
- I defined the stop loss and invalidation point.
- I defined the target and management method.
- I selected the maximum risk per trade.
- I created a daily trade and loss limit.
- I defined my no-trade conditions.
- I understand the prop firm rules that affect the strategy.
- I can explain the complete strategy in plain language.
- I am ready to test the rules without changing them randomly.
Frequently Asked Questions
How many indicators should a beginner strategy use?
Use only indicators that have a specific purpose. A strategy may use none, one, or several, but every tool should support a clearly defined decision rather than decorate the chart.
How many currency pairs should I trade?
One or two liquid pairs are usually enough when building a first strategy. This allows you to learn their volatility, session behavior, and reaction to news.
Can a strategy use more than one setup?
Yes, but beginners usually improve faster by testing one primary setup first. Additional setups should be treated as separate strategies with separate performance data.
What risk-to-reward ratio should I use?
The ratio must be supported by realistic market structure and the strategy’s tested win rate. Do not force a large target simply to advertise an impressive ratio.
Should I change my strategy after several losses?
Review whether the trades followed the rules and whether the sample is large enough. Several losses can occur inside a valid strategy. Change rules only when reliable data supports the adjustment.
Can I use the same strategy in London and New York?
Possibly, but test the results separately. Liquidity, volatility, economic releases, and price behavior can differ by session.
When is a strategy ready for live trading?
It should have clear written rules, a meaningful backtesting sample, acceptable drawdown, positive expectancy, and successful forward testing under realistic conditions.
Knowledge Check Quiz
1. What is the main difference between a setup and a strategy?
2. Which rule is most objective?
3. What should determine position size?
4. Why are no-trade rules important?
5. What is a valid strategy loss?
6. What should happen before changing a strategy rule?
Quiz Answer Key
Question 1 Answer
B. A setup is one potential opportunity, while a strategy defines the complete process for deciding whether and how to trade it.
Question 2 Answer
C. A candle closing above a defined swing level is measurable and can be tested consistently.
Question 3 Answer
C. Position size is calculated from the maximum account risk and the distance to the logical stop loss.
Question 4 Answer
B. No-trade rules protect the account from poor conditions, emotional decisions, and unnecessary entries.
Question 5 Answer
B. A valid strategy loss occurs when every rule was followed but the market still invalidated the setup.
Question 6 Answer
C. Rules should be changed only after a meaningful sample of consistent, recorded results supports the adjustment.
What You Must Remember
- A strategy is a complete decision-making system.
- Choose a small market list and one primary setup.
- Give each timeframe a clear purpose.
- Define the exact session and time window you trade.
- Market context must support the setup.
- Entry confirmation must be objective and repeatable.
- Stop loss placement must follow invalidation.
- Targets and management rules belong in the strategy before entry.
- Risk rules protect the trade, day, and account.
- No-trade rules are just as important as entry rules.
- Do not change a strategy after every loss.
- Test the exact rules before risking meaningful capital.
Lesson Summary
Your first trading strategy should be simple, specific, and rule-based. It should define the market you trade, the session you trade, the context you require, the setup location, the confirmation, the entry method, the stop loss, the target, the management process, and the maximum risk.
A strategy does not eliminate losses. It creates a repeatable process that allows you to separate valid strategy losses from execution mistakes. That distinction is essential for improvement.
Do not attempt to create the perfect strategy immediately. Build a clear first version, keep the rules consistent, and collect reliable evidence before making changes.
In the next lesson, you will learn how to backtest and forward test this strategy so you can measure win rate, risk-to-reward, drawdown, expectancy, and execution quality before depending on it in live market conditions.