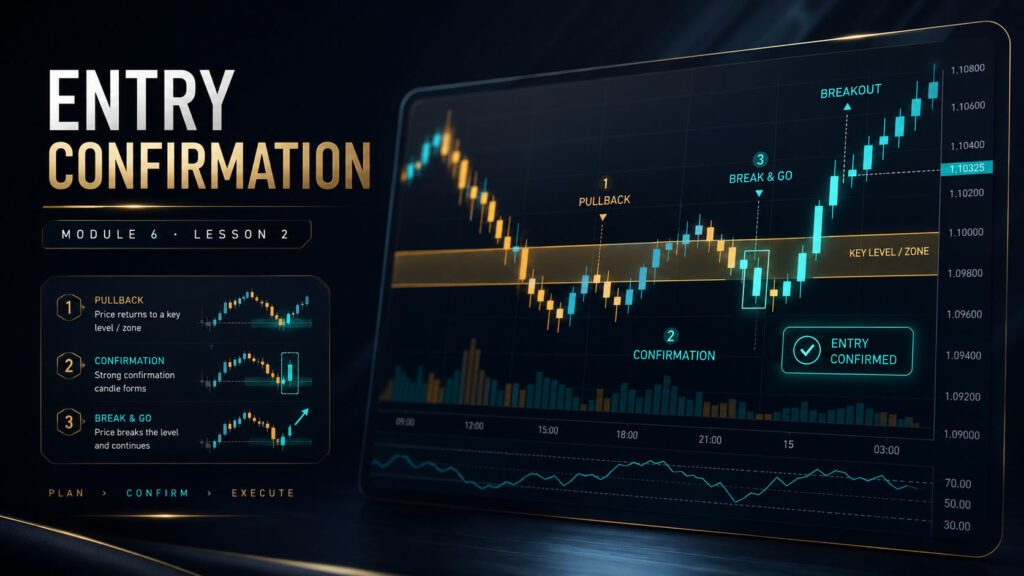
Entry Confirmation
Learn how to wait for price to confirm your trade idea before entering, reduce emotional guessing, and execute with cleaner timing, clearer invalidation, and more controlled risk.
Learning Objectives
By the end of this lesson, you should understand what entry confirmation is, why it matters, and how to use it without entering too early or too late.
- Understand the difference between anticipation and confirmation.
- Recognize the most useful confirmation methods.
- Use candlestick behavior, structure shifts, retests, and momentum as confirmation.
- Understand why location matters more than the signal alone.
- Avoid entering before price proves the setup.
- Avoid chasing after confirmation is already too extended.
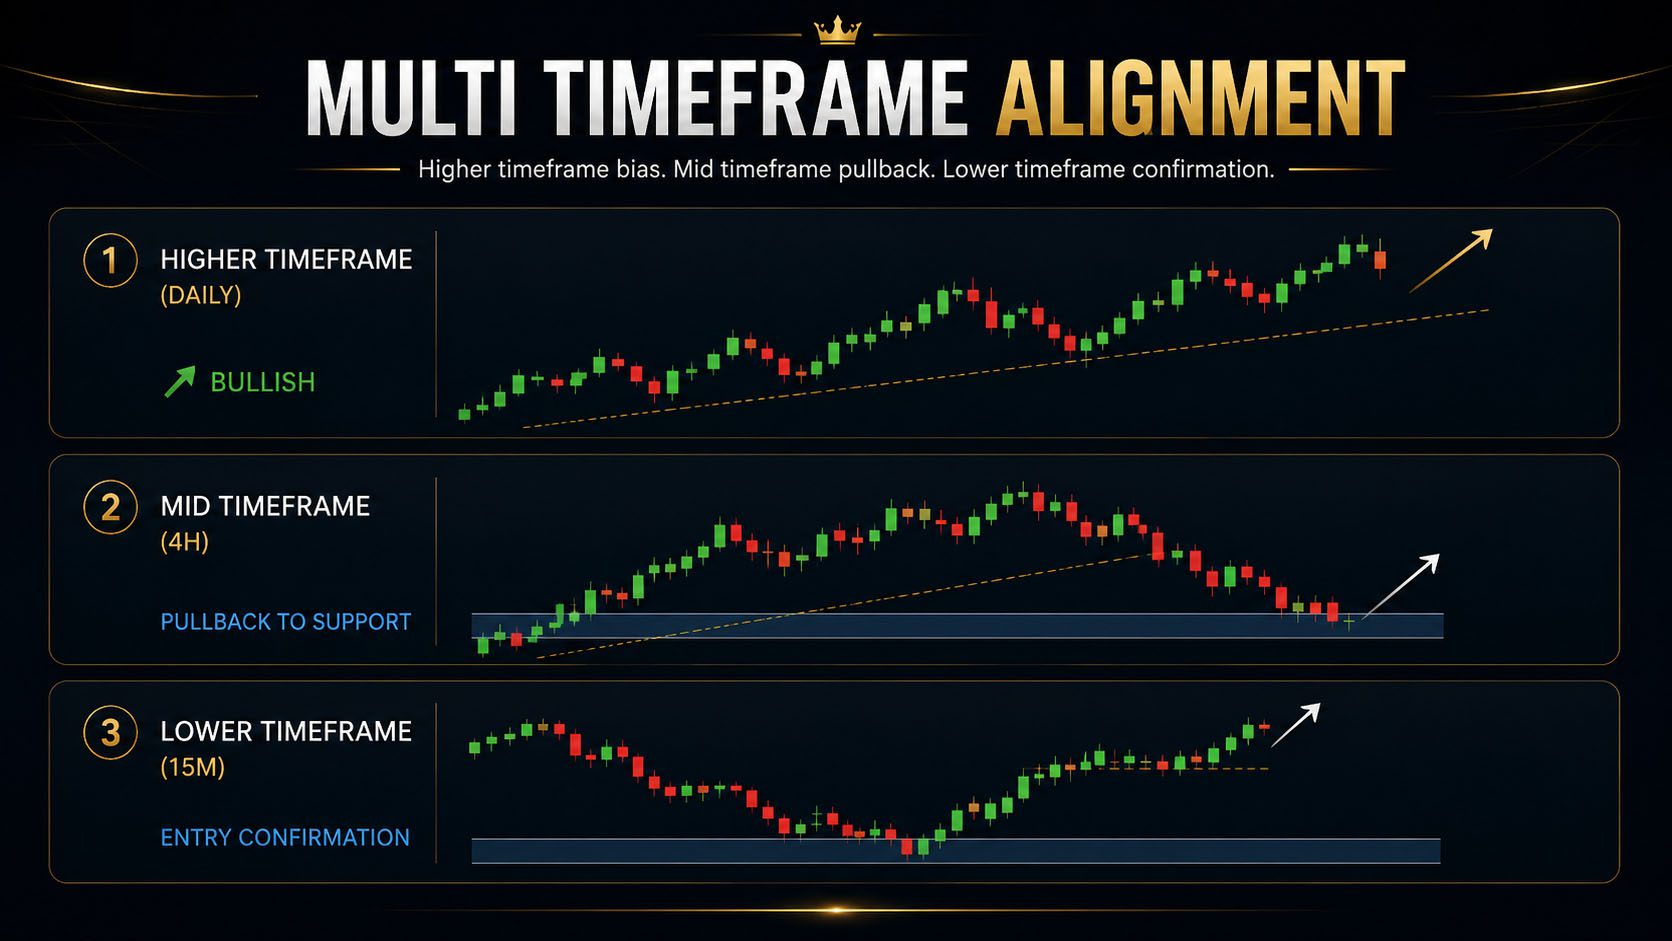
- Use higher timeframe bias with lower timeframe confirmation.
- Create a repeatable confirmation checklist for prop firm trading.
What Is Entry Confirmation?
Entry confirmation is evidence that price is beginning to react in the direction of your planned trade. It does not guarantee the trade will win. It tells you that the market has started behaving in a way that supports your idea.
A trader may identify a bullish support zone, but that does not mean they should buy immediately. Price may break straight through the zone. Confirmation allows the trader to wait and see whether buyers actually defend the area.
This lesson builds directly on Building a Trade Setup. A setup identifies the opportunity. Confirmation helps determine whether the opportunity is becoming valid.
Anticipation vs Confirmation
Anticipation means entering because you expect price to react. Confirmation means entering after price begins to prove that reaction.
| Approach | What the Trader Does | Main Advantage | Main Risk |
|---|---|---|---|
| Anticipation | Enters before the reaction is proven. | Earlier price and potentially tighter stop. | Higher chance of entering while price is still moving against the idea. |
| Confirmation | Waits for evidence before entering. | More information and cleaner direction. | Entry may be slightly later. |
| Chasing | Enters after price has already moved too far. | Feels emotionally safe because direction looks obvious. | Poor reward-to-risk and late execution. |
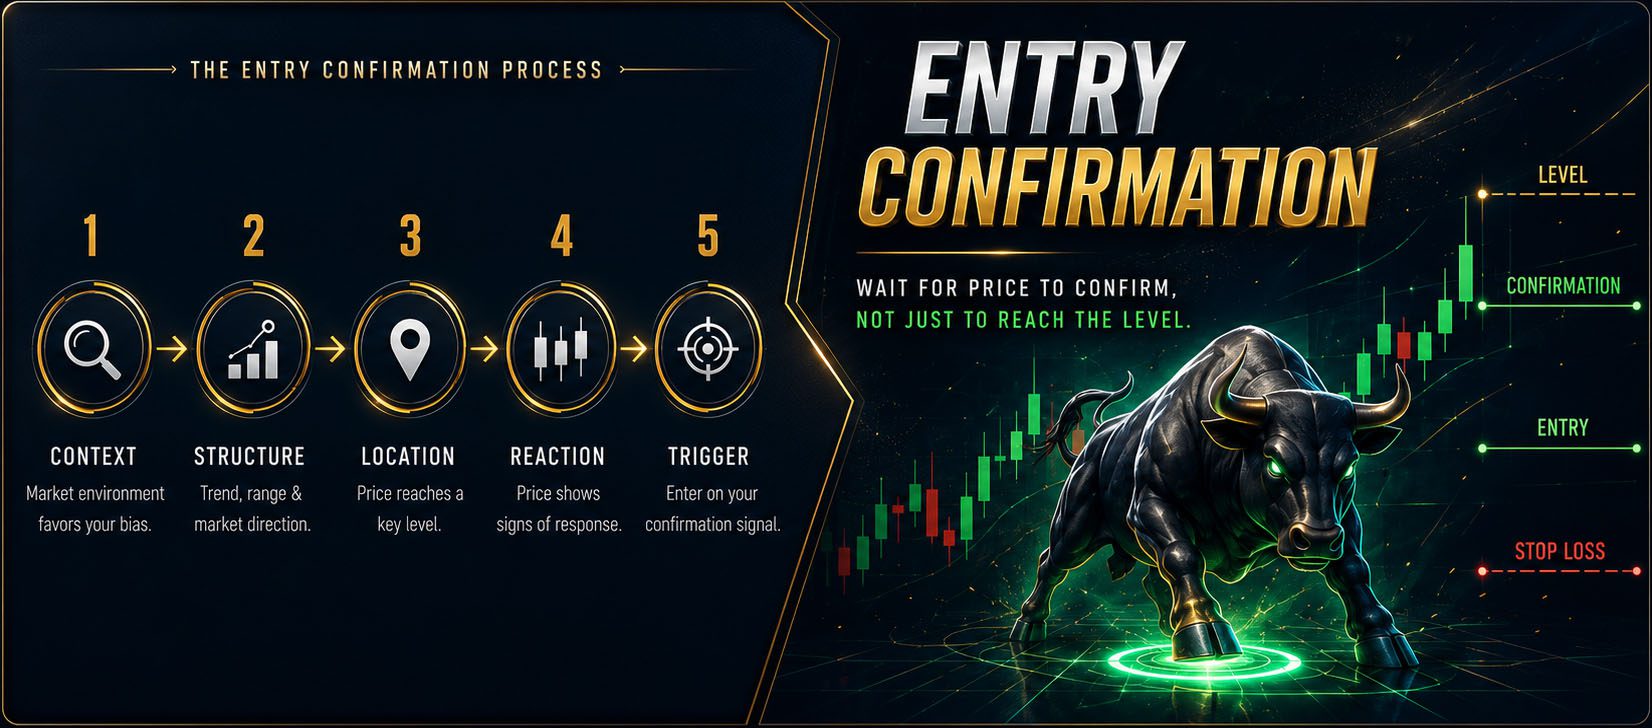
The Entry Confirmation Process
Entry confirmation should follow a clear order. If the trader starts with the signal and ignores the rest of the setup, the confirmation can become misleading.
Why Location Comes Before Confirmation
The same confirmation signal can have completely different value depending on where it forms. A bullish engulfing candle at higher timeframe support can be meaningful. A bullish engulfing candle in the middle of a range may be nothing more than noise.
This is why professional traders do not scan the chart looking for random candles. They first identify where price should react. Then they wait for confirmation at that location.
Meaningful Locations Include
- Higher timeframe support or resistance.
- Supply and demand zones.
- Previous highs or lows.
- Breakout and retest areas.
- Trendline or channel boundaries.
- Higher low or lower high areas.
- Range edges instead of the middle.
Review Support & Resistance and Market Structure before relying on any entry signal.
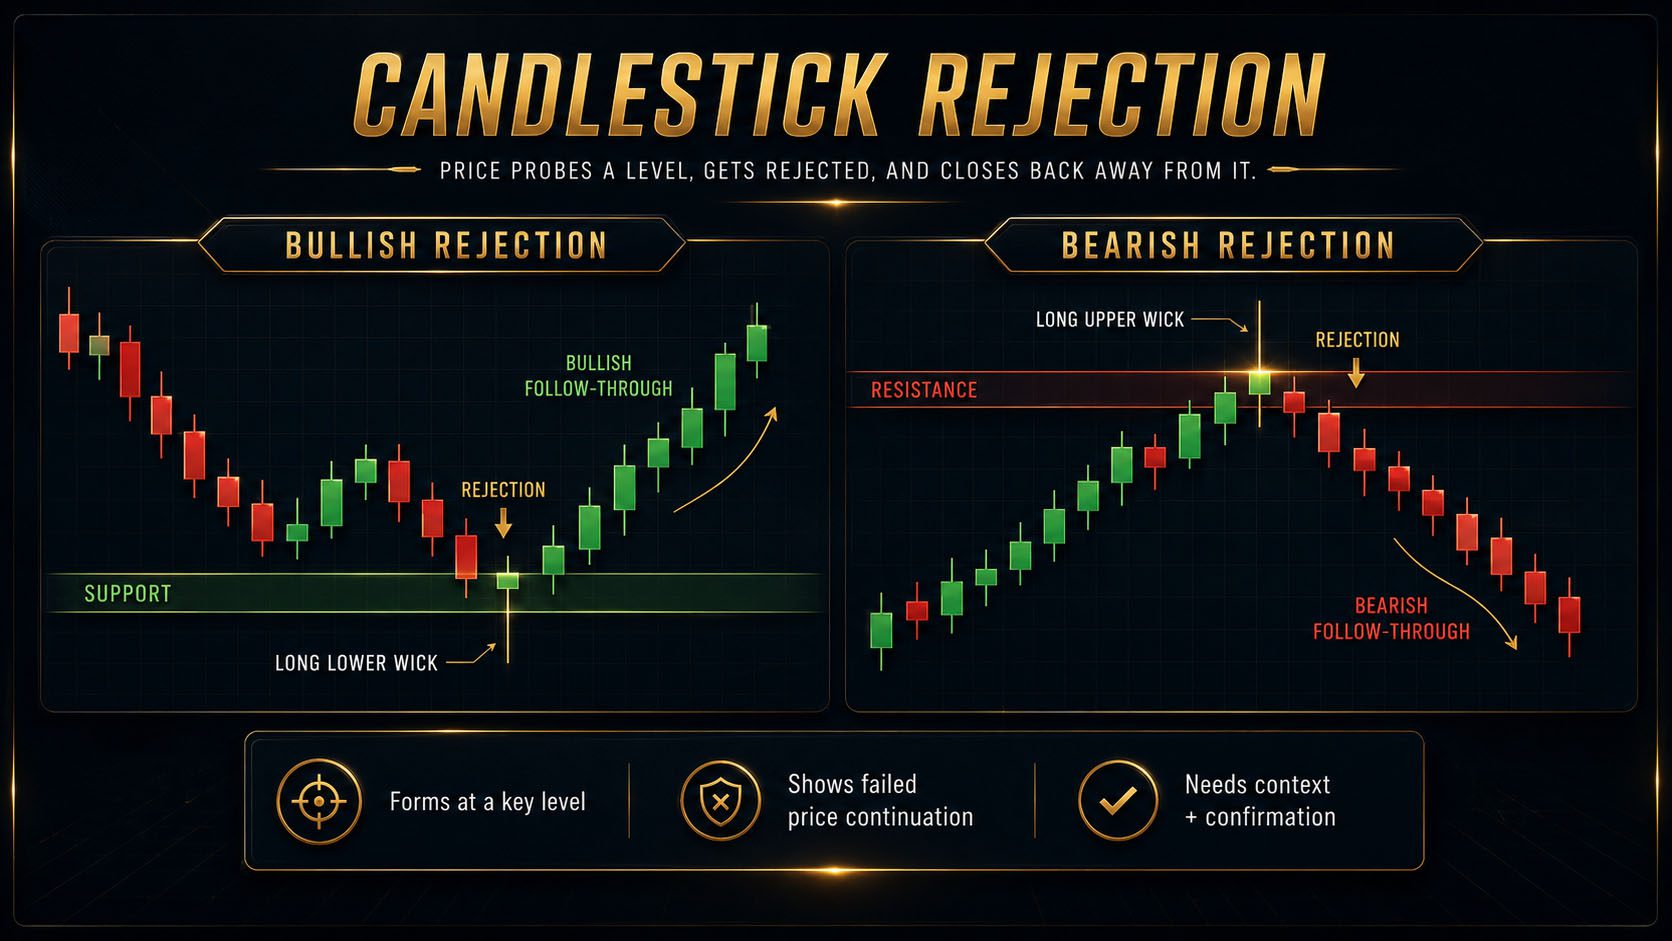
Confirmation Method 1 — Candlestick Rejection
Candlestick rejection happens when price attempts to move through a level but is pushed back before the candle closes. A long lower wick near support can show buyers rejecting lower prices. A long upper wick near resistance can show sellers rejecting higher prices.
Bullish Rejection
- Forms near support or demand.
- Shows a long lower wick.
- Closes away from the low.
- Becomes stronger if the next candle confirms upward momentum.
Bearish Rejection
- Forms near resistance or supply.
- Shows a long upper wick.
- Closes away from the high.
- Becomes stronger if the next candle confirms downward momentum.
Review Candlestick Patterns for a deeper explanation of body size, wick size, and candle closing position.
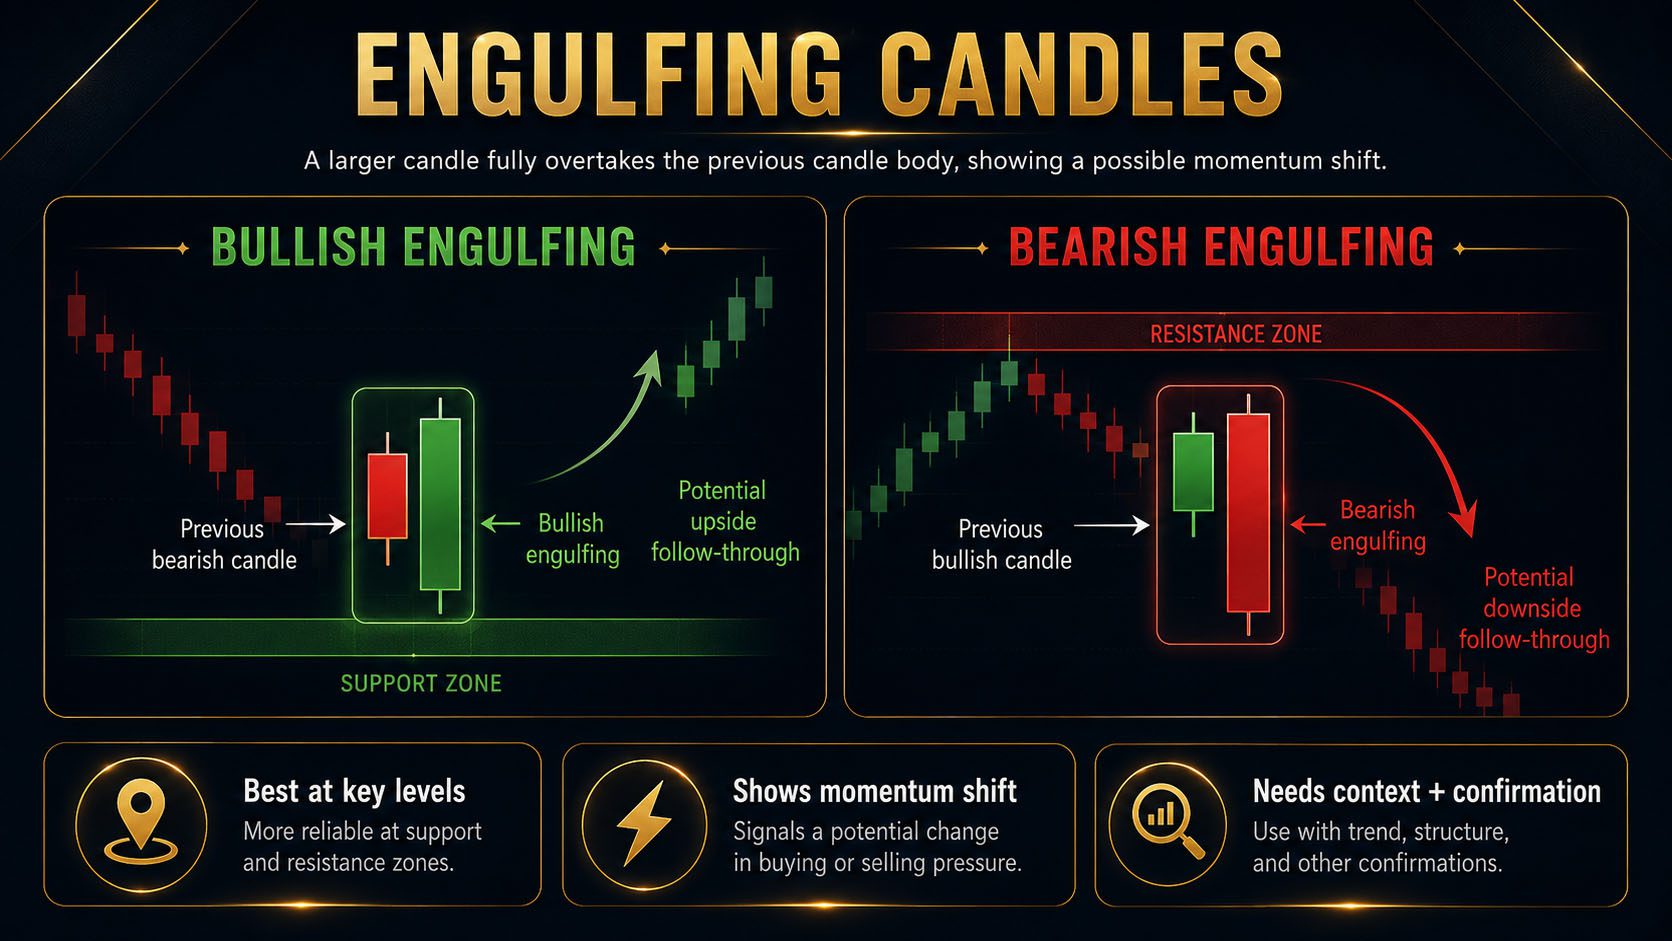
Confirmation Method 2 — Engulfing Candles
An engulfing candle shows strong momentum when one candle’s body overtakes the body of the previous candle. A bullish engulfing candle can show buyers taking control. A bearish engulfing candle can show sellers taking control.
Bullish Engulfing Confirmation
Price reaches support, forms weakness, and then closes with a strong bullish candle that overtakes the previous bearish body. This can show a shift from selling pressure to buying pressure.
Bearish Engulfing Confirmation
Price reaches resistance, forms hesitation, and then closes with a strong bearish candle that overtakes the previous bullish body. This can show a shift from buying pressure to selling pressure.
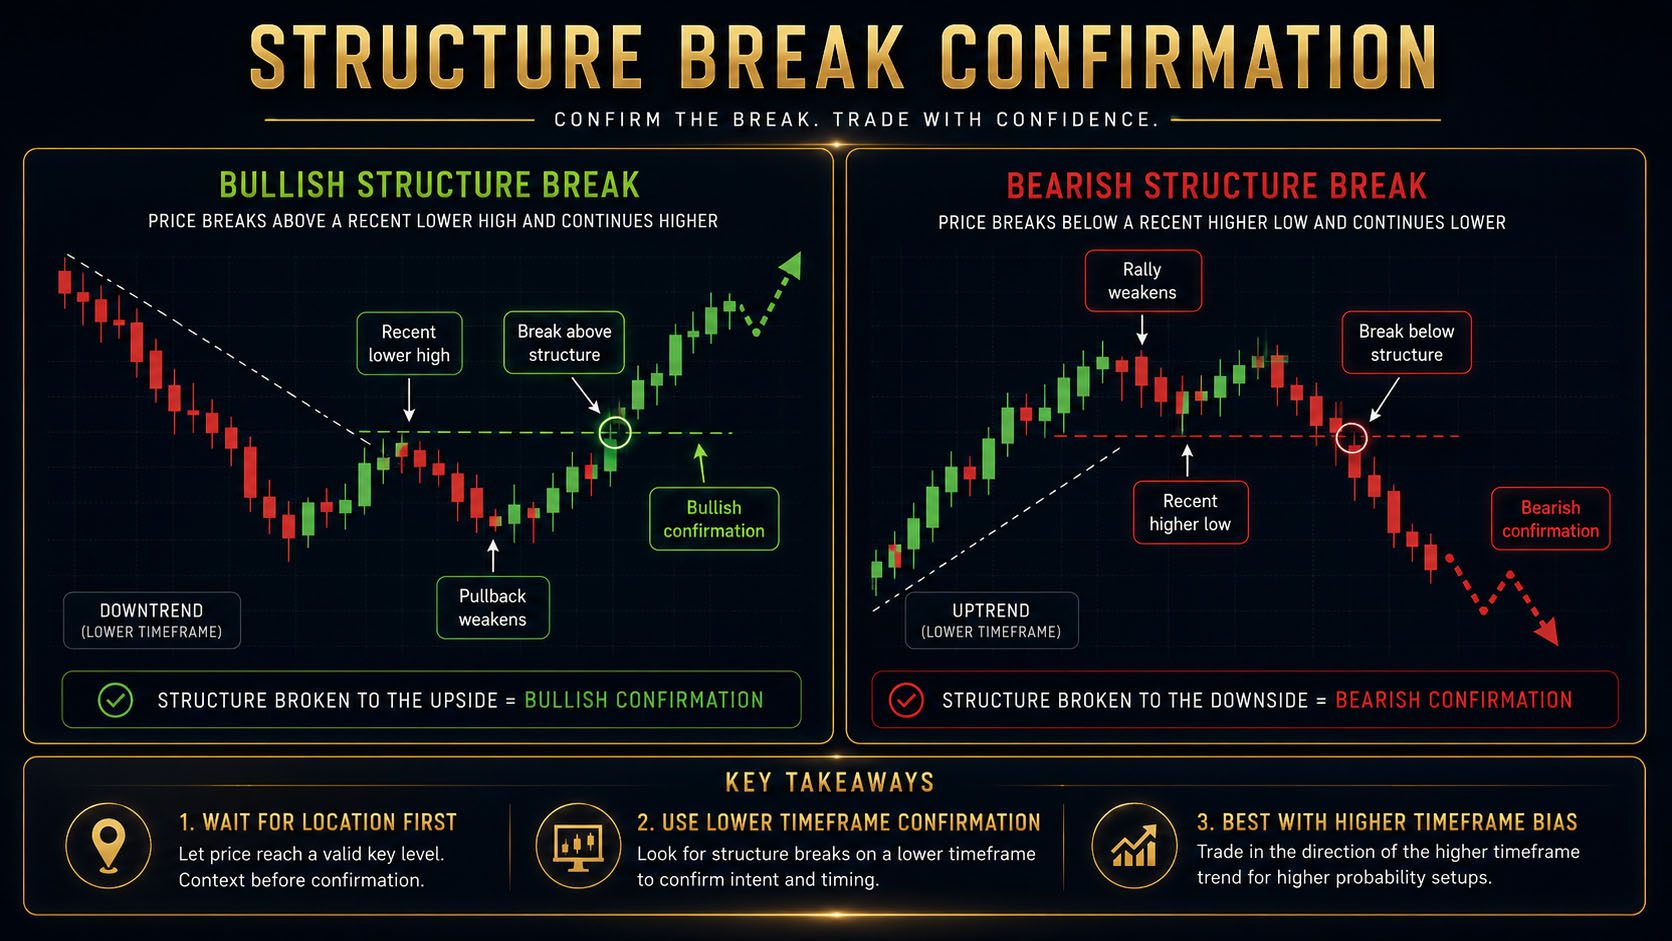
Confirmation Method 3 — Break of Lower Timeframe Structure
A lower timeframe structure break is one of the clearest confirmation methods. Instead of entering immediately at a higher timeframe level, the trader waits for the lower timeframe to stop moving against the planned trade.
For a bullish setup, price may be making lower highs during the pullback. Confirmation occurs when price breaks above the most recent lower high and begins forming a higher low. For a bearish setup, confirmation may occur when price breaks below a recent higher low and starts forming lower highs.
Bullish Structure Confirmation
- Higher timeframe bias is bullish.
- Price pulls back into support.
- Lower timeframe selling begins to weaken.
- Price breaks a recent lower high.
- Trader waits for entry or retest.
Bearish Structure Confirmation
- Higher timeframe bias is bearish.
- Price rallies into resistance.
- Lower timeframe buying begins to weaken.
- Price breaks a recent higher low.
- Trader waits for entry or retest.
This is where Multi-Timeframe Analysis becomes essential.
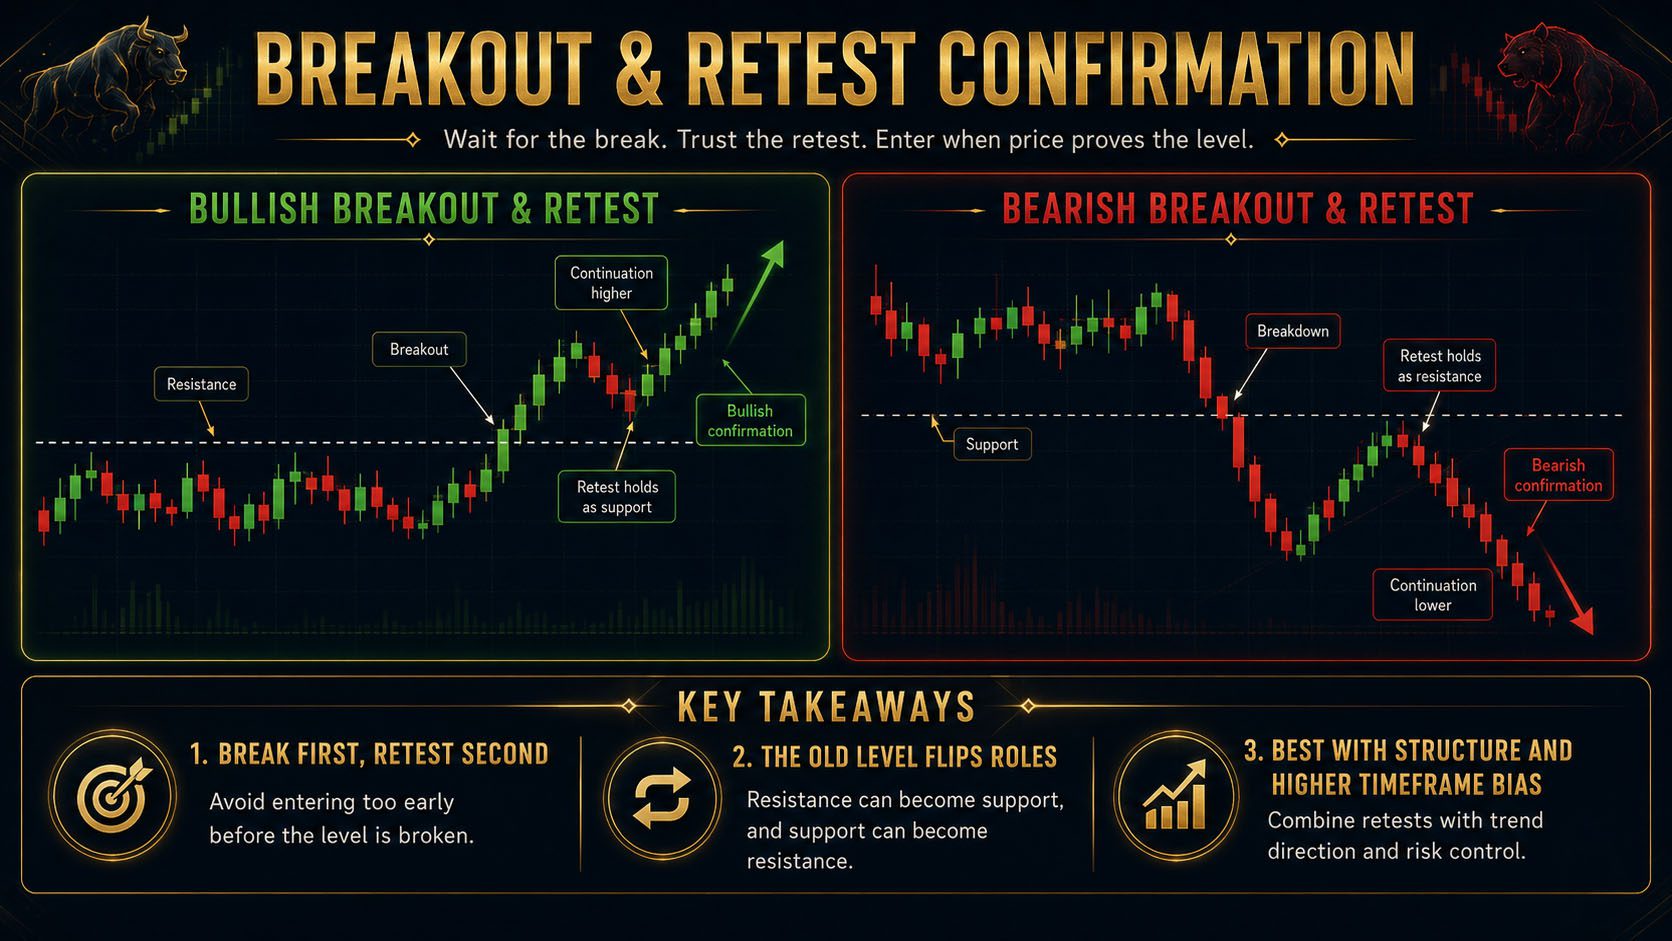
Confirmation Method 4 — Breakout and Retest
A breakout occurs when price moves beyond a key level. A retest occurs when price returns to that level after the break. If the level holds from the opposite side, the retest can provide confirmation.
Bullish Breakout Retest
Resistance breaks, price returns to the old resistance, and the level begins holding as support. Bullish confirmation at the retest can create a cleaner long setup.
Bearish Breakout Retest
Support breaks, price returns to the old support, and the level begins holding as resistance. Bearish confirmation at the retest can create a cleaner short setup.
Confirmation Method 5 — Momentum Shift
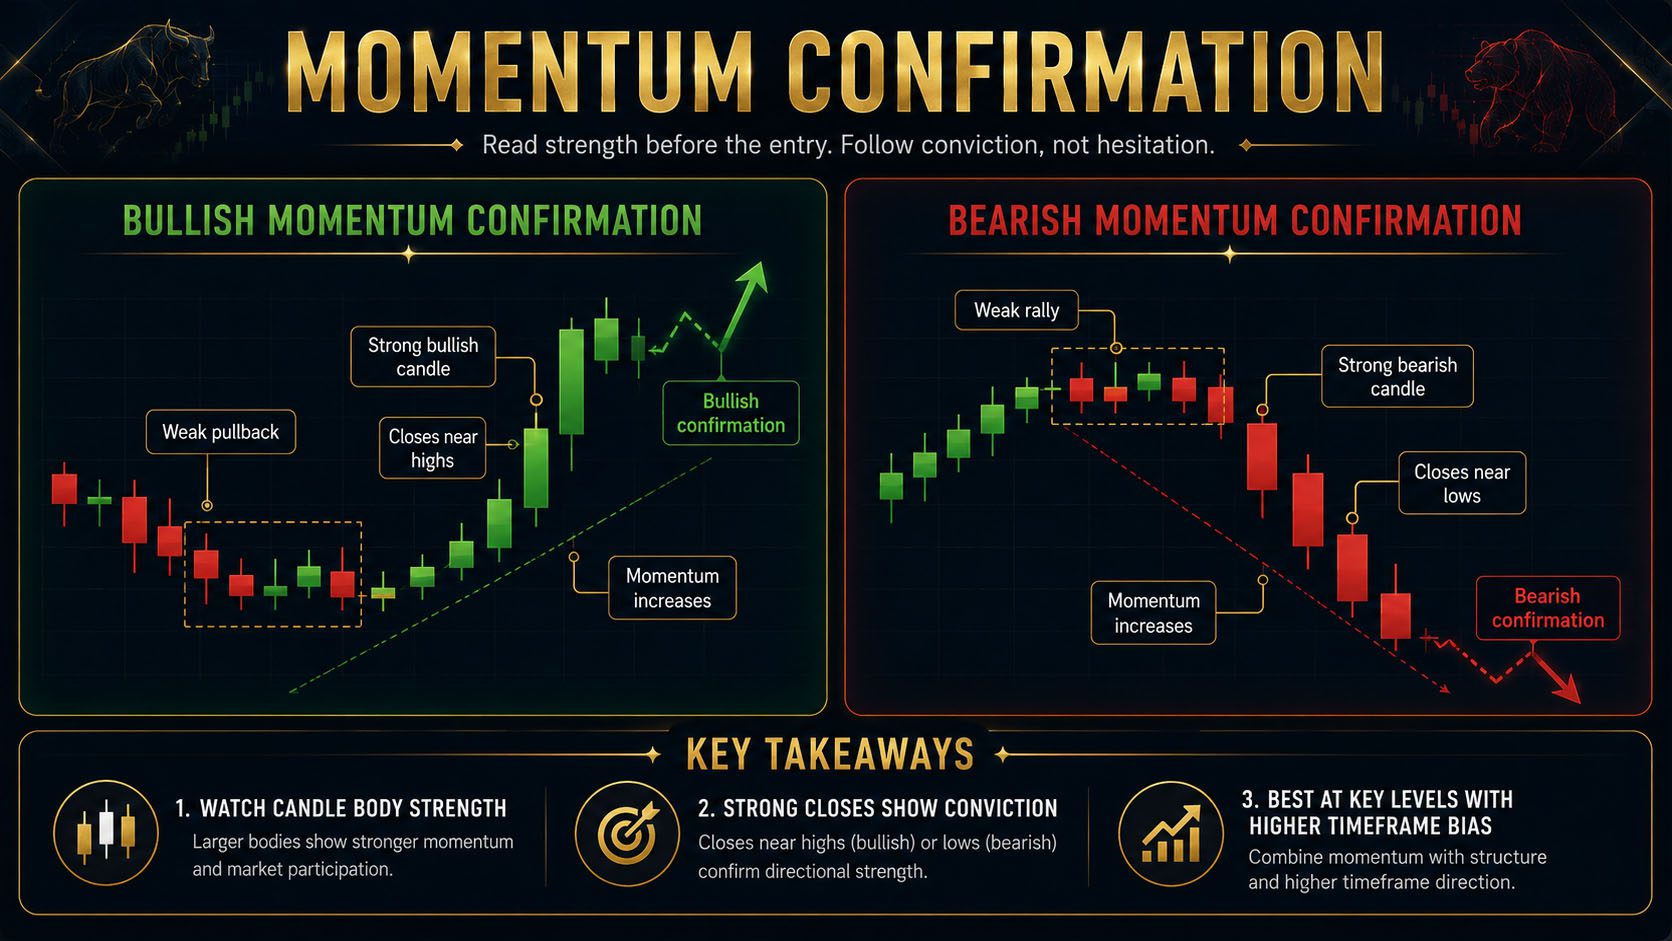
Momentum confirmation occurs when price begins moving with clear strength in the planned direction. This may appear as a strong body-dominant candle, a series of decisive closes, or a sudden increase in directional movement.
Signs of Bullish Momentum
- Larger bullish candle bodies.
- Closes near candle highs.
- Weak bearish pullbacks.
- Breaks above recent highs.
- Fast rejection of lower prices.
Signs of Bearish Momentum
- Larger bearish candle bodies.
- Closes near candle lows.
- Weak bullish pullbacks.
- Breaks below recent lows.
- Fast rejection of higher prices.
Confirmation Method 6 — Pattern Completion
Chart patterns can also provide confirmation when they complete at meaningful locations. A double top at resistance may confirm seller strength after the neckline breaks. A bullish flag may confirm continuation after price breaks the consolidation and holds.
Useful Pattern Confirmations
- Double top neckline break.
- Double bottom neckline break.
- Flag breakout in trend direction.
- Triangle breakout with follow-through.
- Head and shoulders neckline break.
- Failed breakout that traps traders.
Review Chart Patterns for more detail.
Single Confirmation vs Multiple Confirmations
A single confirmation signal may be enough when the setup is very clean. Multiple confirmations can strengthen the idea, but waiting for too many can also create a late entry.
| Confirmation Level | Example | Benefit | Risk |
|---|---|---|---|
| Single Confirmation | One strong rejection candle at support. | Earlier entry. | Less evidence. |
| Two Confirmations | Rejection candle plus structure break. | Stronger evidence and clearer direction. | Slightly later entry. |
| Three or More | Rejection, structure break, retest, and momentum. | Very clear setup. | Entry may become extended or reward-to-risk may weaken. |
Good Confirmation vs Bad Confirmation
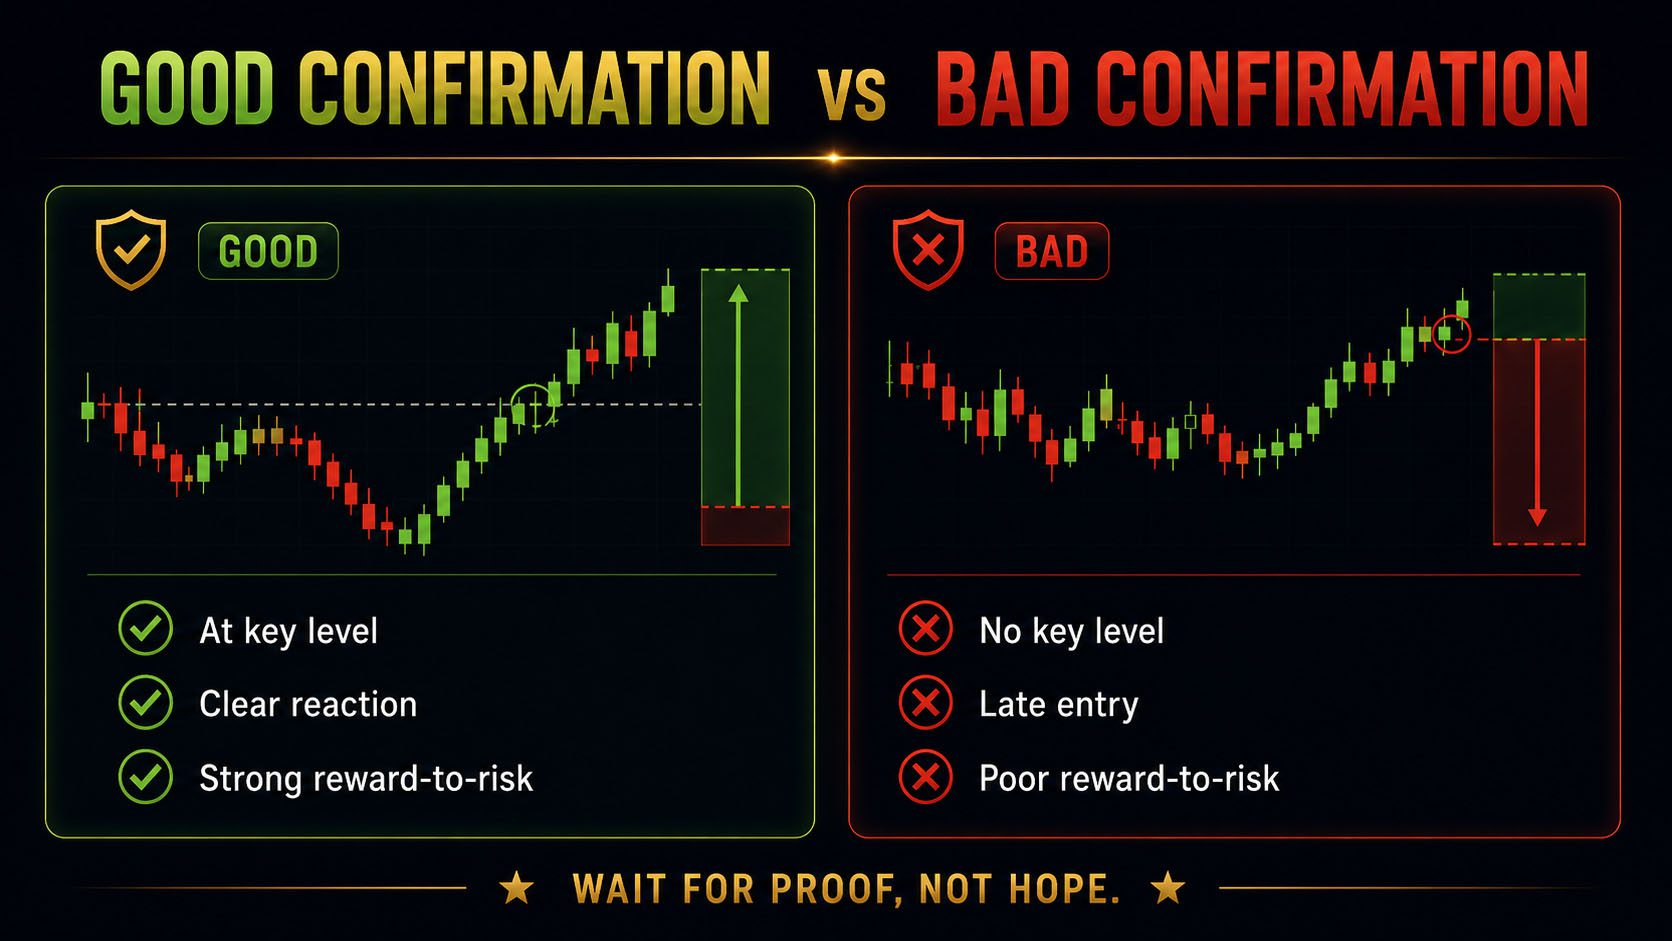
Good Confirmation
- Forms at a meaningful level.
- Aligns with market structure.
- Matches the higher timeframe bias.
- Creates a clear invalidation point.
- Still offers acceptable reward-to-risk.
- Occurs during a quality trading session.
Bad Confirmation
- Forms in the middle of nowhere.
- Fights the higher timeframe trend.
- Appears after price is already extended.
- Creates a wide stop and small target.
- Occurs in choppy or low-volume conditions.
- Is used to justify an emotional trade.
Practical Example — Bullish Entry Confirmation
EURUSD is bullish on the 4H chart and pulls back into a previous resistance level that may now act as support. The trader does not buy immediately.
The Confirmation Sequence
- Price reaches the support zone.
- Selling momentum begins to slow.
- A long lower wick forms.
- The next candle closes bullish.
- Price breaks above a recent lower timeframe high.
- The trader enters after the break or on a clean retest.
Practical Example — Bearish Entry Confirmation
XAUUSD is bearish on the 4H chart and rallies into a resistance zone. The trader waits instead of shorting the first touch.
The Confirmation Sequence
- Price reaches resistance.
- Buying momentum weakens.
- A long upper wick forms.
- A bearish engulfing candle closes.
- Lower timeframe structure breaks downward.
- The trader enters after confirmation or a retest.
When Confirmation Is Too Late
Waiting for confirmation is important, but entering after price has moved too far can destroy the trade quality. A late entry may place the stop too far away, reduce the target distance, and create poor reward-to-risk.
Signs the Entry May Be Too Late
- Price already moved several large candles from the level.
- The stop must be placed far behind current price.
- The next support or resistance level is too close.
- The risk-to-reward is no longer acceptable.
- The trader feels fear of missing out.
If the entry is gone, review Patience Pays and wait for the next opportunity.
Confirmation and Reward-to-Risk
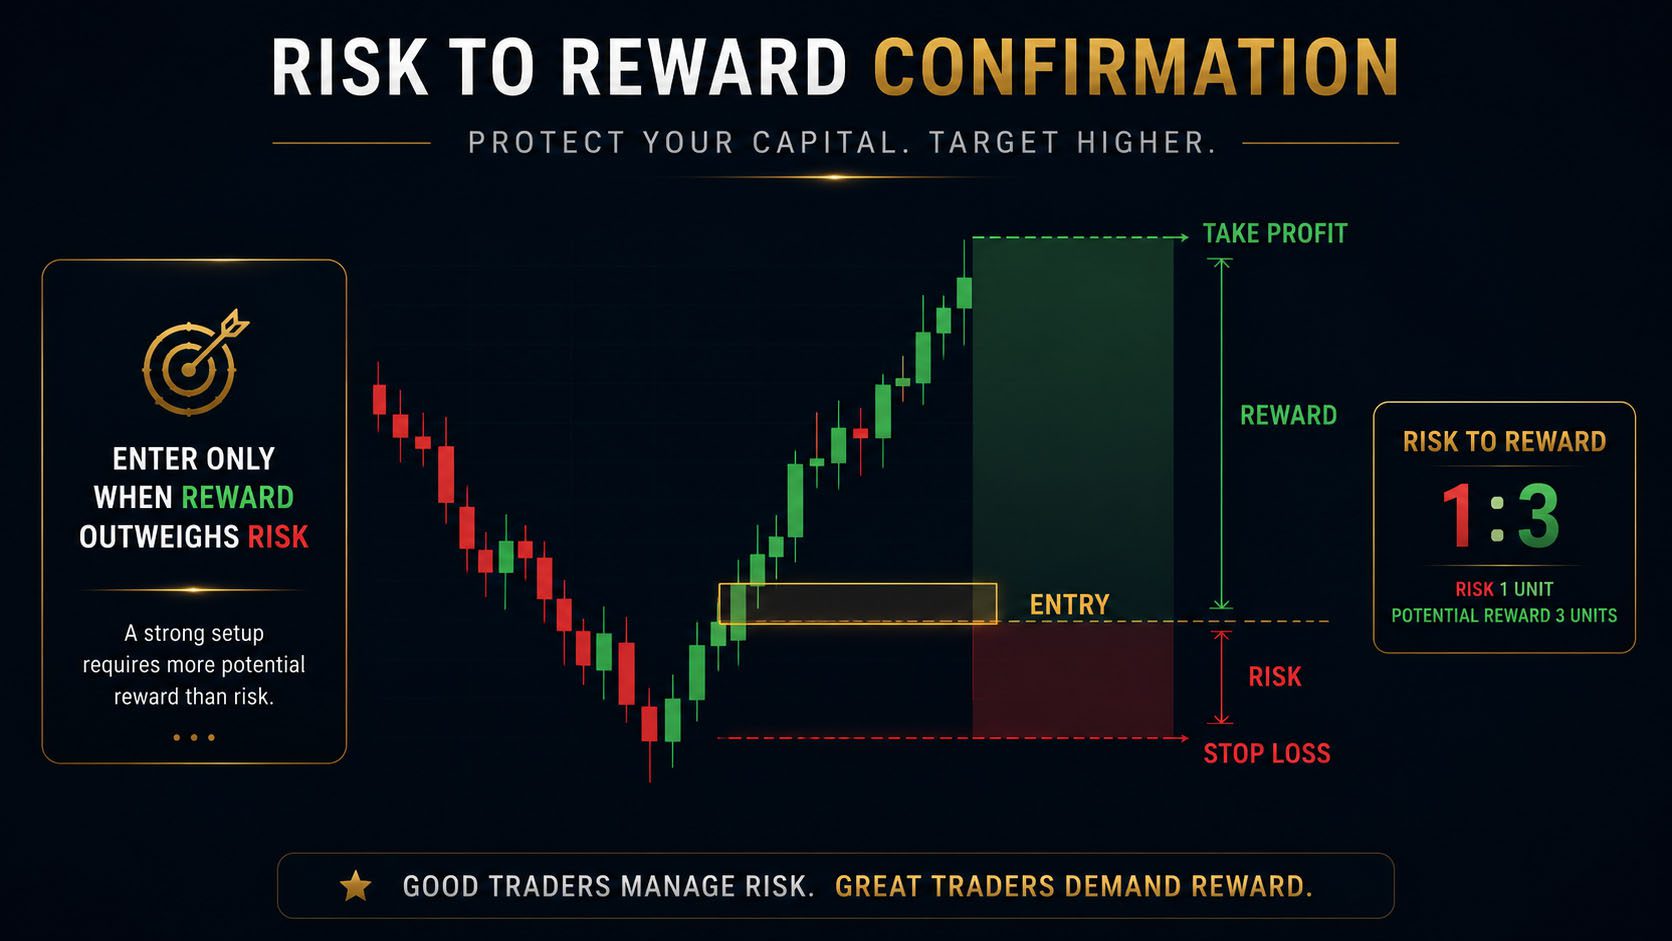
Confirmation must improve the setup without destroying the reward-to-risk. A trader may wait for strong evidence, but if price moves too far before entry, the trade may no longer be worth taking.
Before Entering, Recalculate
- Where is the new entry price?
- Where is the logical invalidation point?
- How wide is the stop?
- Where is the next realistic target?
- Does the reward still justify the risk?
Use Risk-to-Reward Trading before every confirmed entry.
Entry Confirmation Scorecard
You can score your confirmation before entering. This helps prevent emotional decisions and forces you to evaluate the setup objectively.
Correct location
Structure alignment
Clear reaction
Valid risk-to-reward
Common Entry Confirmation Mistakes
Entering on the First Touch
Price reaches a level and the trader enters immediately. The level may fail without any reaction.
Using One Candle as the Entire Setup
A candle pattern alone does not replace context, structure, location, or risk.
Waiting Too Long
The trader waits until the move looks completely obvious, then enters after the reward-to-risk has disappeared.
Ignoring Higher Timeframe Conflict
A lower timeframe signal may look good but still fight the larger market direction.
Moving the Entry Rules
The trader changes what counts as confirmation because they want to be in the trade.
Chasing After Missing the Entry
The trader sees confirmation, hesitates, then enters late from fear of missing out.
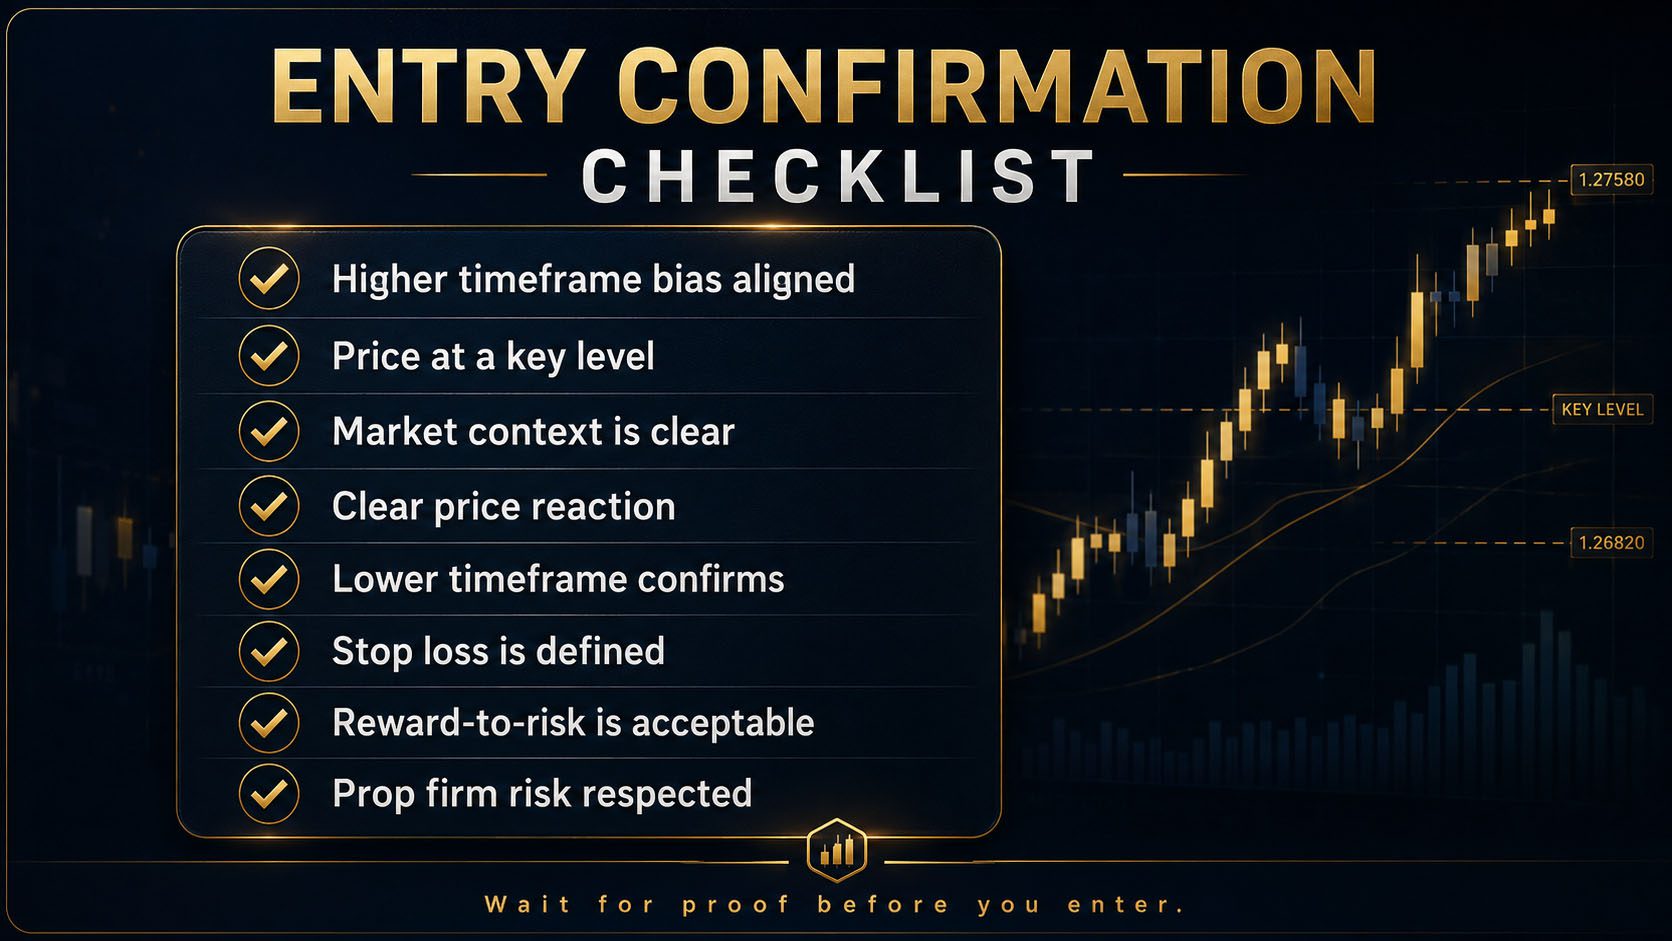
Professional Entry Confirmation Checklist
- Does higher timeframe bias support the trade?
- Is price at a meaningful level?
- Is the market context suitable?
- Has momentum against the trade weakened?
- Did price show a clear reaction?
- Did lower timeframe structure shift?
- Is the entry still close enough to the level?
- Is invalidation clear?
- Does reward-to-risk remain acceptable?
- Does the setup respect prop firm risk limits?
How Entry Confirmation Protects Prop Firm Accounts
Prop firm traders must protect drawdown. Entering too early can create unnecessary losses. Chasing too late can create poor reward-to-risk. Entry confirmation helps traders become more selective.
Confirmation Can Help You
- Avoid entering while price is still moving against the setup.
- Reduce random trades at weak levels.
- Create clearer stop loss placement.
- Improve confidence without becoming overconfident.
- Reduce emotional entries and overtrading.
- Protect daily drawdown during poor conditions.
Review Daily Drawdown and Position Sizing before executing any confirmed setup.
FAQ
Does confirmation guarantee a winning trade?
No. Confirmation improves the quality of the decision, but every trade still carries risk.
What is the best confirmation signal?
There is no single best signal. The strongest confirmation usually combines location, structure, price reaction, and acceptable risk.
Should I always wait for a candle to close?
For most newer traders, waiting for the candle close can reduce false signals. More experienced traders may use different entry rules, but those rules should be tested and documented.
How many confirmations do I need?
Usually one or two strong confirmations are enough when the setup is clean. Waiting for too many may lead to a late entry.
What should I do if confirmation appears but reward-to-risk is poor?
Skip the trade. A valid setup is not automatically a worthwhile trade.
Can I use indicators for confirmation?
Yes, but indicators should support price action, structure, and location. They should not replace them.
Knowledge Quiz
- What is entry confirmation?
Answer: Evidence that price is beginning to support the planned trade idea. - What should come before confirmation?
Answer: Context, structure, and location. - Why is a rejection candle useful?
Answer: It can show that price attempted to break a level and was pushed back. - What does a lower timeframe structure break show?
Answer: The pullback may be weakening and the larger move may be resuming. - Why are retests useful?
Answer: They can create cleaner confirmation, stop placement, and reward-to-risk. - What is the danger of waiting too long?
Answer: The entry may become extended and reward-to-risk may weaken. - Should a candle pattern be traded anywhere on the chart?
Answer: No. It should form at a meaningful location and fit the context. - What should you do if confirmation appears but risk is poor?
Answer: Skip the trade. - Does confirmation eliminate losses?
Answer: No. It helps reduce guessing and avoidable entries. - What is the main execution rule?
Answer: No location, no confirmation, no trade.
Key Takeaways
- Entry confirmation is evidence, not certainty.
- Location must come before the signal.
- Candlestick rejection, engulfing candles, structure shifts, retests, momentum, and patterns can all provide confirmation.
- Higher timeframe bias and lower timeframe confirmation should work together.
- Waiting for too little confirmation creates early entries.
- Waiting for too much confirmation creates late entries.
- Reward-to-risk must be recalculated after confirmation appears.
- Prop firm traders should use confirmation to reduce avoidable drawdown.
Lesson Summary
Entry confirmation helps traders move from prediction to evidence-based execution. Instead of entering immediately when price reaches a level, professional traders wait for rejection, momentum, structure shifts, breakout retests, or pattern completion. The strongest confirmation forms at a meaningful location, aligns with higher timeframe structure, and still offers acceptable reward-to-risk. Inside prop firm challenges, confirmation helps reduce random entries, improve timing, and protect drawdown.