
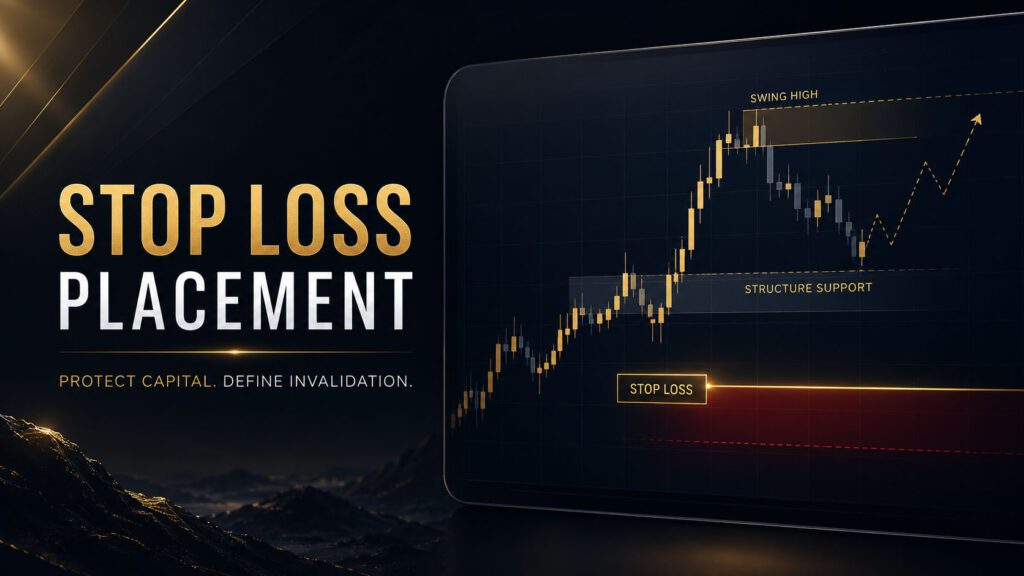
Stop Loss Placement
Learn how professional traders place stop losses based on market invalidation, structure, volatility, and risk—not fear, guesswork, or an arbitrary number of pips.
A Stop Loss Is More Than an Exit Order
A stop loss is an order designed to close a trade when price reaches a predetermined level. Its most obvious purpose is to limit financial loss, but professional stop loss placement does much more than that. It defines the exact point where your original trading idea is no longer valid.
Many inexperienced traders treat the stop loss as an annoying obstacle. They place it wherever the potential loss feels comfortable, move it when price gets close, or remove it entirely because they are afraid of being stopped out. Professional traders view it differently. A properly positioned stop loss is part of the trade setup before the trade is entered.
The entry, stop loss, position size, and profit target must work together. A trade is not fully planned until all four have been defined. This builds directly on Building a Trade Setup and Entry Confirmation.
Learning Objectives
- Understand the true purpose of a stop loss.
- Identify the invalidation point of a trade setup.
- Use market structure to place logical stops.
- Account for spread, volatility, and normal price noise.
- Avoid stops that are unnecessarily tight or excessively wide.
- Adjust position size to match the stop distance.
- Understand when moving a stop is appropriate.
- Protect prop firm accounts from avoidable drawdown.
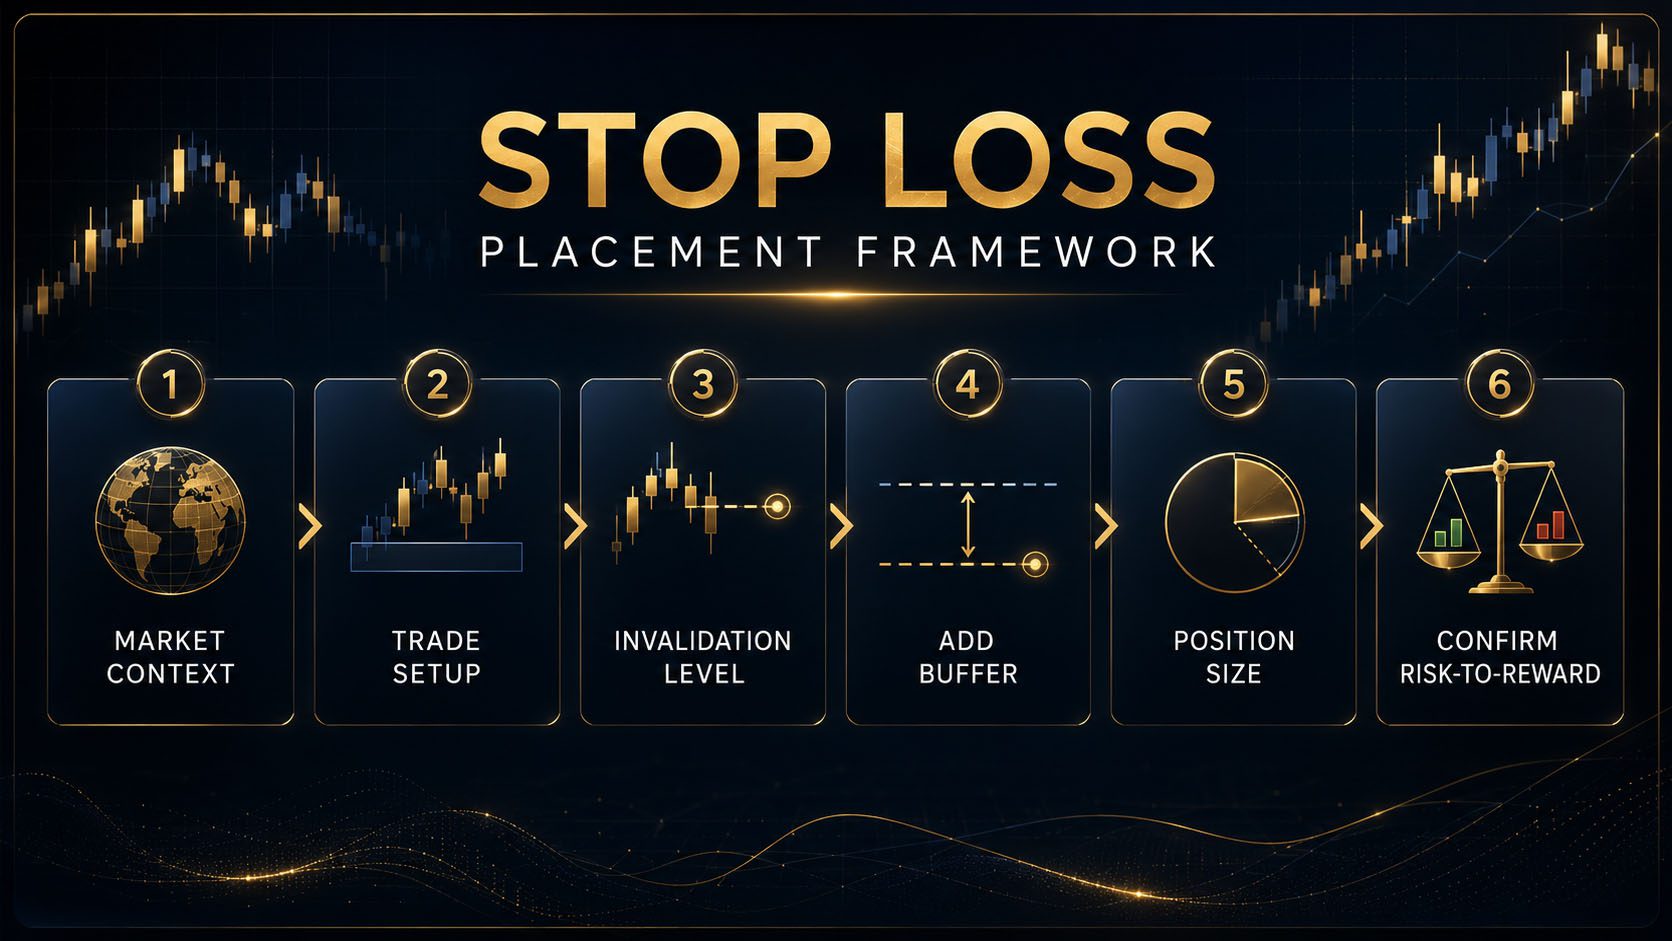
1. The Real Purpose of a Stop Loss
Limit Financial Risk
The stop loss determines the maximum planned loss if the trade fails under normal market conditions.
Define Invalidation
It marks the price level where the market has disproved the reason for entering the position.
Remove Emotional Decisions
It prevents a manageable loss from becoming a much larger loss because of hesitation, hope, or denial.
Before placing a stop, you must first understand the broader environment in which the setup exists. Review Market Context and Understanding Market Structure if you are not yet comfortable identifying trends, ranges, swing highs, swing lows, and structural breaks.
2. Stop Placement Begins With Trade Invalidation
Every valid setup has a condition that must remain true. A bullish setup might depend on a higher low holding above support. A bearish setup might depend on price remaining below a recent swing high. A breakout trade may depend on price holding beyond a broken resistance level.
Your invalidation point is the level where that condition is no longer true.
Questions to Ask Before Entering
- What market condition makes this trade valid?
- What price movement would prove the setup has failed?
- Which swing high, swing low, support, resistance, or structural level protects the idea?
- Can price reasonably move beyond that level and still leave the setup valid?
- Is there enough room between the entry and stop to survive normal volatility?
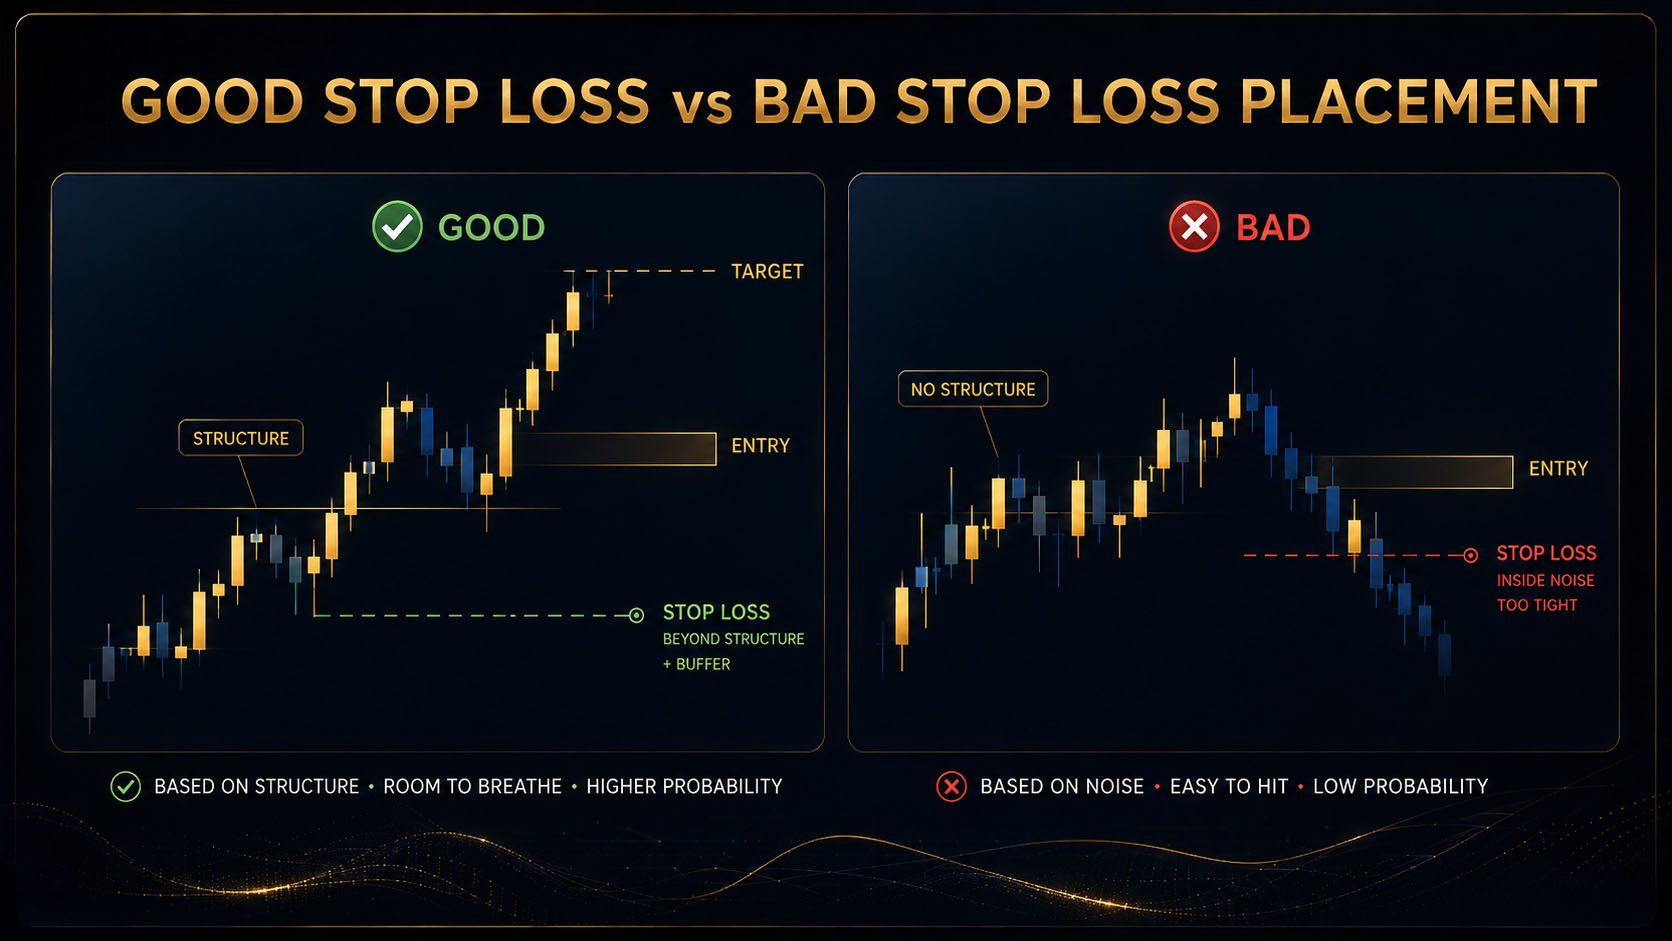
The buffer is important. Placing a stop exactly on an obvious swing high, swing low, support line, or resistance line can expose the trade to normal price probing. Markets frequently test liquidity around obvious levels before making the intended move.
3. Market Structure Stop Loss Placement
Market structure is one of the most reliable foundations for stop loss placement because it connects the stop directly to the logic of the setup.
Stop Below the Protected Low
In a bullish setup, the stop is commonly placed below the swing low, higher low, demand zone, or support level that must hold for the bullish idea to remain valid.
- Identify the most recent meaningful higher low.
- Confirm that the low is structurally relevant.
- Place the stop below it with a reasonable buffer.
- Avoid placing the stop directly underneath the entry candle unless that candle defines the setup.
Stop Above the Protected High
In a bearish setup, the stop is commonly placed above the swing high, lower high, supply zone, or resistance level that must remain intact.
- Identify the most recent meaningful lower high.
- Confirm that price rejection occurred from a valid area.
- Place the stop beyond the structural level.
- Allow enough room for normal price fluctuation and spread.
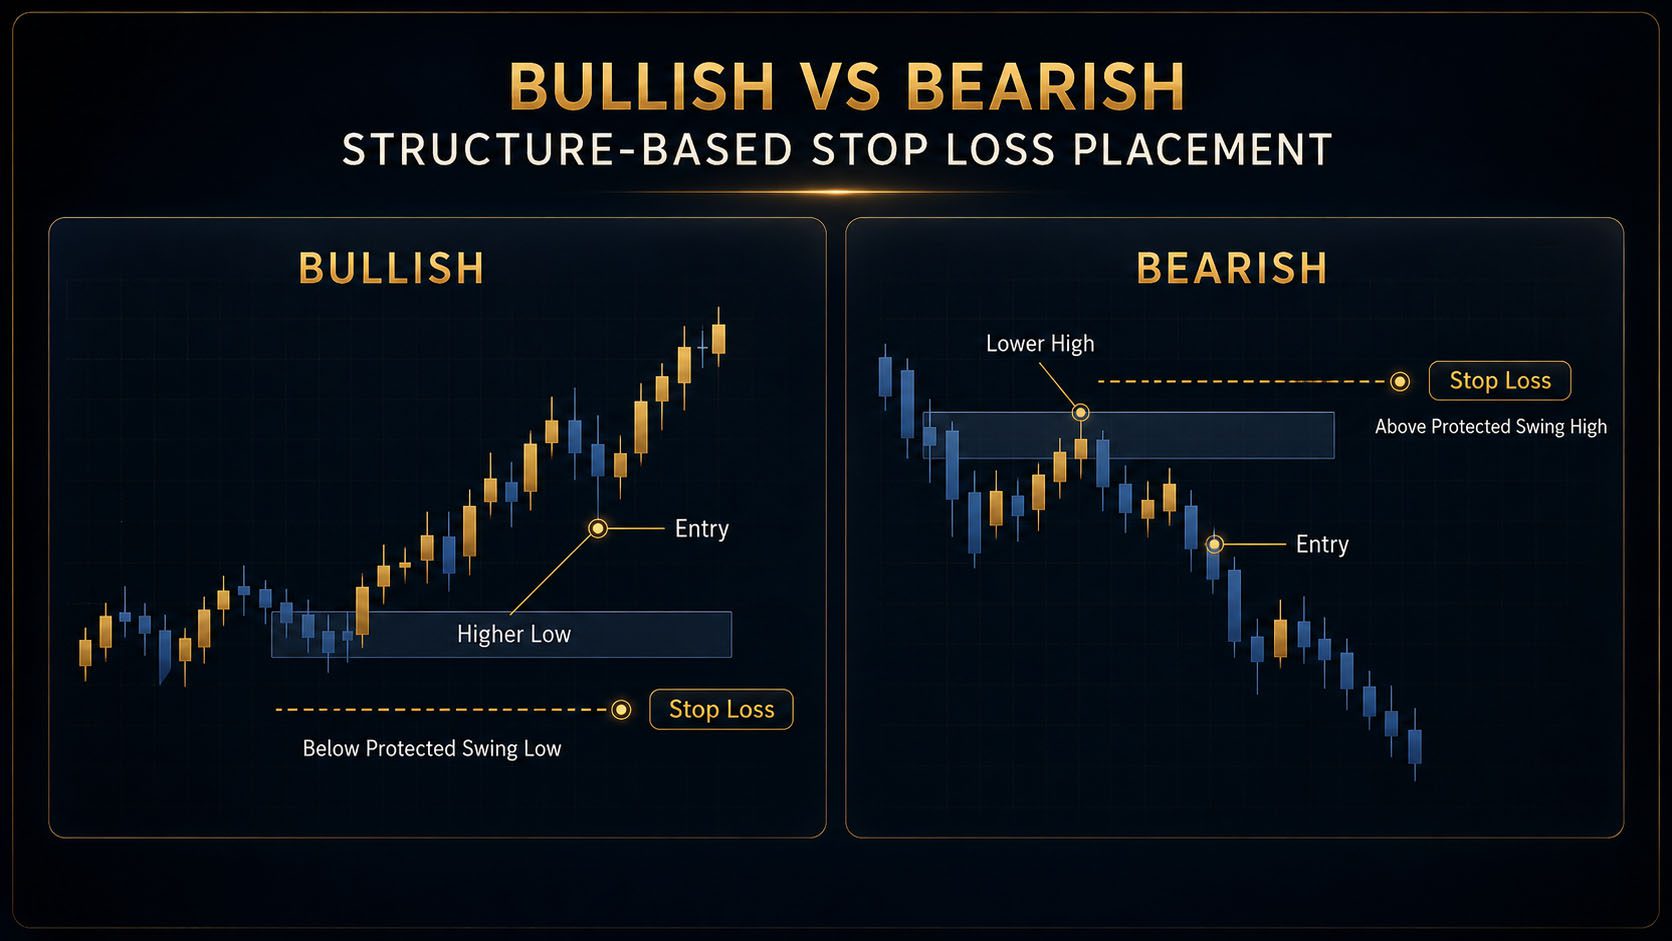
Do not automatically use the nearest high or low. A tiny candle wick may not be a meaningful structure point. Use the concepts from Multi-Timeframe Analysis to determine whether the level matters only on the entry timeframe or is supported by a higher timeframe.
4. Common Stop Loss Placement Methods
Below Support or Above Resistance
A long trade can be protected below a support level, while a short trade can be protected above resistance. The stop belongs beyond the area that should prevent price from moving against the trade.
Study Support and Resistance Trading Strategy before relying on this method.
Beyond a Swing High or Swing Low
This method uses a recent structural turning point. It is particularly useful when trading trend continuation, pullbacks, reversals, and structure shifts.
Beyond a Candlestick Signal
A stop may be placed beyond the wick of a rejection candle, pin bar, engulfing pattern, or other confirmation candle when that candle clearly defines the setup’s invalidation.
Review Candlestick Patterns for more context.
Beyond a Trendline or Channel
When a setup depends on a respected trendline or channel boundary, the stop may be placed beyond the line and nearby price structure. Never rely on the diagonal line alone.
Beyond a Breakout Retest
For a breakout-and-retest trade, the stop is often placed beyond the retest area. If price decisively returns through the broken level, the breakout premise may no longer be valid.
Volatility-Based Stop
A volatility-based method uses current market movement to determine whether the trade needs more breathing room. Average True Range, recent candle range, or normal session movement may help measure volatility.
5. Why Stops Get Hit Before Price Moves
Traders often say, “The market hunted my stop,” after price touches their stop and then moves in the original direction. Stop runs do happen around concentrated liquidity, but many stopped trades are simply the result of poor placement.
Typical Causes
- The stop was placed exactly at an obvious high or low.
- The trader ignored spread and execution costs.
- The stop was inside normal candle volatility.
- The entry occurred too early, forcing an awkward stop location.
- The setup was entered directly before important economic news.
- The trader used the same fixed stop distance in every market condition.
- The stop was based on desired lot size instead of market structure.
6. Stop Loss Buffers and Market Noise
A buffer is a small amount of additional distance placed beyond the invalidation level. Its purpose is to keep the trade from being closed by spread, minor volatility, or an ordinary liquidity test.
| Condition | Buffer Consideration | Reason |
|---|---|---|
| Quiet session | Smaller buffer may be reasonable | Price movement and candle ranges are generally reduced. |
| London or New York open | Additional room may be necessary | Volatility and liquidity can expand rapidly. |
| High-impact news nearby | Avoid the trade rather than dramatically widening the stop | Spreads and slippage may become unpredictable. |
| Highly volatile instrument | Use a wider structural buffer and smaller position size | Normal movement is larger than on quieter instruments. |
| Obvious equal highs or lows | Place beyond the full liquidity area | Price may sweep the obvious level before reversing. |
A buffer should be justified by market behavior. It should not be so large that the stop becomes disconnected from the trade idea. If the necessary stop is wider than your trading plan allows, skip the trade or wait for a better entry.
7. Tight Stops vs Wide Stops
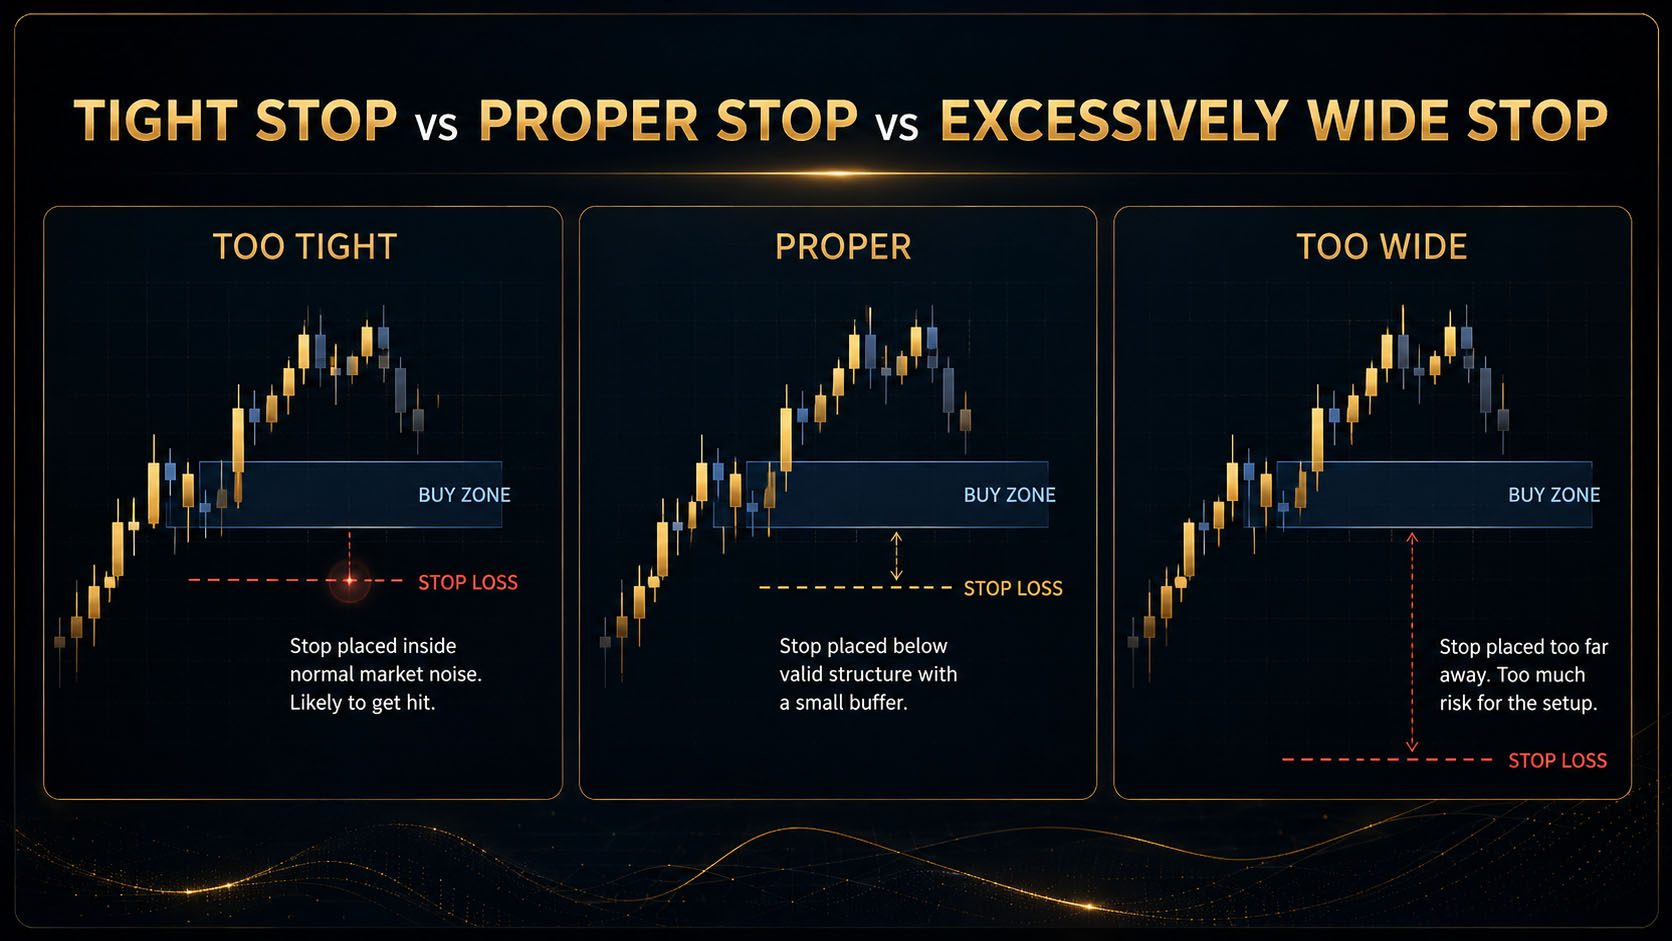
Stops That Are Too Tight
- Sit inside normal market noise.
- Are placed too close to the entry simply to increase lot size.
- Ignore nearby liquidity or structural wicks.
- Cause repeated small losses on otherwise valid ideas.
- Create emotional frustration and revenge trading.
Stops That Are Too Wide
- Remain open after the setup has clearly failed.
- May produce poor risk-to-reward potential.
- Can expose the account to unnecessary drawdown.
- Often indicate that the entry was late or poorly timed.
- May violate prop firm risk limits when position size is not adjusted.
8. Position Size Must Adapt to the Stop
Once the correct stop location has been identified, position size must be calculated from the distance between the entry and the stop. The process should never be reversed.
Suppose a trader is permitted to risk $100. If the logical stop is 10 pips away, the position can be larger than it would be if the logical stop were 25 pips away. In both cases, the total planned risk remains $100.
Correct Sequence
- Identify the trade setup.
- Define the invalidation point.
- Place the stop beyond invalidation.
- Measure the stop distance.
- Calculate the correct lot size.
- Confirm that the potential reward justifies the risk.
Review Position Sizing Made Simple and Risk-to-Reward Trading before risking real or funded capital.
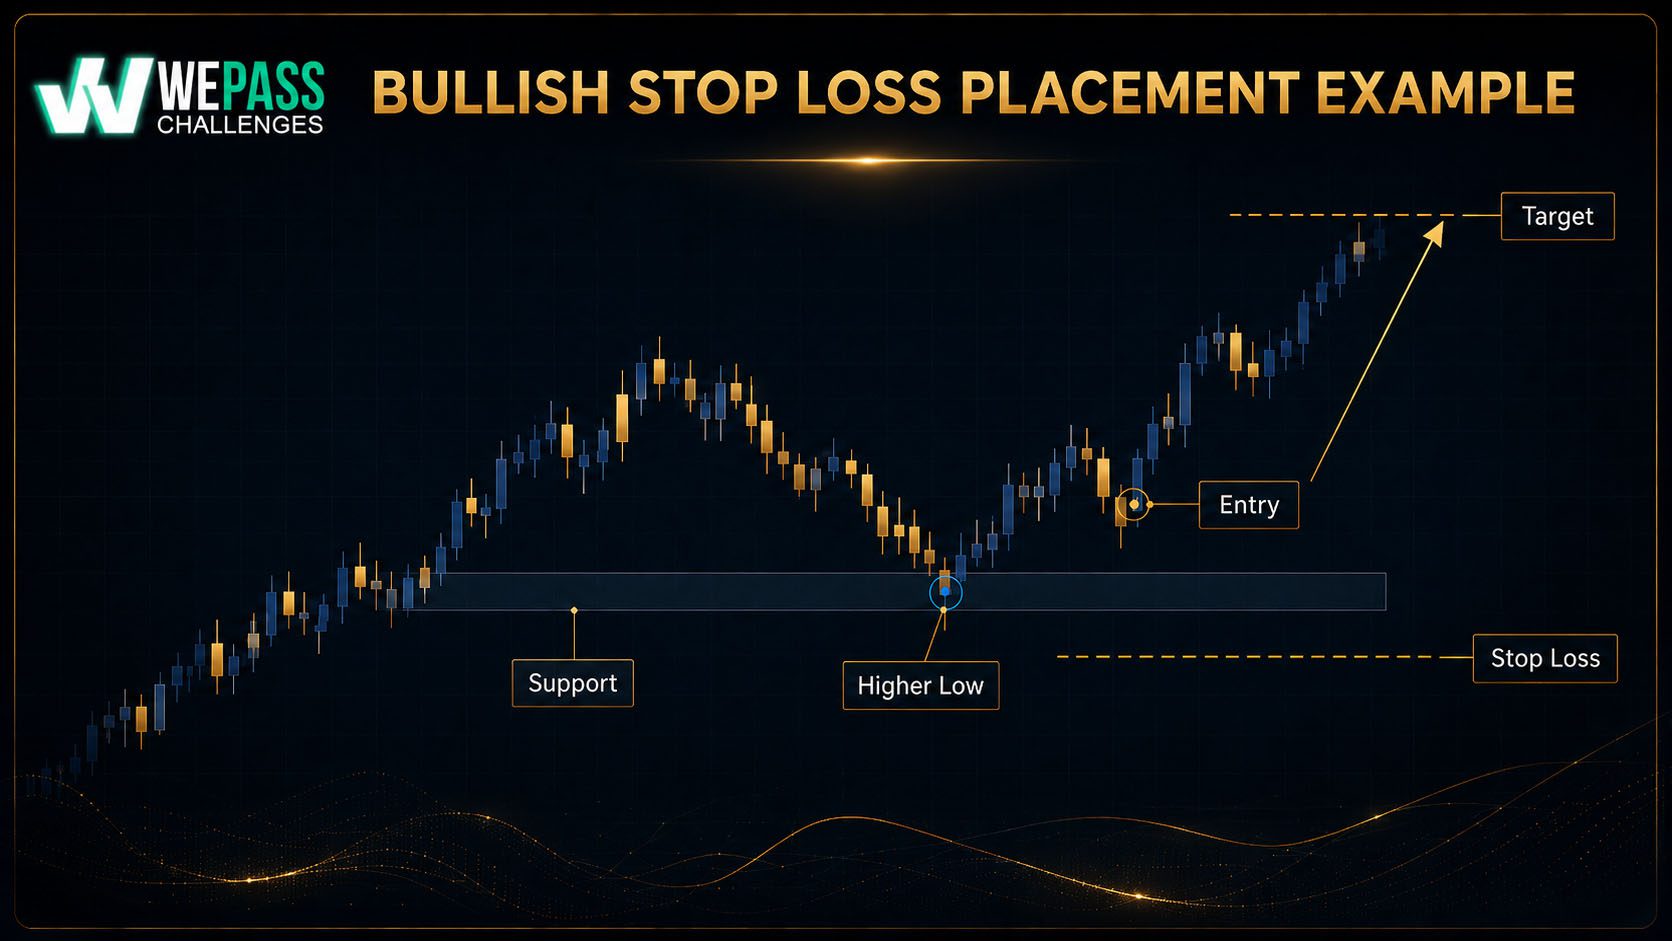
9. Bullish Stop Loss Example
Example: Buying a Higher-Low Pullback
Assume EURUSD is producing higher highs and higher lows on the one-hour chart. Price pulls back into a previously respected support area. On the 15-minute chart, a rejection candle forms, followed by a bullish structure break.
- Market context: Established bullish trend.
- Entry confirmation: Rejection plus bullish structure break.
- Entry: After the confirmation candle or controlled retest.
- Invalidation: Price decisively breaks below the protected higher low.
- Stop placement: Below the higher low and support zone with a small volatility buffer.
- Target: Previous high or next major resistance, provided reward remains acceptable.
Placing the stop directly below the entry candle would be too tight if the candle sits far above the protected higher low. Placing it far below multiple unrelated lows would be unnecessarily wide.
10. Bearish Stop Loss Example
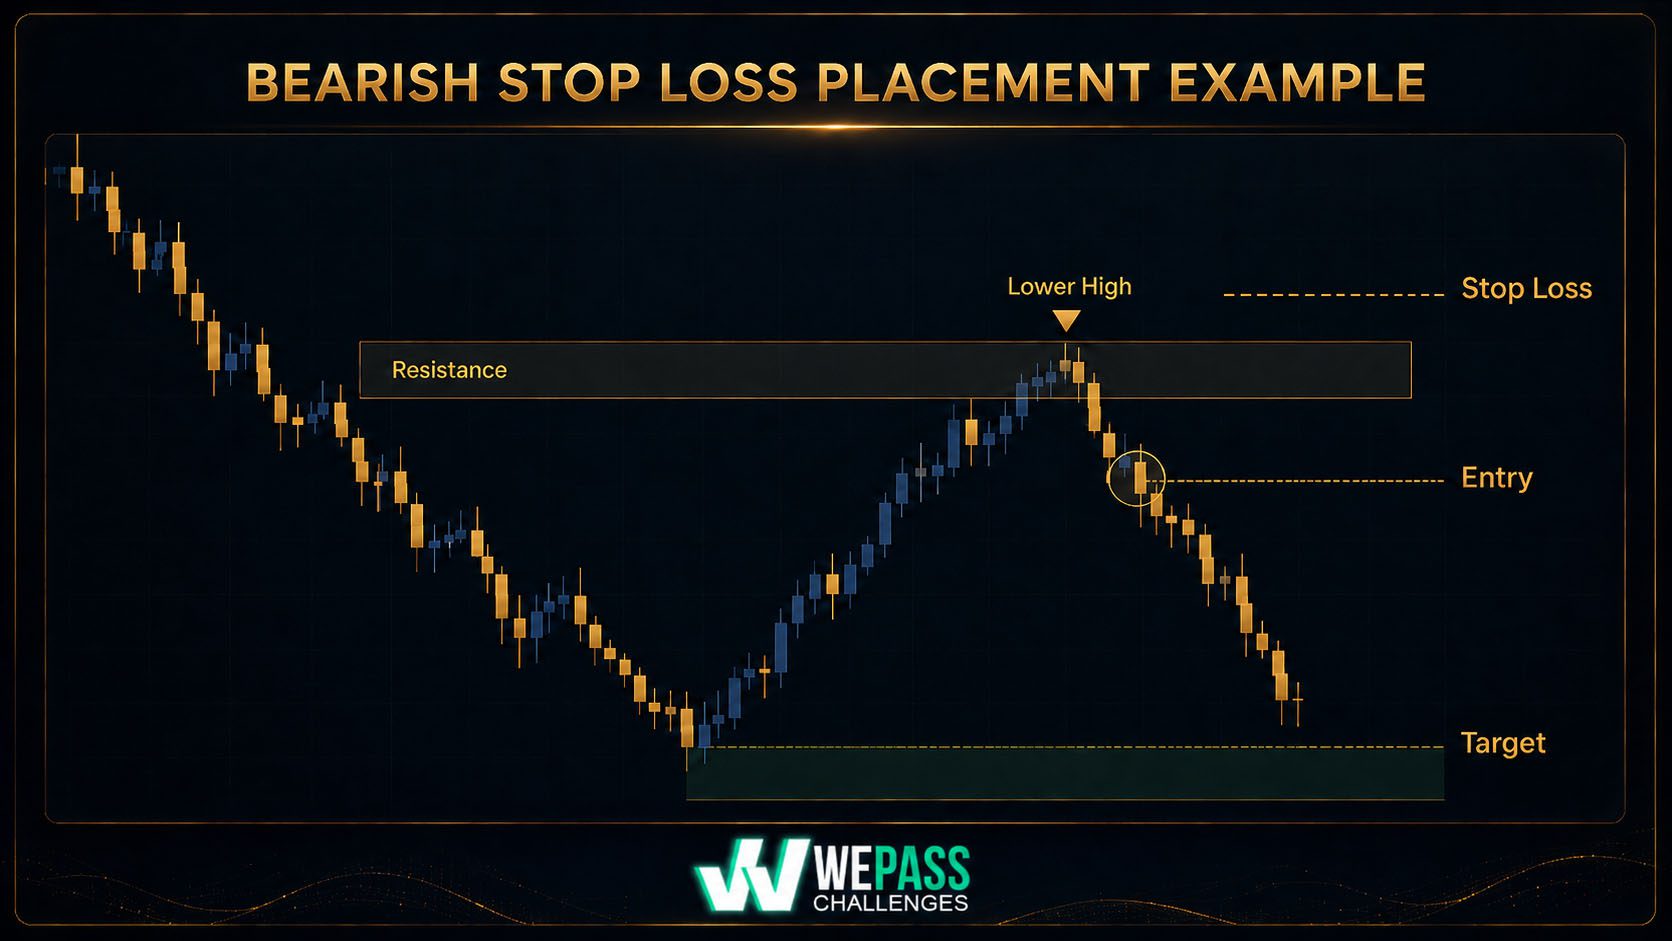
Example: Selling a Resistance Rejection
Assume price is trending lower and rallies back into a former support level that is now acting as resistance. A bearish engulfing candle forms, followed by a lower-timeframe break of structure.
- Market context: Bearish trend with lower highs and lower lows.
- Entry confirmation: Resistance rejection plus bearish structure break.
- Entry: On the break or retest according to the trading plan.
- Invalidation: Price breaks and holds above the lower high and resistance area.
- Stop placement: Above the lower high with enough room for spread and normal volatility.
- Target: Previous low or the next support zone.
The stop is connected to the structural level that keeps the bearish setup valid. If that level fails, there is no reason to continue holding the original short idea.
11. Stops for Breakouts, Retests, and Chart Patterns
Breakout Trades
A breakout stop is commonly placed back inside the broken structure, beyond the retest swing, or beyond the consolidation that produced the breakout. The exact location depends on whether the trader entered during the breakout or after a retest.
Chart Pattern Trades
For patterns such as double tops, double bottoms, triangles, flags, or head-and-shoulders formations, the stop should be placed where the pattern is invalidated. Do not blindly copy a textbook stop without considering nearby structure and current volatility.
Study Chart Patterns and the broader Technical Analysis Summary for additional context.
12. When Should You Move a Stop Loss?
A stop loss may be adjusted after the trade develops, but every adjustment must follow a predetermined rule. Moving a stop because you feel nervous is not trade management—it is emotional interference.
Move to Break-Even
This may be appropriate after price has moved sufficiently in your favor, completed a structural objective, or formed new protective structure.
Trail Behind Structure
In a long trade, the stop may trail below confirmed higher lows. In a short trade, it may trail above confirmed lower highs.
Reduce Risk
The stop can be tightened when market evidence supports the adjustment, not merely because the position temporarily shows profit.
Moving to Break-Even Too Early
Traders frequently move the stop to entry as soon as a trade becomes slightly profitable. Price then performs a normal retest, closes the position at break-even, and continues toward the original target.
Break-even is not automatically a safe location. It is simply your entry price, and the market does not care where you entered. The stop should be moved only when the trade has created a new logical protection level or your strategy specifically requires the adjustment.
13. Stop Loss Placement for Prop Firm Challenges
Prop firm traders must operate within strict daily and maximum drawdown limits. Poor stop placement can breach an account even when the general trade idea is reasonable.
Prop Firm Risk Considerations
- Know the exact daily drawdown and overall drawdown rules.
- Calculate total open risk across all positions.
- Account for commissions, spread, and possible slippage.
- Avoid stacking several correlated trades with separate stop losses.
- Reduce risk when volatility is abnormal.
- Do not widen stops after entering.
- Stop trading before the account approaches a hard loss limit.
Review Understanding Daily Drawdown, Maximum Drawdown Explained, and Common Rules That Get Traders Disqualified.
14. Common Stop Loss Mistakes
| Mistake | Why It Fails | Professional Correction |
|---|---|---|
| Using the same fixed-pip stop on every trade | Different instruments and market conditions have different volatility. | Base the stop on structure and current volatility. |
| Placing the stop according to desired lot size | The stop becomes disconnected from invalidation. | Choose the stop first, then calculate lot size. |
| Putting the stop exactly at support or resistance | Normal price tests can trigger the stop. | Place it beyond the full level with a justified buffer. |
| Removing the stop | A controlled loss can become catastrophic. | Accept the planned risk before entering. |
| Moving the stop farther away | It increases risk after the trade has already failed. | Never increase the original trade risk. |
| Moving to break-even immediately | Normal retracements can close a valid trade. | Wait for structural or strategy-based justification. |
| Ignoring economic news | Spread, volatility, and slippage can expand. | Follow the rules in When Not to Trade. |
| Entering too late | The logical stop may become too wide relative to the target. | Wait for a better entry or skip the trade. |
15. The Professional Stop Loss Process
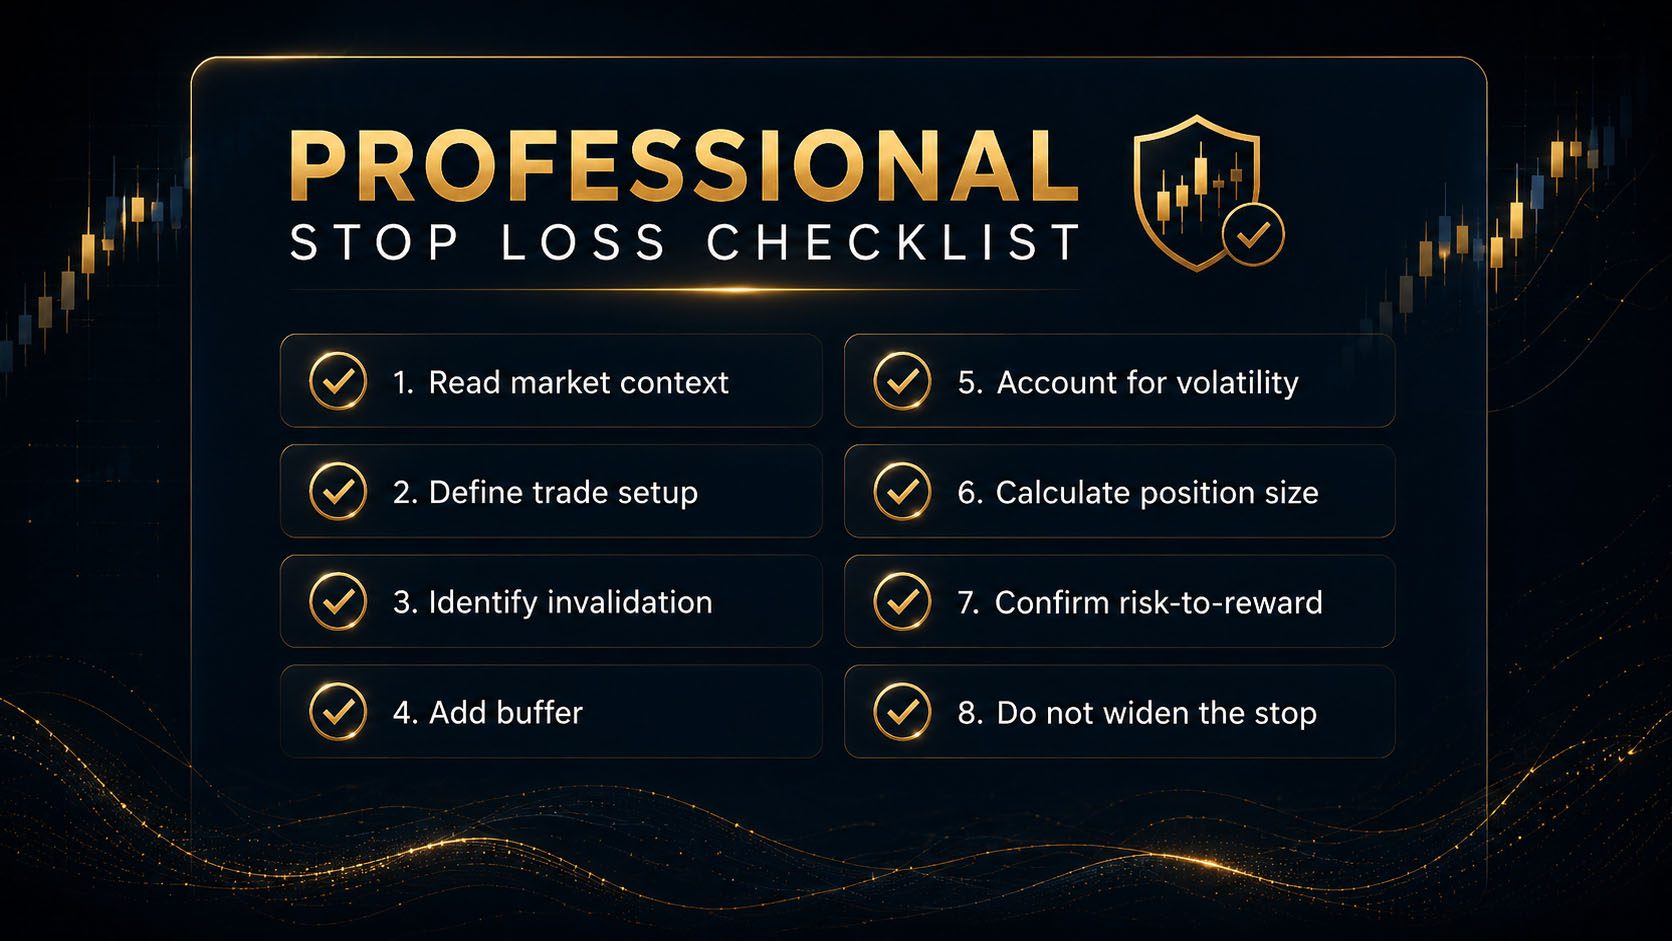
Read the Context
Determine trend, range, volatility, session, and higher-timeframe direction.
Define the Setup
Identify the structure, level, pattern, or condition supporting the trade.
Locate Invalidation
Find the exact level where the original trading idea becomes incorrect.
Add a Buffer
Allow appropriate room for spread, normal volatility, and liquidity testing.
Calculate Position Size
Reduce the lot size when the logical stop requires more distance.
Confirm Reward
Skip the trade if the realistic target does not justify the risk.
16. Stop Loss Placement Checklist
- I understand the higher-timeframe market context.
- I can clearly explain why this trade setup is valid.
- I have identified the exact invalidation level.
- My stop is beyond meaningful structure, not inside normal noise.
- I have considered spread and current volatility.
- I am not entering immediately before high-impact news.
- I calculated position size using the actual stop distance.
- The total cash risk is within my trading plan.
- The reward potential justifies the risk.
- The stop does not violate daily or maximum drawdown limits.
- I will not widen or remove the stop after entering.
- I know the exact rule that would allow me to trail or reduce risk.
Frequently Asked Questions
How many pips should my stop loss be?
There is no universal pip distance. The stop should be placed beyond the setup’s invalidation point. The required distance will vary by instrument, timeframe, market structure, and volatility.
Should I always place a stop below the previous candle?
No. The previous candle may not represent meaningful structure. Use the candle’s high or low only when that candle defines the setup and invalidation.
Why does price hit my stop and then reverse?
Your stop may be placed at an obvious liquidity level, inside normal volatility, or too close to the entry. It is also possible that the setup temporarily failed before conditions changed. One isolated example does not prove that a stop should have been removed.
Should I use mental stops instead of actual stop orders?
Most traders should use an actual protective order. Mental stops require exceptional discipline and expose the trader to hesitation, platform interruption, sudden volatility, and emotional decision-making.
Is a wider stop safer?
Not automatically. A wider stop may survive more volatility, but it can also remain open long after the setup has failed. The correct stop is the logical invalidation level combined with appropriate position sizing.
When should I move my stop to break-even?
Move it according to a tested strategy rule, such as after a structural objective is reached, a new swing protects the position, or a specific profit threshold is achieved. Avoid moving it merely because the trade is slightly profitable.
Can I trade without a stop loss?
Trading without a defined exit exposes the account to uncontrolled risk. This is especially dangerous in leveraged forex trading and prop firm challenges with strict drawdown limits.
Knowledge Check Quiz
1. What should primarily determine a stop loss location?
2. Why is a small buffer sometimes placed beyond structure?
3. What should happen when a logical stop is wider than usual?
4. Which action usually violates professional risk management?
5. Why can moving to break-even too quickly be harmful?
6. Where is a common stop location for a bullish higher-low setup?
Quiz Answer Key
Question 1 Answer
C. The stop belongs where the market proves the trade idea invalid.
Question 2 Answer
B. A reasonable buffer helps account for spread, ordinary volatility, and liquidity testing around obvious levels.
Question 3 Answer
C. Position size should be reduced so the total cash risk remains within the trading plan.
Question 4 Answer
C. Moving the stop farther away increases the original risk and allows a failed setup to produce a larger loss.
Question 5 Answer
B. Price may perform a normal retracement to the entry area before continuing toward the target.
Question 6 Answer
C. The stop is commonly placed beneath the protected higher low and the structure that keeps the bullish setup valid.
What You Must Remember
- A stop loss defines where the trade idea becomes invalid.
- Market structure should determine the stop before position size is calculated.
- A valid buffer can protect against spread, volatility, and normal liquidity tests.
- Tight stops are not automatically efficient, and wide stops are not automatically safe.
- Never widen or remove a stop to avoid accepting a planned loss.
- Break-even and trailing adjustments should follow tested rules.
- Prop firm traders must account for total open risk and drawdown limits.
- Skipping a trade is better than forcing an illogical stop placement.
Lesson Summary
Professional stop loss placement begins with understanding why the trade is valid. Once you identify the market structure, support, resistance, confirmation, or pattern supporting the setup, you can define the price level that would invalidate it.
The stop should be placed beyond that invalidation level with enough room for spread and normal market movement. After the stop distance is measured, position size must be adjusted so the total financial risk remains within your trading plan.
A stop loss should never be moved farther away because a trader is unwilling to accept a loss. Losses are a normal operating expense in trading. Your responsibility is not to avoid every losing trade; it is to keep each loss controlled and prevent one position from causing major account damage.
The next lesson will connect stop loss placement with profit targets, partial profits, break-even rules, and active trade management.