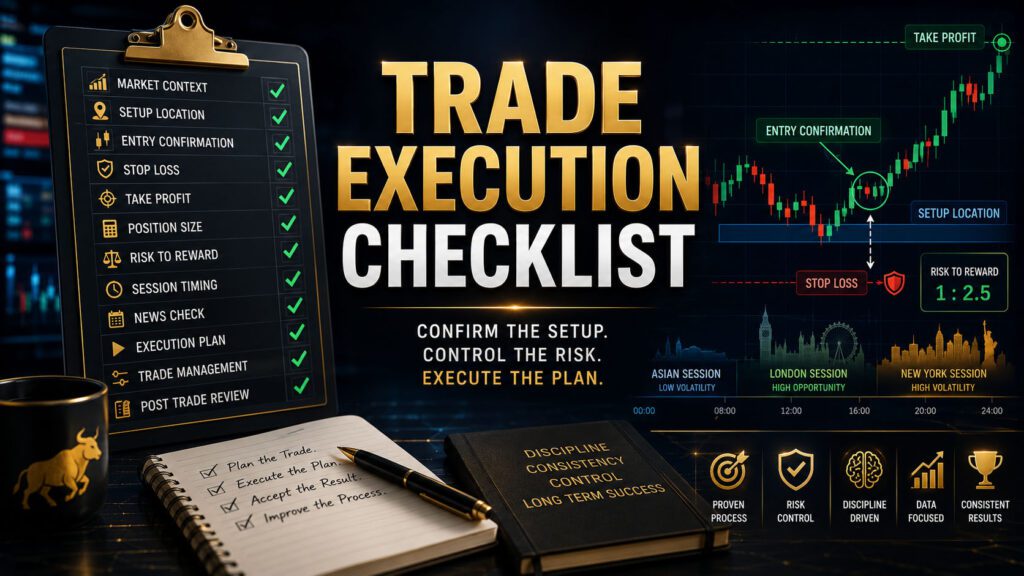
Trade Execution Checklist & Module Summary
Bring market context, confirmation, stop loss placement, profit targets, session timing, strategy rules, and testing together into one disciplined execution process.
Execution Is Where Trading Knowledge Becomes a Result
You can understand market structure, identify support and resistance, recognize candlestick patterns, calculate position size, and build a tested strategy. None of that matters if you abandon the process when it is time to place the trade.
Trade execution is the moment when analysis, risk management, timing, and discipline must operate together. A trader who skips one critical step may turn a high-quality setup into an avoidable loss. A trader who follows the complete process can execute calmly because every major decision has already been made.
The purpose of a trade execution checklist is not to make trading complicated. It is to prevent important decisions from being forgotten under pressure. Pilots, surgeons, engineers, and professional teams use checklists because even experienced people make mistakes when speed, stress, and uncertainty increase.
This final lesson combines everything from Building a Trade Setup, Entry Confirmation, Stop Loss Placement, Take Profit & Trade Management, Trading Sessions & Timing, Building Your First Trading Strategy, and Backtesting & Forward Testing.
Learning Objectives
- Understand why checklists improve trading discipline.
- Complete a structured pre-market preparation process.
- Confirm market context before looking for an entry.
- Verify setup location and entry confirmation.
- Calculate risk and position size before execution.
- Confirm stop loss and profit target placement.
- Check session timing, spreads, news, and volatility.
- Manage an open trade without emotional improvisation.
- Complete a professional post-trade review.
- Summarize and apply every lesson from Module 6.
1. Why Professional Traders Use Checklists
They Reduce Emotional Decisions
A checklist forces the trader to answer objective questions before fear, greed, or excitement controls the entry.
They Protect Against Forgetfulness
Important details such as news, spread, drawdown, and position size can be missed when a chart begins moving quickly.
They Create Repeatable Data
When every trade follows the same process, results become easier to measure, compare, and improve.
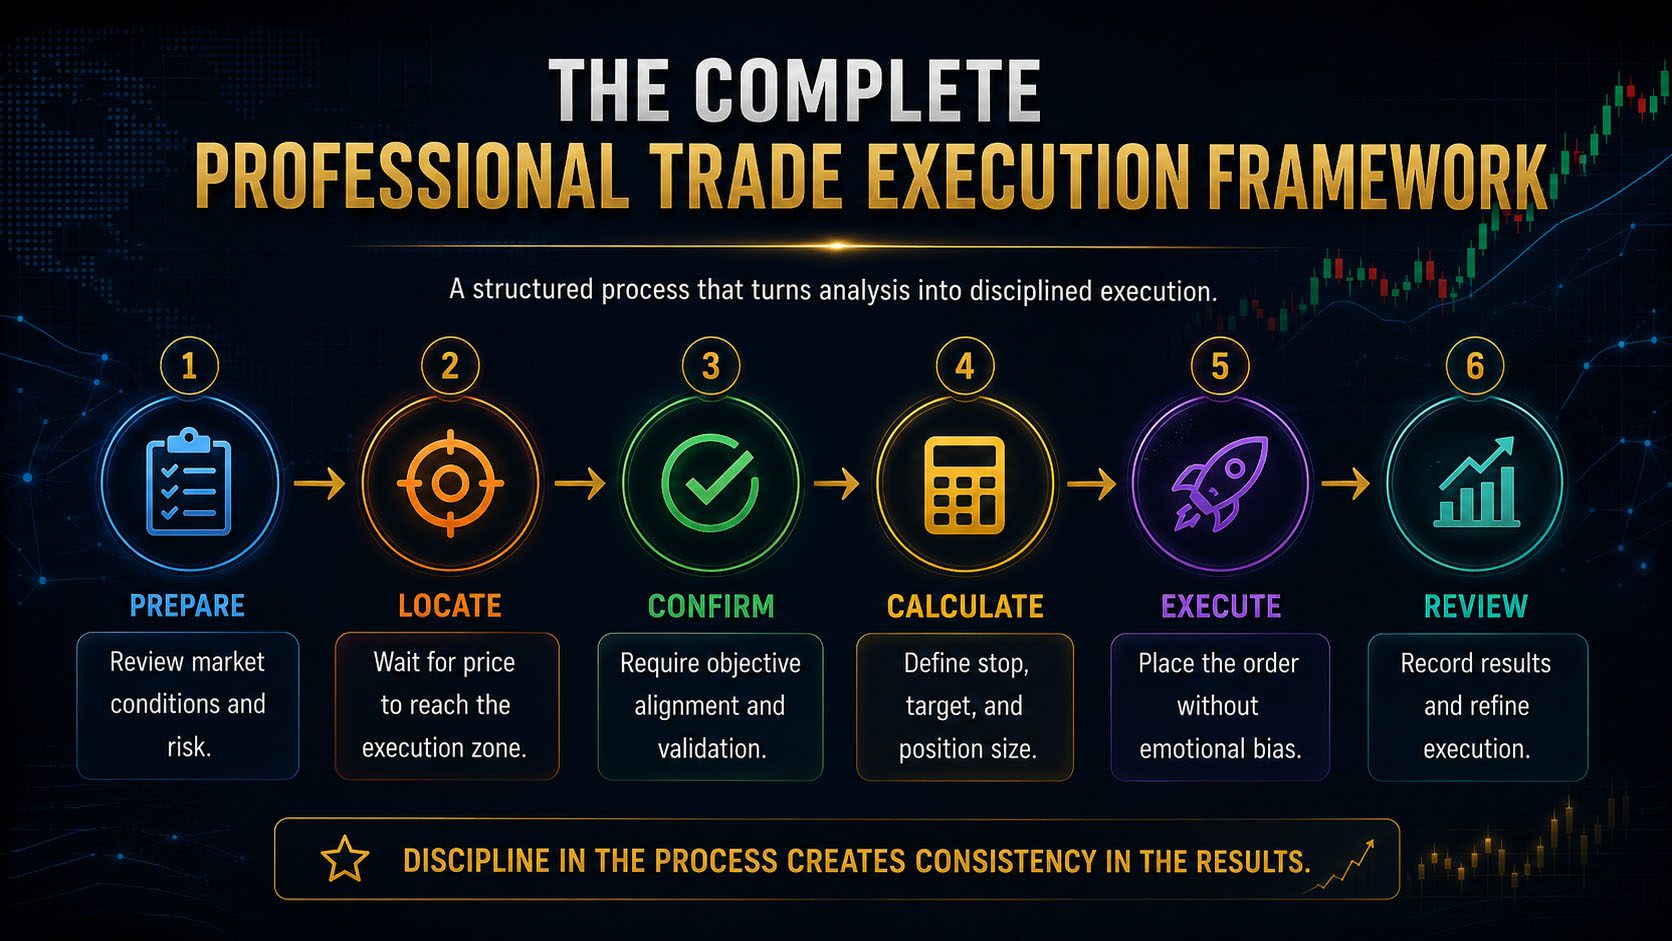
2. The Six Stages of Professional Trade Execution
3. Stage One: Pre-Market Preparation
Prepare the Environment Before Price Starts Moving
Professional execution begins before the setup appears. You should know the market environment, trading schedule, economic risks, and account limits before considering an order.
Pre-Market Preparation Checklist
- I reviewed the higher-timeframe trend and structure.
- I marked major support and resistance.
- I identified previous session highs and lows.
- I marked important liquidity areas.
- I checked the economic calendar.
- I know when high-impact news is scheduled.
- I confirmed the active trading session.
- I know the exact time my trading window ends.
- I reviewed my current daily profit or loss.
- I calculated the remaining daily risk allowance.
- I reviewed open positions and correlated exposure.
- I am mentally focused and able to follow the plan.
Review Market Context, Multi-Timeframe Analysis, and Trading Sessions & Timing.
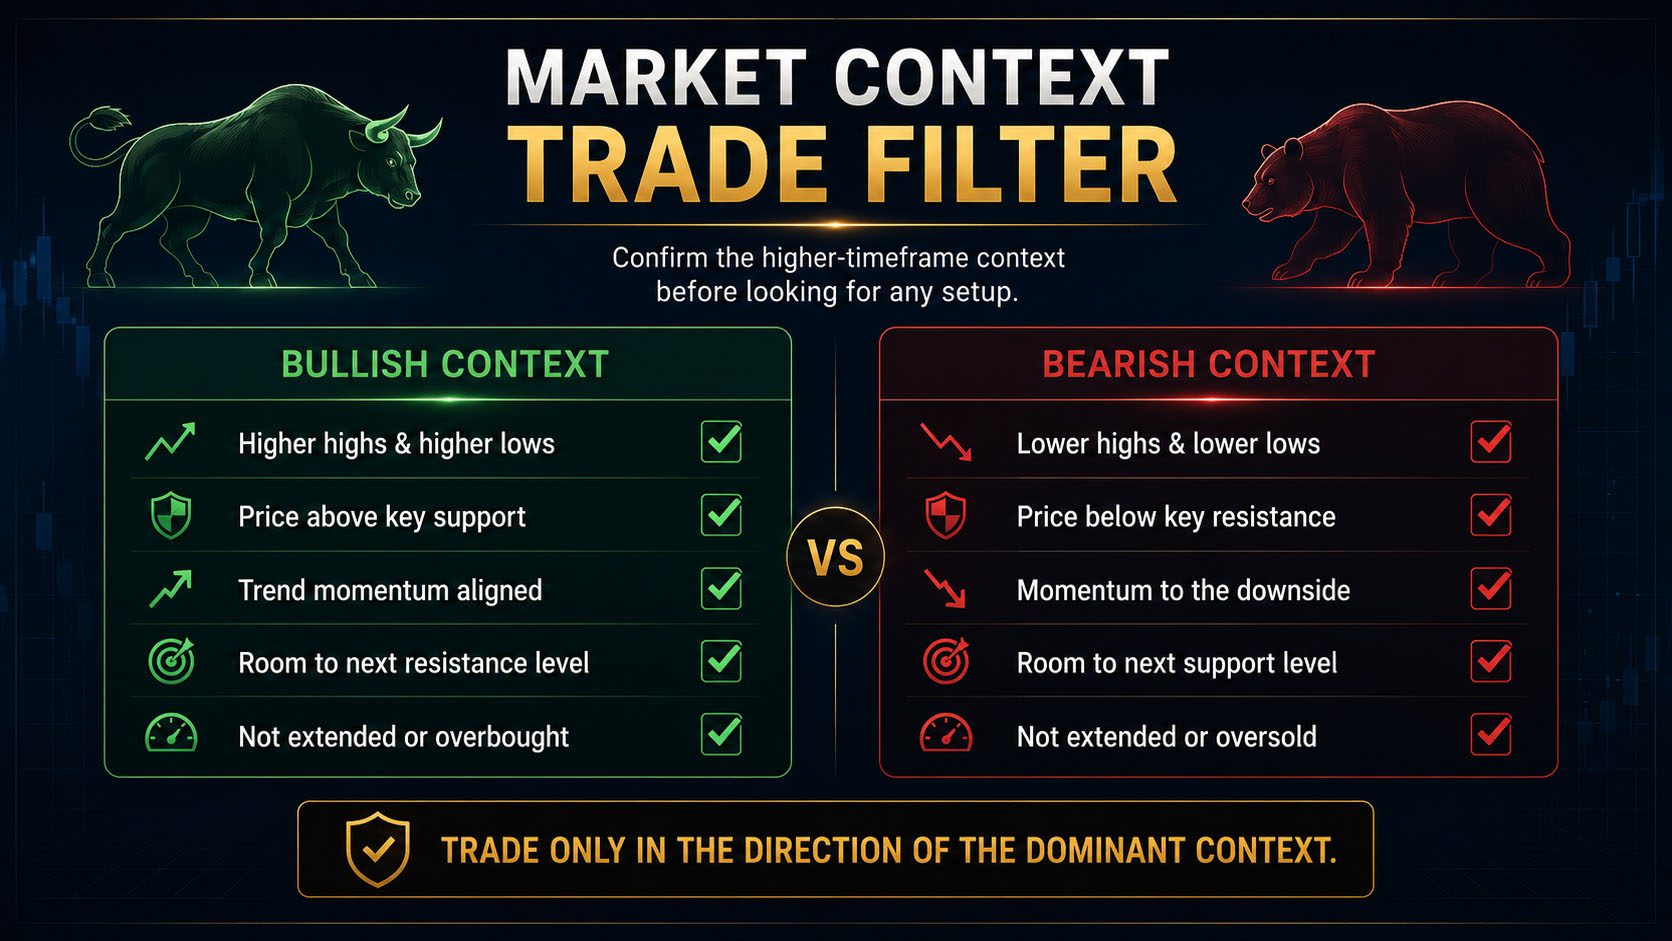
4. Stage Two: Confirm Market Context
Bullish Context Questions
- Is the higher timeframe forming higher highs and higher lows?
- Is price above a major support area?
- Is the trade aligned with the dominant trend?
- Is there room before the next major resistance?
- Has price already completed an extended move?
Bearish Context Questions
- Is the higher timeframe forming lower highs and lower lows?
- Is price below a major resistance area?
- Is bearish momentum supported by structure?
- Is there room before the next major support?
- Is the market already oversold or extended?
Review Understanding Market Structure and Technical Analysis Summary.
5. Stage Three: Confirm the Setup Location
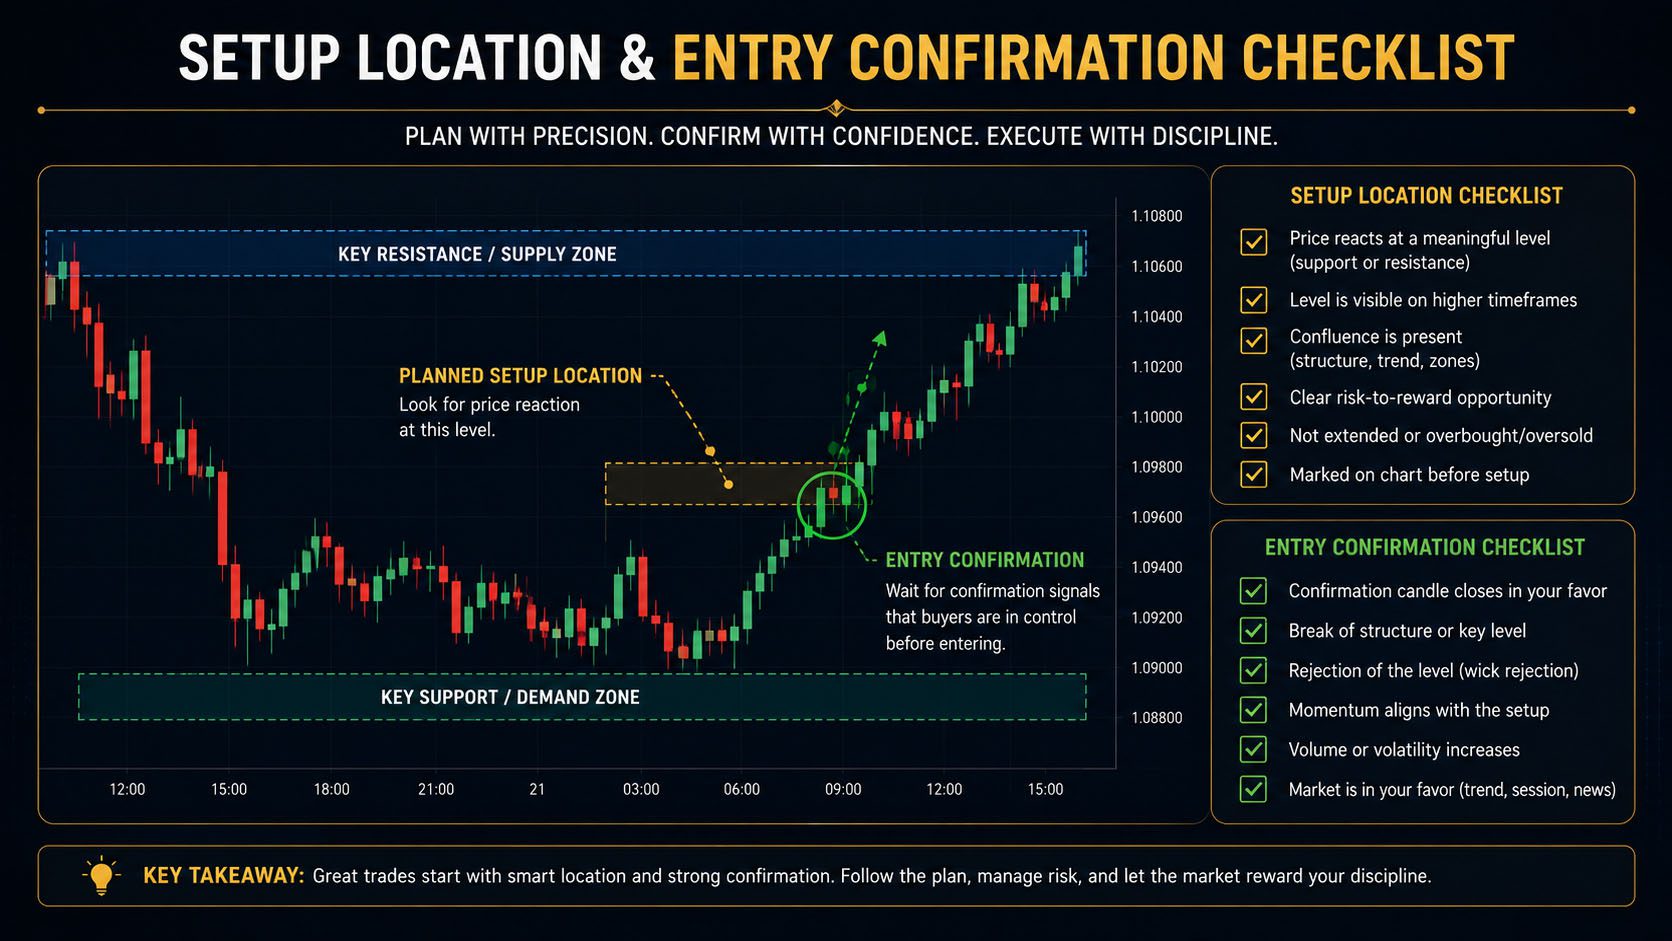
A valid trade begins at a meaningful location. Before searching for confirmation, verify that price has reached the area defined by your strategy.
Possible Setup Locations
- Higher-timeframe support or resistance.
- Previous breakout level.
- Protected swing high or swing low.
- Trendline or channel boundary.
- Asian session high or low.
- Previous day high or low.
- Liquidity sweep area.
- Chart-pattern breakout or retest.
Location Checklist
- Price is at a level identified before the setup formed.
- The level is visible on the strategy’s required timeframe.
- The level has not been tested too many times.
- The setup is not forming in the middle of random price action.
- The next opposing level leaves enough profit potential.
- The trade is not being chased after price moved away from the area.
Review Support and Resistance Trading Strategy, Trendlines & Channels, and Chart Patterns.
6. Stage Four: Require Entry Confirmation
Once price reaches the setup area, wait for the market to demonstrate that the expected move may be beginning. Confirmation protects you from entering only because price touched a level.
Possible Entry Confirmations
- Strong rejection candle.
- Bullish or bearish engulfing candle.
- Lower-timeframe structure break.
- Breakout and successful retest.
- Momentum expansion after consolidation.
- Multiple timeframe alignment.
- Liquidity sweep followed by rejection.
Confirmation Checklist
- The confirmation candle has closed.
- The signal occurred at the planned setup location.
- The confirmation supports the higher-timeframe direction.
- Structure has shifted or held as required.
- The entry is not based on one wick alone.
- The market has not already moved too far from the stop location.
- The entry still provides acceptable risk-to-reward.
Review Entry Confirmation and Candlestick Patterns.
7. Stage Five: Define the Stop Loss Before Entry
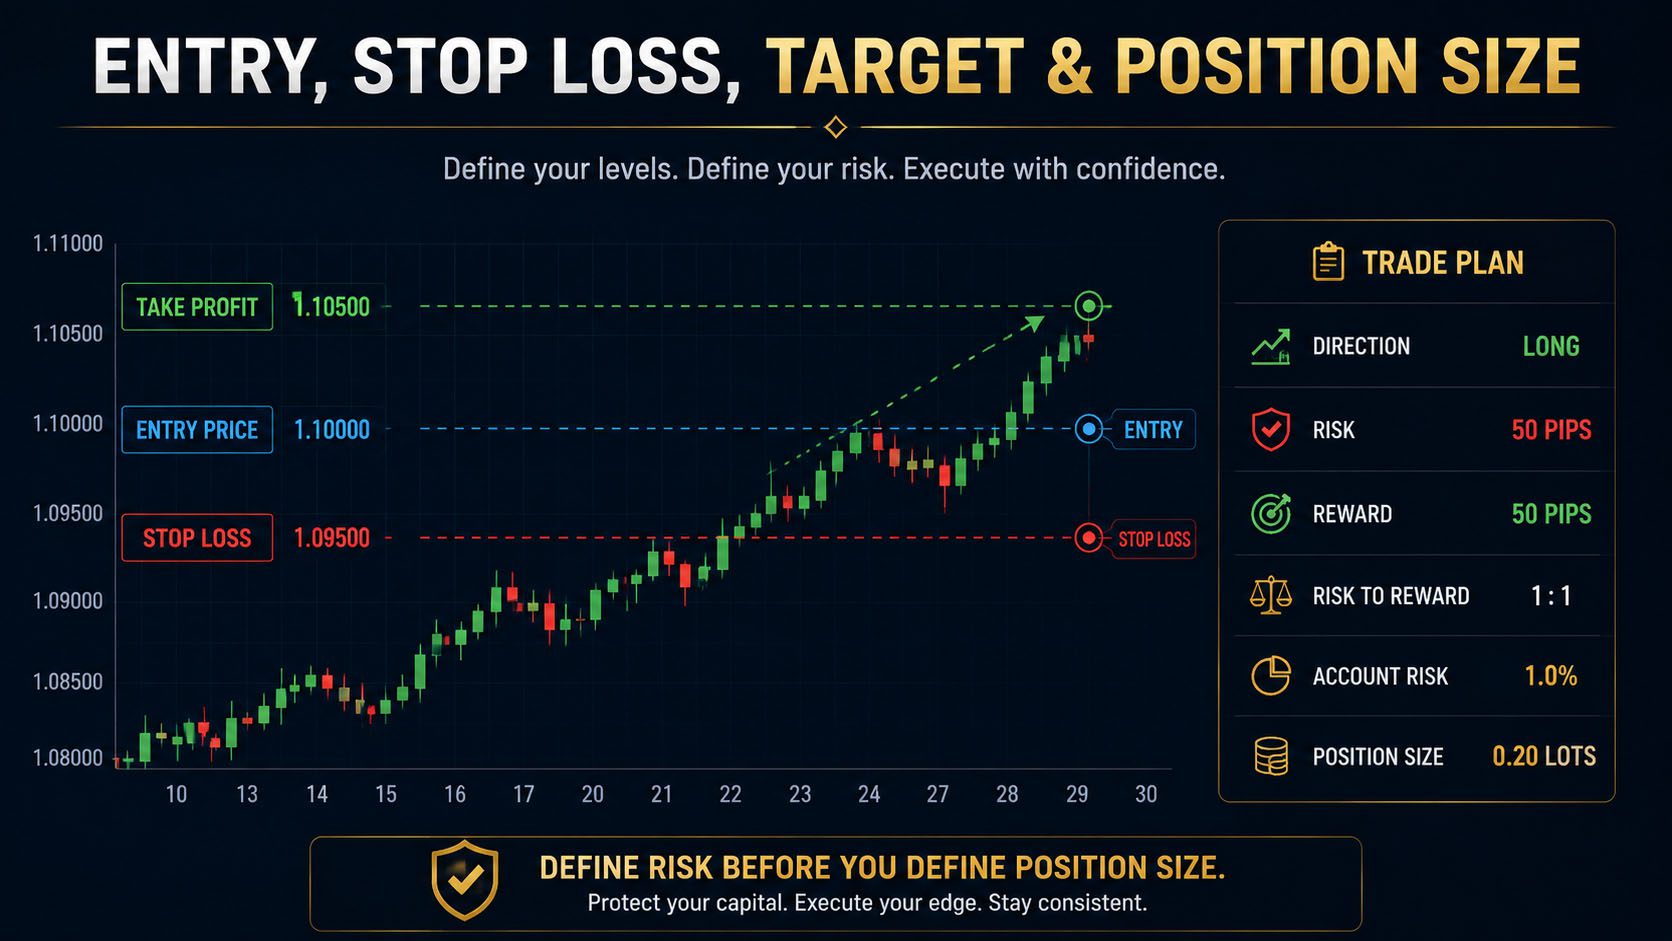
The stop loss should be placed at the price level that proves the trade idea is wrong. This decision must happen before position size is calculated.
Stop Loss Checklist
- The stop is beyond the structural invalidation point.
- The stop is not based only on a random pip distance.
- The stop includes a reasonable spread or volatility buffer.
- The stop is not directly on an obvious high or low without protection.
- The stop distance is appropriate for the instrument and timeframe.
- I will not widen the stop after entering.
- I will skip the trade if the logical stop creates excessive risk.
Review Stop Loss Placement.
8. Stage Six: Define the Profit Target
The profit target must be based on a realistic market destination. It should be selected before entering so that the reward can be compared with the risk.
Profit Target Checklist
- The target is based on market structure.
- The target is placed near a previous high, low, support, or resistance.
- The target is not based on the money I want to earn.
- The target offers acceptable risk-to-reward.
- The target is not placed beyond several major obstacles without evidence.
- I know whether I will close the full position or take partial profits.
- I know the exact rule for trailing the stop.
- I will not extend the target because of greed.
Review Take Profit & Trade Management and Risk-to-Reward Trading.
9. Calculate Position Size
Once the entry and stop loss are defined, calculate the position size that keeps the maximum loss within your account risk limit.
Position Size Checklist
- I know the exact percentage or cash amount being risked.
- I measured the entry-to-stop distance accurately.
- I used the correct pip or point value.
- I accounted for spread and commission.
- I checked whether other positions create correlated exposure.
- The total account risk remains below my daily limit.
- I did not increase size because the setup looks unusually strong.
Review Position Sizing Made Simple.
10. Session, News and Execution Quality
A technically valid setup may still be disqualified by poor timing or unstable execution conditions.
Timing and Execution Checklist
- The setup formed during my approved trading session.
- The instrument is normally active during this period.
- No major economic release is approaching.
- I am not entering immediately before the 8:30 AM Eastern news window.
- The spread is within normal limits.
- The market is not in rollover.
- The setup did not form during a major holiday or extremely quiet period.
- The expected reward remains realistic after spread and slippage.
- I am not entering late because I missed the original signal.
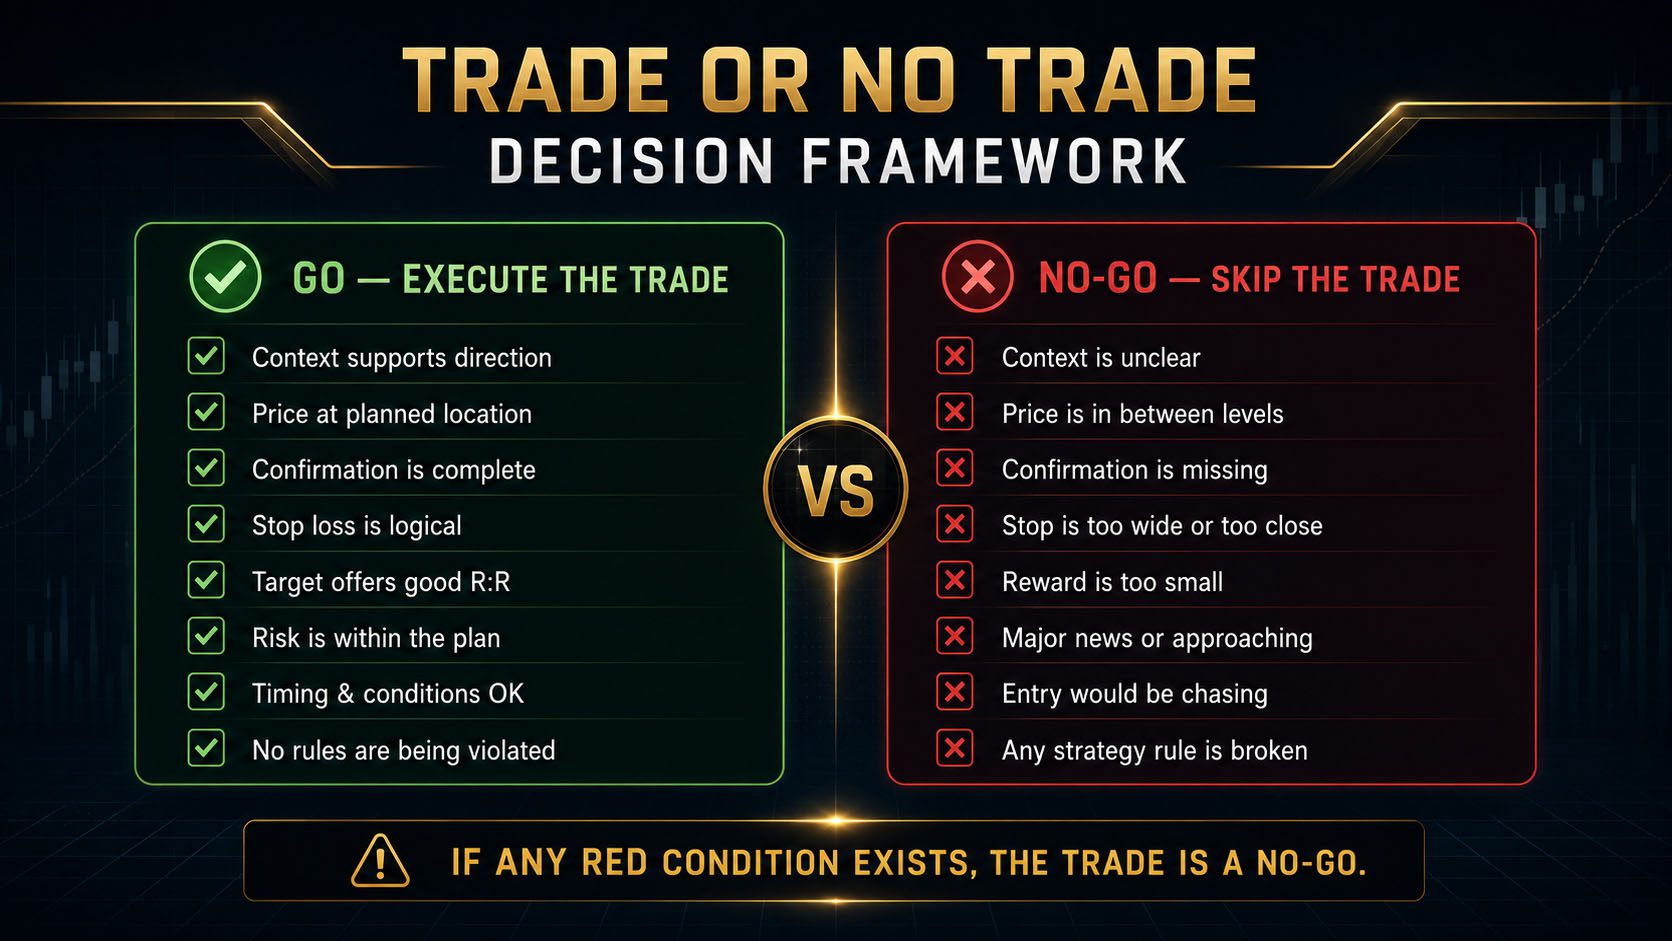
11. The Final Go or No-Go Decision
GO — Execute the Trade
- Context supports the direction.
- Price reached the planned location.
- Confirmation is complete.
- Stop loss is logical.
- Target is realistic.
- Risk is calculated correctly.
- Timing and spread are acceptable.
- No strategy rule is being broken.
NO-GO — Skip the Trade
- Market structure is unclear.
- Price is between important levels.
- Confirmation is incomplete.
- The stop is too wide or too close.
- The reward is too small.
- Major news is approaching.
- The entry would require chasing.
- You are trying to justify a broken rule.
12. Placing the Order Correctly
Order Placement Checklist
- The correct instrument is selected.
- The trade direction is correct.
- The order type matches the strategy.
- The lot size is correct.
- The entry price is correct.
- The stop loss is entered immediately.
- The take profit is entered immediately.
- The order has not been duplicated accidentally.
- The total exposure remains within the risk plan.
- I reviewed the full order before confirming.
13. The Professional Trade Ticket
Complete This Before Every Trade
14. Managing the Open Trade
After the order is placed, your job is to follow the management plan. The analysis phase is over. Constantly inventing new decisions usually makes the result worse.
Open Trade Checklist
- I will not widen the stop loss.
- I will not add risk because the trade moved against me.
- I will not move to break-even before the strategy allows it.
- I will not close because of one temporary pullback.
- I will not extend the target because of greed.
- I will follow the predetermined partial-profit rule.
- I will trail only behind confirmed structure.
- I will monitor total account exposure.
- I will not open unnecessary correlated trades.
- I will accept the planned loss if the stop is reached.
15. When an Early Exit Is Justified
| Situation | Possible Response | Reason |
|---|---|---|
| Clear opposite structure break | Reduce or close exposure | The original setup may no longer be valid. |
| Unexpected major news | Follow emergency risk rules | Normal market conditions may disappear. |
| Order placed by mistake | Close immediately | An accidental trade has no strategic justification. |
| Daily risk limit threatened | Reduce or close according to plan | Account survival takes priority. |
| Strong rejection at final target | Secure planned profit | Opposing pressure has entered at the intended objective. |
| One opposite candle | Usually no action | One candle does not automatically invalidate structure. |
16. Post-Trade Review
Every trade should produce information, whether it wins or loses. A post-trade review separates market outcomes from execution quality.
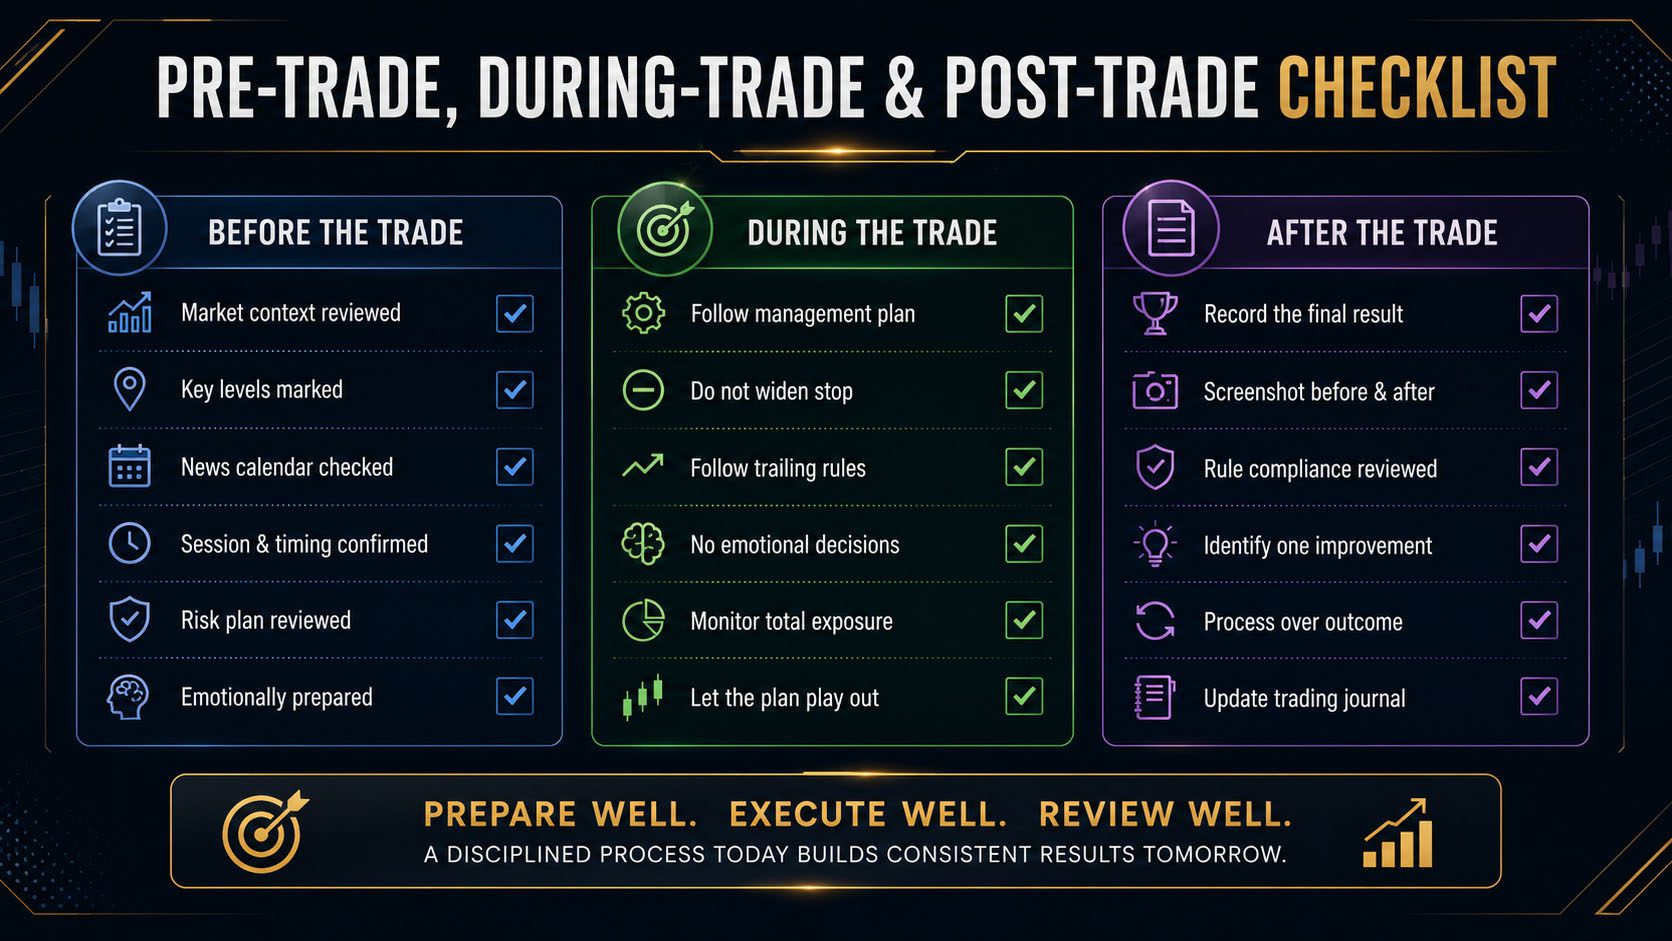
Post-Trade Checklist
- I recorded the final result in money, percentage, and R.
- I saved a screenshot before entry.
- I saved a screenshot after the trade closed.
- I recorded whether every strategy rule was followed.
- I identified any emotional decision.
- I separated a valid strategy loss from an execution mistake.
- I recorded spread, slippage, and news conditions.
- I noted whether the target and stop behaved as expected.
- I identified one lesson without rewriting the strategy immediately.
- I updated the strategy journal.
17. Process Score vs Trade Result
High-Quality Losing Trade
- Every rule was followed.
- Risk was controlled.
- The setup was valid.
- The market invalidated the idea.
- The trade receives a strong process score.
Low-Quality Winning Trade
- The entry was chased.
- Risk was too high.
- Confirmation was missing.
- The market happened to move favorably.
- The trade receives a poor process score.
18. Common Execution Mistakes
| Mistake | What Usually Causes It | Professional Correction |
|---|---|---|
| Entering before confirmation | Fear of missing out | Wait for the required candle or structure close. |
| Chasing price | Missing the planned entry | Wait for a retest or skip the trade. |
| Oversized position | Overconfidence or recovery pressure | Calculate size from fixed risk. |
| Moving the stop wider | Refusal to accept the loss | Respect the original invalidation. |
| Closing too early | Fear of losing open profit | Follow the tested management rule. |
| Extending the target | Greed | Take profit at the planned objective. |
| Trading before news | Ignoring the calendar | Complete the timing checklist first. |
| Overtrading after a loss | Revenge and urgency | Stop when the daily limit is reached. |
| Changing strategy mid-trade | Emotional discomfort | Make strategy changes only during review. |
19. Prop Firm Execution Checklist
Prop firm accounts require an additional rule check before every trade. A technically valid trade may still violate the firm’s trading conditions.
- I know the current daily drawdown allowance.
- I know the current maximum drawdown allowance.
- I confirmed whether drawdown is based on balance or equity.
- I checked whether the drawdown is static or trailing.
- I reviewed news-trading restrictions.
- I reviewed weekend-holding restrictions.
- I checked consistency requirements.
- I checked maximum position-size restrictions.
- I calculated total exposure across all positions.
- I am not risking the account to complete the challenge quickly.
- I will stop before reaching the firm’s official limit.
Review Understanding Daily Drawdown, Maximum Drawdown Explained, and Common Rules That Get Traders Disqualified.
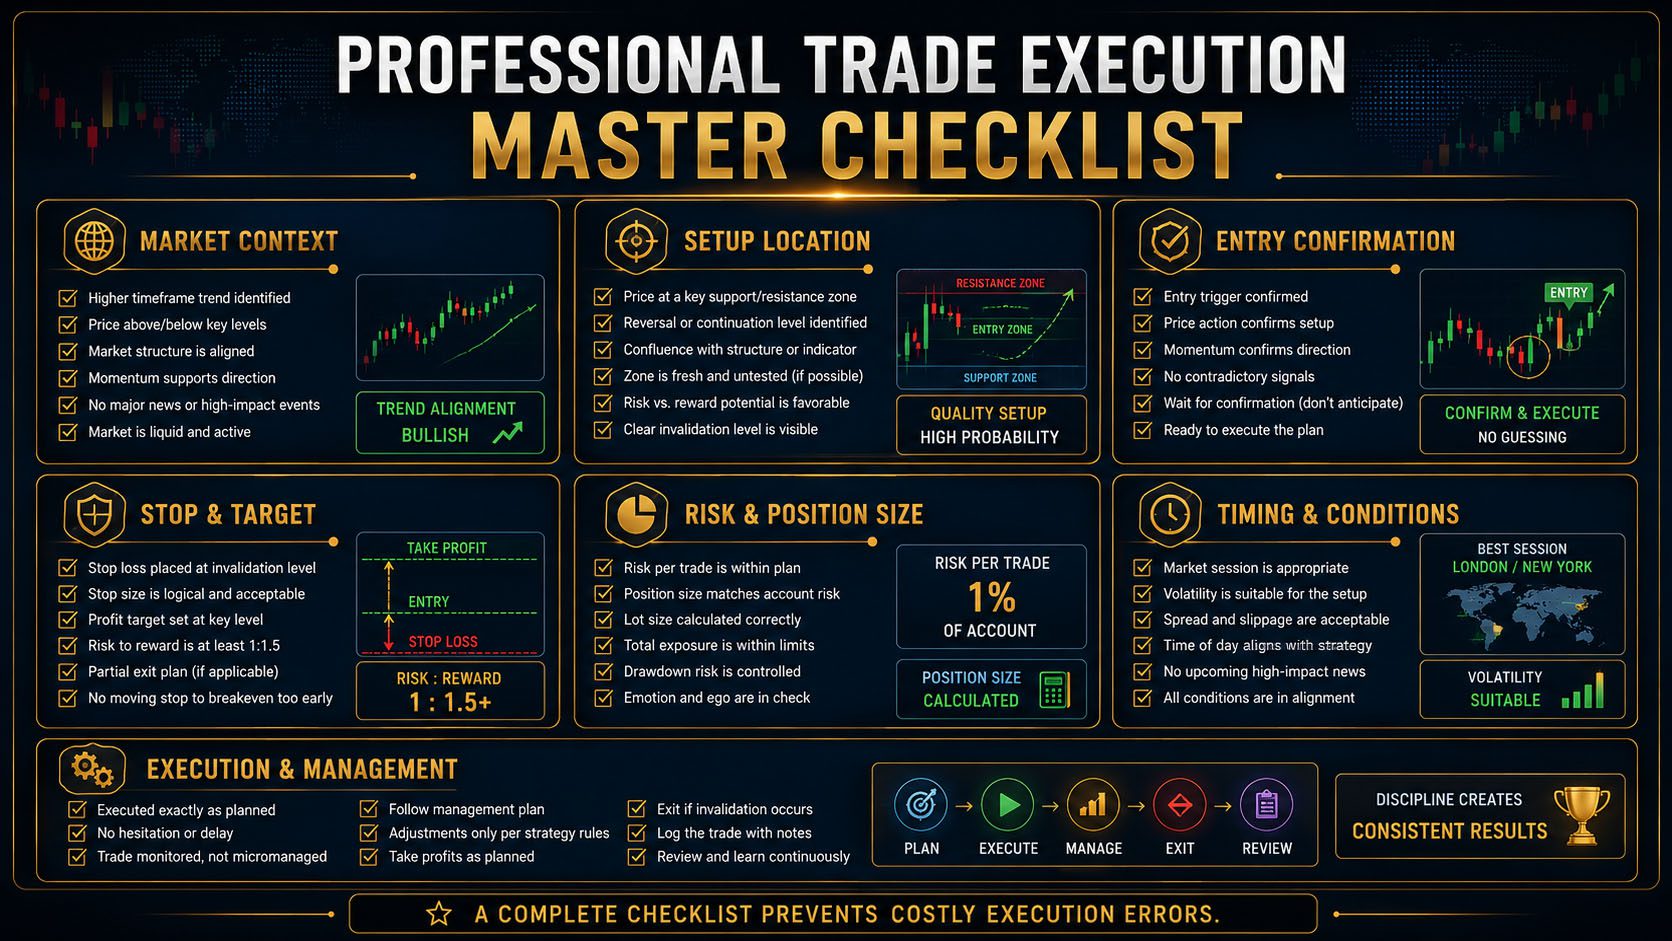
20. The Complete Trade Execution Checklist
Market Context
- The higher-timeframe trend or range is clear.
- Major support and resistance are marked.
- The trade direction aligns with the strategy.
- There is enough room before the next opposing level.
Setup Location
- Price reached a level defined before the setup formed.
- The setup is not in the middle of random price action.
- The entry has not moved too far from the level.
Entry Confirmation
- The required confirmation has closed.
- Structure supports the intended direction.
- Confirmation occurred at the correct location.
Stop Loss and Target
- The stop is beyond invalidation.
- The target is based on realistic structure.
- The setup offers acceptable risk-to-reward.
Risk and Position Size
- Risk per trade is within the plan.
- Position size was calculated correctly.
- Total account exposure is acceptable.
- Daily loss limits remain protected.
Timing and Market Conditions
- The trade is inside the approved session.
- No major news is approaching.
- Spread and liquidity are acceptable.
- The trade is not being chased.
Execution and Management
- The correct instrument and direction are selected.
- The stop and target are attached to the order.
- The management plan is defined.
- No strategy rule is being ignored.
Final Question
21. Module 6 Review: Building a Trade Setup
Lesson 1 explained that a complete setup requires more than a directional opinion. You learned to combine market context, location, confirmation, stop loss, target, timing, and risk into one structured plan.
- Start with market context.
- Identify a meaningful setup location.
- Wait for confirmation.
- Define invalidation.
- Confirm realistic reward.
- Control risk before execution.
22. Module 6 Review: Entry Confirmation
Lesson 2 explained how confirmation improves entry timing. You learned that candlestick rejection, engulfing candles, structure breaks, momentum, retests, and multi-timeframe alignment must occur at a meaningful location.
- Location comes before confirmation.
- Wait for candles to close.
- Use structure to confirm direction.
- Avoid entering from one wick alone.
- Do not chase late confirmation.
23. Module 6 Review: Stop Loss Placement
Lesson 3 explained that the stop loss belongs beyond the level that invalidates the setup. The stop should follow structure, volatility, spread, and strategy logic—not a random cash amount.
- Place stops beyond invalidation.
- Account for spread and volatility.
- Do not widen stops after entry.
- Calculate position size after defining the stop.
- Skip trades with unacceptable stop distance.
24. Module 6 Review: Take Profit & Trade Management
Lesson 4 explained how to place realistic profit targets and manage winning trades without emotional interference.
- Choose targets from market structure.
- Define management before entry.
- Use partial profits consistently.
- Move to break-even only when rules allow it.
- Trail stops behind confirmed structure.
- Do not extend targets from greed.
25. Module 6 Review: Trading Sessions & Timing
Lesson 5 explained that the quality of a setup changes with liquidity, volatility, spreads, news, and session participation.
- Focus on London and New York conditions.
- Mark Asian session highs and lows.
- Understand the London–New York overlap.
- Avoid entering immediately before major news.
- Be cautious around 8:30 AM Eastern releases.
- Stop trading when the planned window closes.
26. Module 6 Review: Building Your First Strategy
Lesson 6 turned individual trading concepts into a complete rule-based strategy.
- Choose a small market list.
- Give every timeframe a purpose.
- Define the market context.
- Define setup and confirmation rules.
- Define stop, target, and risk rules.
- Create no-trade conditions.
- Keep the strategy simple and objective.
27. Module 6 Review: Backtesting & Forward Testing
Lesson 7 explained how to test a strategy with historical and new market data before depending on it with meaningful capital.
- Keep strategy rules fixed during each test.
- Hide future candles.
- Record every valid setup.
- Measure results in R.
- Calculate win rate and expectancy.
- Track drawdown and losing streaks.
- Avoid hindsight bias and overfitting.
- Forward test under realistic conditions.
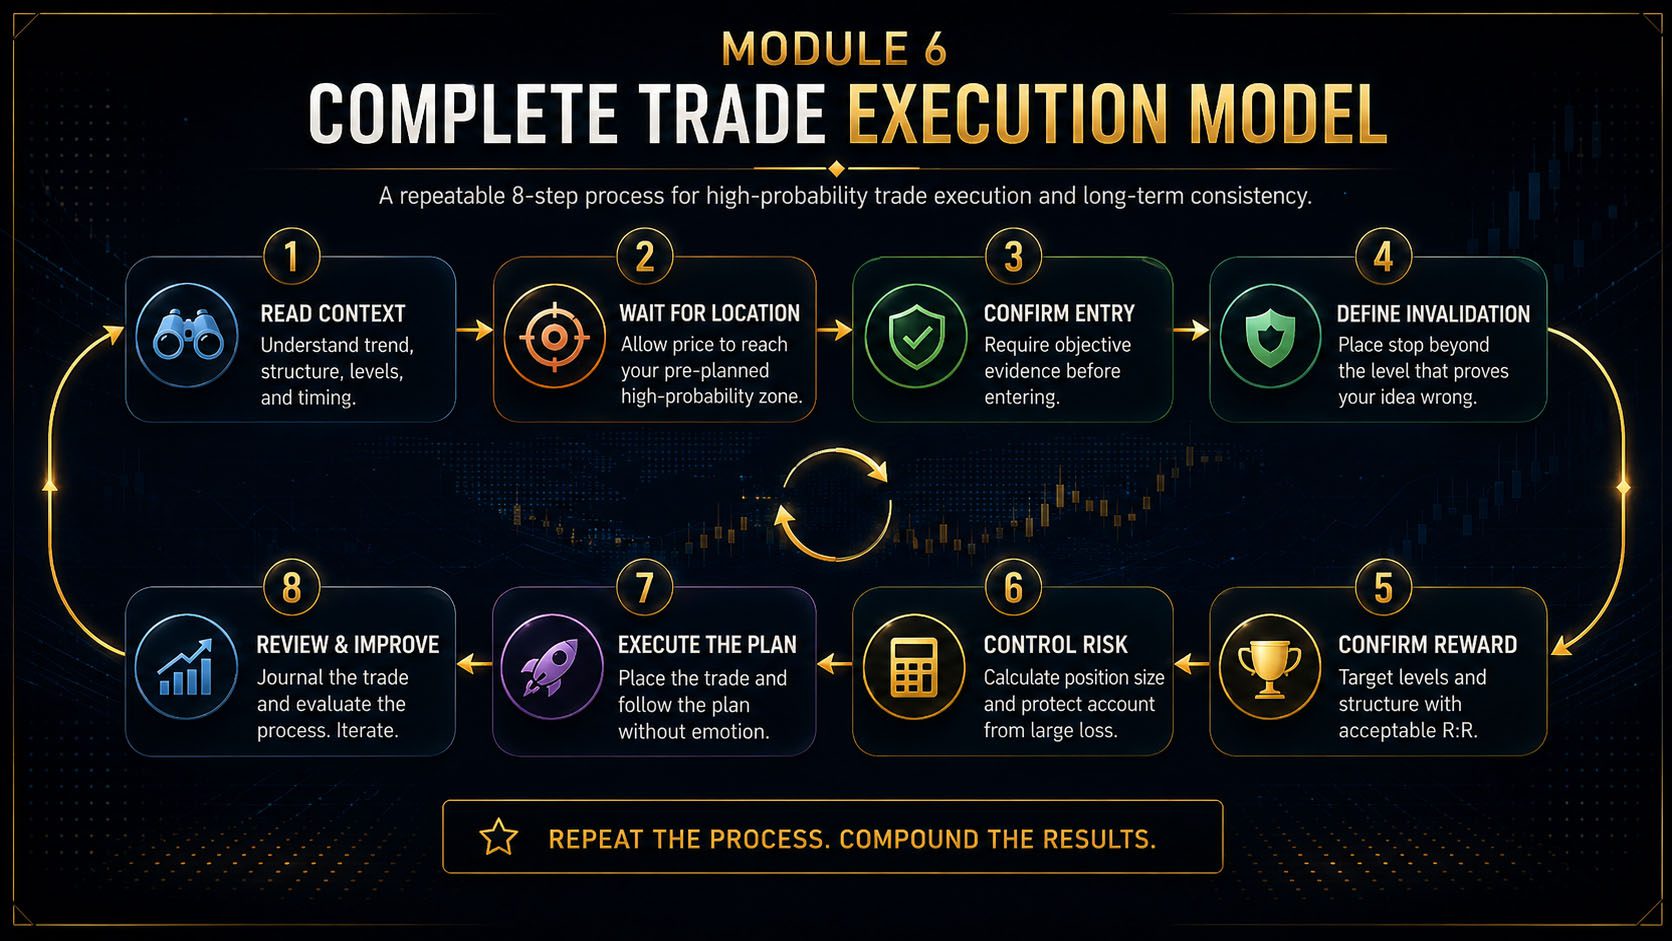
28. The Complete Module 6 Execution Model
Read Context
Identify trend, structure, levels, liquidity, and timing.
Wait for Location
Allow price to reach the strategy’s setup area.
Require Confirmation
Wait for objective evidence before entering.
Define Invalidation
Place the stop where the idea becomes wrong.
Confirm Reward
Target realistic structure with acceptable reward.
Control Risk
Calculate position size and protect drawdown.
Execute the Plan
Place the trade without improvising.
Record and Improve
Journal the trade and evaluate the process.
Frequently Asked Questions
Do I need to complete the checklist before every trade?
Yes. With experience, some steps become faster, but the important checks should never disappear. The checklist is most valuable when the market is moving quickly and emotions are strongest.
What happens if one checklist item fails?
If the failed item is a required strategy rule, the trade should be skipped. Do not compensate for a missing condition by inventing extra confirmation elsewhere.
Can I enter before the confirmation candle closes?
Only if your tested strategy specifically permits an intrabar entry. Otherwise, wait for the candle close to avoid reacting to a signal that disappears before completion.
Should every trade have the same risk-to-reward ratio?
Not necessarily. The target should follow realistic structure. However, your strategy should define the minimum reward required before a setup becomes eligible.
Can a checklist make me miss trades?
Yes, and that is often beneficial. The purpose is to filter out trades that do not meet the full process, not to maximize the number of entries.
What is more important: the result or the process?
The process is more important over the long term. One trade can win or lose randomly, but disciplined execution determines whether a tested edge can appear across many trades.
When should I modify the checklist?
Modify it only after backtesting, forward testing, and journal data show that a specific change improves the strategy. Do not change it because of one emotional experience.
Knowledge Check Quiz
1. What is the main purpose of a trade execution checklist?
2. What should happen before position size is calculated?
3. When should a trade be skipped?
4. What is a high-quality losing trade?
5. What should a trader do after entering?
6. Which statement best summarizes Module 6?
Quiz Answer Key
Question 1 Answer
B. The checklist prevents important analysis, risk, timing, and execution steps from being forgotten.
Question 2 Answer
B. The entry and stop loss distance must be defined before the correct position size can be calculated.
Question 3 Answer
A. A trade should be skipped when any required strategy condition is missing.
Question 4 Answer
B. A high-quality losing trade followed every rule, controlled risk properly, and was simply invalidated by the market.
Question 5 Answer
C. Once the trade is active, management should follow the rules defined before entry.
Question 6 Answer
C. Module 6 teaches how to build, confirm, protect, test, and execute a complete trading strategy.
What You Must Remember
- Professional execution begins before the setup appears.
- Market context determines which trades are permitted.
- Setup location comes before entry confirmation.
- Confirmation must be objective and complete.
- The stop loss belongs beyond invalidation.
- The target must follow realistic market structure.
- Position size is calculated from risk and stop distance.
- Session timing, news, spreads, and liquidity can disqualify a trade.
- A missing strategy rule means no trade.
- Open trades should follow predetermined management rules.
- A disciplined loss is better than a lucky rule-breaking win.
- Every trade should be recorded and reviewed.
- A tested edge only works when it is executed consistently.
Trade Execution & Strategy Development Completed
You have completed all eight lessons in Module 6. You now understand how to build a complete setup, confirm entries, place stops, select targets, trade during the correct sessions, create a strategy, test its performance, and execute it through a professional checklist.
The next stage is to apply this knowledge consistently. Do not rush to add more complexity. Begin with one market, one setup, one trading window, and one clear risk model. Build evidence through repetition.

Final Module Summary
Module 6 transformed technical knowledge into an executable trading process. You learned that professional trading is not one entry signal. It is a sequence of decisions that begins with context and ends with review.
A complete trade requires the correct market environment, a meaningful location, objective confirmation, logical invalidation, realistic reward, controlled position size, appropriate timing, and disciplined management.
You also learned that a strategy must be written, backtested, forward tested, and reviewed before it can be trusted. Testing reveals whether the rules have positive expectancy and whether the trader can execute them consistently.
Your goal is not to eliminate uncertainty. That is impossible. Your goal is to control every decision that is within your control and allow the tested edge to work over a meaningful series of trades.